属性配置介绍
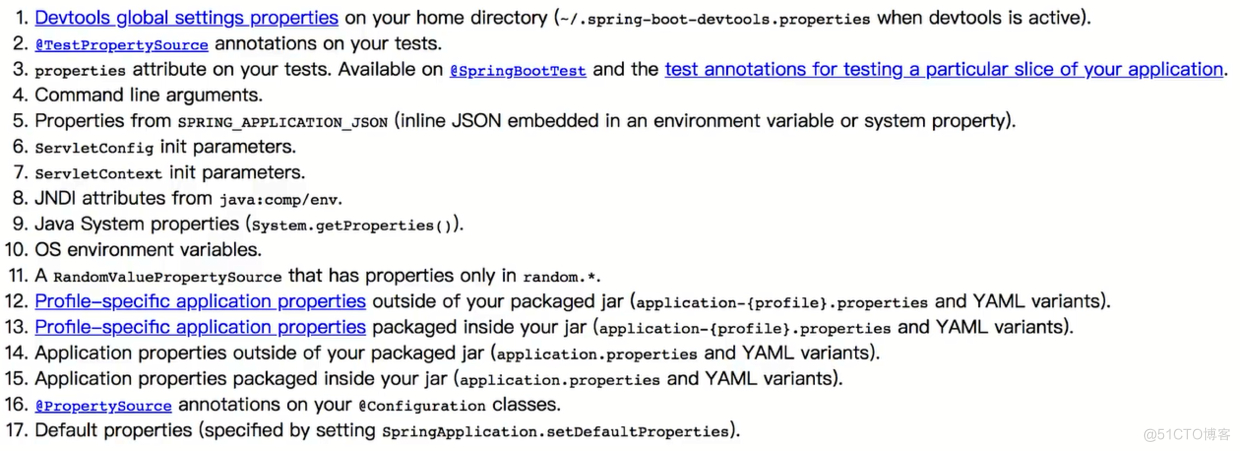
- 1、Devtools全局配置
- 2、测试环境的@TestPropertySource注解
- 3、测试环境properties属性
- 4、命令行参数
- 5、SPRING_APPLICATION_JSON属性
- 6、ServletConfig初始化参数
- 7、ServletContext初始化参数
- 8、JNDI属性
- 9、JAVA系统属性
- 10、操作系统的环境变量
- 11、RandomValuePropertySource随机值属性
- 12、jar包外的application-{profile}.properties
- 13、jar包内的application-{profile}.properties
- 14、jar包外的application.properties
- 15、jar包内的application.properties
- 16、@PropertySource绑定配置
- 17、默认属性
默认属性
默认属性的配置方式
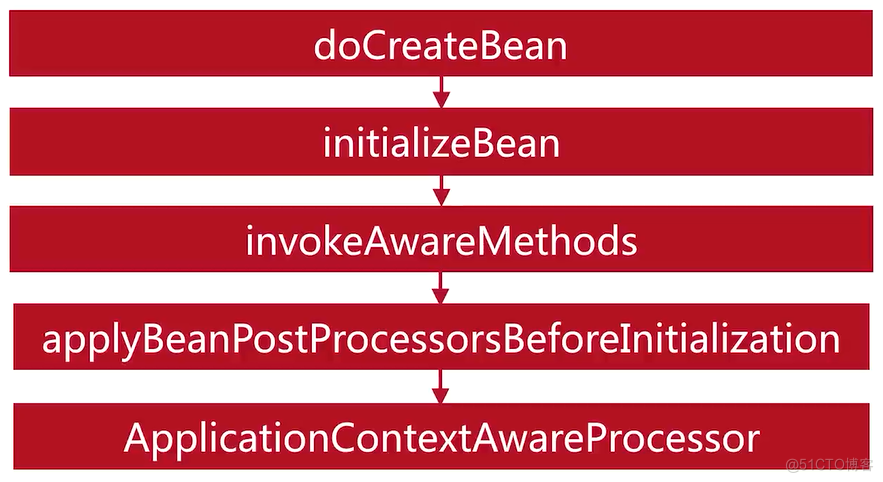
@SpringBootApplication @MapperScan("com.yibo.source.code.mapper") public class Application { public static void main(String[] args) { SpringApplication springApplication = new SpringApplication(Application.class); Properties properties = new Properties(); properties.setProperty("yibo.website.url","yibo_url1"); springApplication.setDefaultProperties(properties); springApplication.run(args); } }验证属性设置成功,那么需要在SpringBoot框架启动成功之后获取这个属性
@Component @Order(3) public class ResultCommandLineRunner implements CommandLineRunner, EnvironmentAware { private Environment env; @Override public void run(String... args) throws Exception { System.out.println(env.getProperty("yibo.website.url")); } @Override public void setEnvironment(Environment environment) { this.env = environment; } }@PropertySource绑定配置
在resources目录下新建demo.properties文件,并写如内容:yibo.website.url=yibo_url2 在启动类上加入@PropertySource({"demo.properties"})注解
@SpringBootApplication @MapperScan("com.yibo.source.code.mapper")//扫描Mapper接口 @PropertySource({"demo.properties"}) public class Application { public static void main(String[] args) { SpringApplication.run(Application.class,args); } }Spring Aware介绍
Aware接口从字面上翻译过来是感知捕获的含义。单纯的bean(未实现Aware系列接口)对容器是没有知觉的;实现了Aware系列接口的bean可以访问Spring容器。这些Aware系列接口增强了Spring bean的功能,但是也会造成对Spring框架的绑定,增大了与Spring框架的耦合度。(Aware是“意识到的,察觉到的”的意思,实现了Aware系列接口表明:可以意识到、可以察觉到)
public interface Aware { }Spring的依赖注入的最大亮点就是你所有的Bean对Spring容器的存在是没有意识的。即你可以将你的容器替换成别的容器,例如Goggle Guice,这时Bean之间的耦合度很低。
但是在实际的项目中,我们不可避免的要用到Spring容器本身的功能资源,这时候Bean必须要意识到Spring容器的存在,才能调用Spring所提供的资源,这就是所谓的Spring Aware。其实Spring Aware本来就是Spring设计用来框架内部使用的,若使用了Spring Aware,你的Bean将会和Spring框架耦合。
SpringBoot提供常用的Aware接口:
- 1、BeanNameAware:获取容器中Bean名称
- 2、BeanClassLoaderAware:获得类加载器
- 3、BeanFactoryAware:获得bean创建工厂
- 4、EnvironmentAware:获取环境变量
- 5、EmbeddedValueResolverAware:获取Spring容器加载的properties文件属性值
- 6、ResourceLoaderAware:获取资源加载器
- 7、ApplicationEventPublisherAware:获得应用事件发布器
- 8、MessageSourceAware:获得文本信息
- 9、ApplicationContextAware:获得当前应用上下文
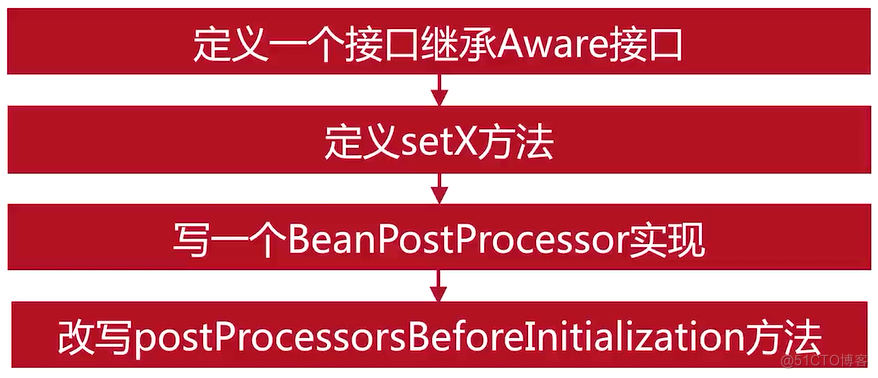
自定义Aware
新建Flag类
@Component public class Flag { private boolean canOperate = true; public boolean isCanOperate() { return canOperate; } public void setCanOperate(boolean canOperate) { this.canOperate = canOperate; } }新建接口MyAware并实现Aware
public interface MyAware extends Aware { void setFlag(Flag flag); }新建MyAwareProcessor并实现BeanPostProcessor
@Component public class MyAwareProcessor implements BeanPostProcessor { private final ConfigurableApplicationContext configurableApplicationContext; public MyAwareProcessor(ConfigurableApplicationContext configurableApplicationContext) { this.configurableApplicationContext = configurableApplicationContext; } @Override public Object postProcessBeforeInitialization(Object bean, String beanName) throws BeansException { if(bean instanceof Aware){ if(bean instanceof MyAware){ ((MyAware)bean).setFlag((Flag) configurableApplicationContext.getBean("flag")); } } return bean; } }在ResultCommandLineRunner中演示
@Component @Order(3) public class ResultCommandLineRunner implements CommandLineRunner, EnvironmentAware,MyAware { private Environment env; private Flag flag; @Override public void run(String... args) throws Exception { System.out.println(env.getProperty("yibo.website.url")); System.out.println(flag.isCanOperate()); } @Override public void setEnvironment(Environment environment) { this.env = environment; } @Override public void setFlag(Flag flag) { this.flag = flag; } }Aware调用
自定义实现Aware
Environment解析
Environment
环境在容器中是一个抽象的集合,是指应用环境的2个方面: profiles和 properties。
整个应用环境模型包括2个关键方面:
-
profiles配置组(以下简称组): 一个profile组,是一个以name名称命名的、逻辑上的、要被注册到容器中的BeanDefinition的集合。简单一点说,一个profile就代表一组BeanDefinition,这个对应配置文件中<beans profile="">。当加载解析xml配置文件的时候,只有active=true激活的BeanDefinition才会被加载进容器。
-
properties环境变量: 在几乎所有的应用中,Properties环境变量都扮演着非常重要的角色,且这些变量值可以来自于各种PropertySource属性源,如:properties文件、jvm虚拟机环境变量、操作系统环境变量、JNDI、Servlet上下文参数、自定义的属性对象、Map对象,等等。Environment环境对象为用户提供了方便的接口,用于配置和使用属性源。
环境体系图如下:
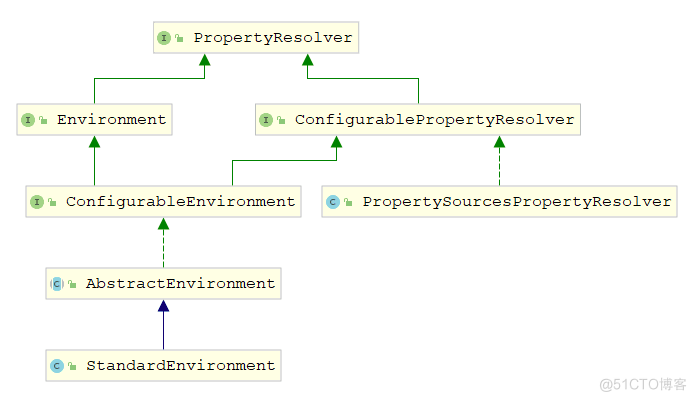
刚才提到环境模型具有2个关键方面:profiles和properties,从体系图中可以看出,properties方面的所有功能由PropertyResolver属性解决器来实现,环境模型只是通过装饰模式,在PropertyResolver功能的基础上,额外扩展出了profiles方面的功能。因此在接口方面,Environment继承自PropertyResolver,从实现类方面,AbstractEnvironment类内部持有一个PropertySourcesPropertyResolver类型对象的引用。
Environment接口:
public interface Environment extends PropertyResolver { /** * 获取当前环境对象激活的所有profile组。 * * @return */ String[] getActiveProfiles(); /** * 获取默认的profile组。 * 如果当前环境对象中激活的组为空(getActiveProfiles()返回空数组)的话, * 则会启用默认profile组。 * * @return */ String[] getDefaultProfiles(); /** * 判断给定的一个或多个组中,是否存在满足当前环境对象配置的组(任意一个组满足即可)。 * 如: * 调用acceptsProfiles("p1","!p2"),如果当前环境对象激活了p1, * 或者没有激活p2(注意是或,满足一个条件即可),则返回true,否则返回false。 * * @param profiles * @return */ boolean acceptsProfiles(String... profiles); }ConfigurableEnvironment
public interface ConfigurableEnvironment extends Environment, ConfigurablePropertyResolver { /** * 重新设置激活的组集合。 * @param profiles */ void setActiveProfiles(String... profiles); /** * 向当前激活的组集合中添加一个组。 * @param profile */ void addActiveProfile(String profile); /** * 设置默认激活的组集合。激活的组集合为空时会使用默认的组集合。 * * @param profiles */ void setDefaultProfiles(String... profiles); /** * 获取当前环境对象中的属性源集合,也就是应用环境变量。 * 属性源集合其实就是一个容纳PropertySource的容器。 * 这个方法提供了直接配置属性源的入口。 * @return */ MutablePropertySources getPropertySources(); /** * 获取操作系统环境变量 * 这个方法提供了直接配置系统环境变量的入口。 * @return */ Map<String, Object> getSystemEnvironment(); /** * 获取虚拟机环境变量 * 这个方法提供了直接配置虚拟机环境变量的入口。 * @return */ Map<String, Object> getSystemProperties(); /** * 合并指定环境对象中的配置到当前环境对象中。 * @param parent */ void merge(ConfigurableEnvironment parent); }AbstractEnvironment抽象基类:
该类实际上实现了以上接口的所有方法,且额外扩展了自定义属性源的入口:protected void customizePropertySources(MutablePropertySources propertySources); 但是因为初始时属性源集合只是一个空集合,没有任何意义,因为该类定义为抽象基类,不能直接实例化使用。部分代码如下:
/** * 部分代码 * @author lixin * */ public class AbstractEnvironment { /** * 可变属性源集合 */ private final MutablePropertySources propertySources = new MutablePropertySources(); /** * 在构造方法中直接调用自定义属性源集合 */ public AbstractEnvironment() { customizePropertySources(this.propertySources); } /** * 自定义属性源集合, * 默认空实现,子类可重写,用来配置属性源。 * * @param propertySources */ protected void customizePropertySources(MutablePropertySources propertySources) { } }StandardEnvironment
该类定义了Spring应用运行时使用的标准环境,其实就是重写了customizePropertySources方法,先后追加了jvm虚拟机环境变量属性源和操作系统环境变量属性源这两个属性源。当然对于特殊的spring运行环境,我们可以创建标准环境的子类,以实现属性源的扩充,比如:StandardServletEnvironment类,用于web应用环境。
public class StandardEnvironment extends AbstractEnvironment { // 操作系统环境变量属性源的名称 public static final String SYSTEM_ENVIRONMENT_PROPERTY_SOURCE_NAME = "systemEnvironment"; // jvm虚拟机系统环境变量属性源的名称 public static final String SYSTEM_PROPERTIES_PROPERTY_SOURCE_NAME = "systemProperties"; @Override protected void customizePropertySources(MutablePropertySources propertySources) { // 追加虚拟机环境变量属性源 propertySources.addLast(new MapPropertySource(SYSTEM_PROPERTIES_PROPERTY_SOURCE_NAME, getSystemProperties())); // 追加操作系统环境变量属性源 propertySources.addLast(new SystemEnvironmentPropertySource(SYSTEM_ENVIRONMENT_PROPERTY_SOURCE_NAME, getSystemEnvironment())); } }Spring profile介绍
Spring profile作用
- 将不同的配置参数绑定在不同的环境
properties 配置
假设,一个应用的工作环境有:dev、test、prod 那么,我们可以添加 4 个配置文件:
- applcation.properties - 公共配置
- application-dev.properties - 开发环境配置
- application-test.properties - 测试环境配置
- application-prod.properties - 生产环境配置
在 applcation.properties 文件中可以通过以下配置来激活 profile:
spring.profiles.active = testyml 配置
与 properties 文件类似,我们也可以添加 4 个配置文件:
- applcation.yml - 公共配置
- application-dev.yml - 开发环境配置
- application-test.yml - 测试环境配置
- application-prod.yml - 生产环境配置
在 applcation.yml 文件中可以通过以下配置来激活 profile:
spring: profiles: active: prod此外,yml 文件也可以在一个文件中完成所有 profile 的配置:
# 激活 prod spring: profiles: active: prod # 也可以同时激活多个 profile # spring.profiles.active: prod,proddb,prodlog --- # dev 配置 spring: profiles: dev # 略去配置 --- spring: profiles: test # 略去配置 --- spring.profiles: prod spring.profiles.include: - proddb - prodlog --- spring: profiles: proddb # 略去配置 --- spring: profiles: prodlog # 略去配置注意:不同 profile 之间通过---分割
激活 profile
插件激活 profile
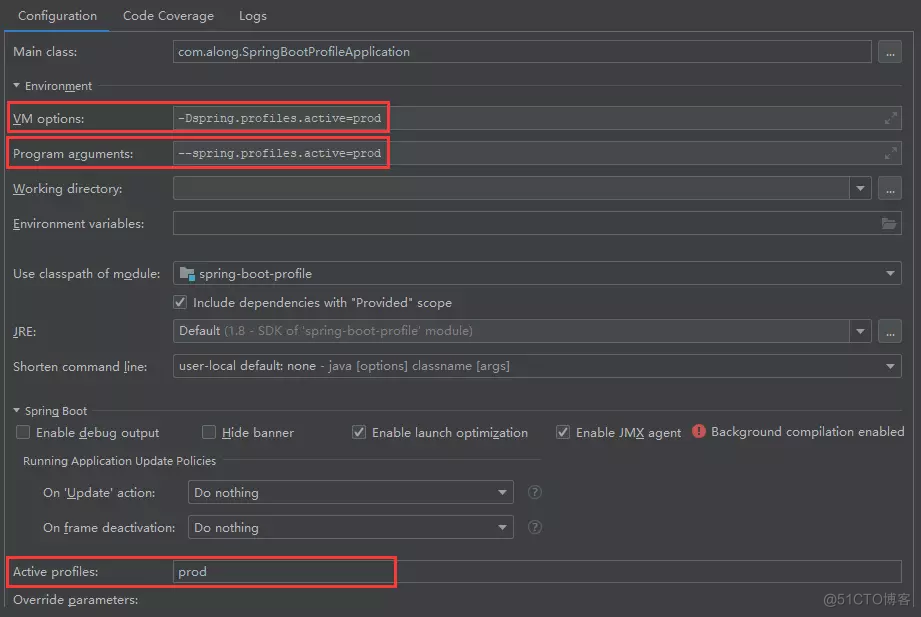
spring-boot:run -Drun.profiles=prodVM options、Program arguments、Active Profile
VM options设置启动参数:-Dspring.profiles.active=prod
Program arguments设置:--spring.profiles.active=prod
Active Profile 设置 prod
这三个参数不要一起设置,会引起冲突,选一种即可,如下图
命令行
将项目打成jar包,在jar包的目录下打开命令行,使用如下命令启动:
java -jar spring-boot-profile.jar --spring.profiles.active=prod在 Java 代码中激活 profile
直接指定环境变量来激活 profile:
System.setProperty("spring.profiles.active", "test");在 Spring 容器中激活 profile:
AnnotationConfigApplicationContext ctx = new AnnotationConfigApplicationContext(); ctx.getEnvironment().setActiveProfiles("development"); ctx.register(SomeConfig.class, StandaloneDataConfig.class, JndiDataConfig.class); ctx.refresh();profile还可以用在类上,spring提供了@Peofile注解可以实现不同环境下配置参数的切换,任何@Component或@Configuration注解的类都可以使用@Profile注解。
我们可以在配置类上使用@Profile注解,如下,该配置只会在prod环境下生效
@Configuration @Profile("prod") public class ProductionConfiguration { // ... }如果在实现类上加上@Profile注解,则可以实现注入接口时根据当时的配置环境动态注入对应的实现类。下面是一个例子: 有一个HelloService接口
public interface HelloService { String hello(); }对HelloService接口做了两个实现,分别对应于生产环境和开发环境,如下
/** * 生产环境实现类 */ @Service @Profile("dev") public class DevServiceImpl implements HelloService { @Override public String hello() { return "use dev"; } } /** * 开发环境实现类 */ @Service @Profile("prod") public class ProdServiceImpl implements HelloService { @Override public String hello() { return "use prod"; } }然后写一个接口调用HelloService
@RestController public class HelloController { @Autowired private HelloService helloService; @RequestMapping("hello") public String sayHello(){ return helloService.hello(); } }当前启用的配置环境是prod,application.yml配置如下
spring: profiles: active: prod启动项目,浏览器访问http://localhost:8082/hello,接口返回use prod,再改变application.yml配置,启用dev,重启项目,再次访问接口返回use dev,说明@Profile注解起到了作用,实现了根据当时的配置环境动态的选择相应的实现类。
maven中的场景配置
使用maven的resource filter可以实现多场景切换。在pom.xml文件中添加如下配置
<profiles> <profile> <id>dev</id> <properties> <profileActive>dev</profileActive> </properties> </profile> <profile> <id>prod</id> <properties> <profileActive>prod</profileActive> </properties> </profile> <profile> <id>test</id> <properties> <profileActive>test</profileActive> </properties> <activation> <activeByDefault>true</activeByDefault> </activation> </profile> </profiles> <build> <resources> <resource> <filtering>true</filtering> <directory>src/main/resources</directory> <includes> <include>application.yml</include> <include>application-${profileActive}.yml</include> </includes> </resource> </resources> </build>这样在maven编译时,可以通过-P参数指定maven profile。
Spring profile解析
下面带大家简单看一下在Spring Boot中针对Profile的基本处理流程(不会过度细化具体操作)。在Spring Boot启动的过程中执行其run方法时,会执行如下一段代码:
public class SpringApplication { public ConfigurableApplicationContext run(String... args) { ...... try { ApplicationArguments applicationArguments = new DefaultApplicationArguments(args); ConfigurableEnvironment environment = prepareEnvironment(listeners, applicationArguments); ...... } ...... return context; } }其中prepareEnvironment方法的相关代码如下:
private ConfigurableEnvironment prepareEnvironment(SpringApplicationRunListeners listeners, ApplicationArguments applicationArguments) { ...... listeners.environmentPrepared(environment); ...... return environment; }在prepareEnvironment方法处理业务的过程中会调用SpringApplicationRunListeners的environmentPrepared方法发布事件。该方法会遍历注册在spring.factories中SpringApplicationRunListener实现类,然后调用其environmentPrepared方法。
其中spring.factories中SpringApplicationRunListener实现类注册为:
# Run Listeners org.springframework.boot.SpringApplicationRunListener=\ org.springframework.boot.context.event.EventPublishingRunListenerSpringApplicationRunListeners方法中的调用代码如下:
public void environmentPrepared(ConfigurableEnvironment environment) { for (SpringApplicationRunListener listener : this.listeners) { listener.environmentPrepared(environment); } }其中listeners便是注册的类的集合,这里默认只有EventPublishingRunListener。它的environmentPrepared方法实现为:
@Override public void environmentPrepared(ConfigurableEnvironment environment) { this.initialMulticaster .multicastEvent(new ApplicationEnvironmentPreparedEvent(this.application, this.args, environment)); }其实就是发布了一个监听事件。该事件会被同样注册在spring.factories中的ConfigFileApplicationListener监听到:
# Application Listeners org.springframework.context.ApplicationListener=\ ...... org.springframework.boot.context.config.ConfigFileApplicationListener,\ ......关于配置文件的核心处理便在ConfigFileApplicationListener中完成。在该类中我们可以看到很多熟悉的常量:
public class ConfigFileApplicationListener implements EnvironmentPostProcessor, SmartApplicationListener, Ordered { private static final String DEFAULT_PROPERTIES = "defaultProperties"; // Note the order is from least to most specific (last one wins) private static final String DEFAULT_SEARCH_LOCATIONS = "classpath:/,classpath:/config/,file:./,file:./config/"; private static final String DEFAULT_NAMES = "application"; }比如Spring Boot默认寻找的配置文件的名称、默认扫描的类路径等。
不仅如此,该类还实现了监听器SmartApplicationListener接口和EnvironmentPostProcessor接口也就是拥有了监听器和环境处理的功能。
其onApplicationEvent方法对接收到事件进行判断,如果是ApplicationEnvironmentPreparedEvent事件则调用onApplicationEnvironmentPreparedEvent方法进行处理,代码如下:
@Override public void onApplicationEvent(ApplicationEvent event) { if (event instanceof ApplicationEnvironmentPreparedEvent) { onApplicationEnvironmentPreparedEvent((ApplicationEnvironmentPreparedEvent) event); } if (event instanceof ApplicationPreparedEvent) { onApplicationPreparedEvent(event); } }onApplicationEnvironmentPreparedEvent会获取到对应的EnvironmentPostProcessor并调用其postProcessEnvironment方法进行处理。而loadPostProcessors方法获取的EnvironmentPostProcessor正是在spring.factories中配置的当前类。
private void onApplicationEnvironmentPreparedEvent(ApplicationEnvironmentPreparedEvent event) { List<EnvironmentPostProcessor> postProcessors = loadPostProcessors(); postProcessors.add(this); AnnotationAwareOrderComparator.sort(postProcessors); for (EnvironmentPostProcessor postProcessor : postProcessors) { postProcessor.postProcessEnvironment(event.getEnvironment(), event.getSpringApplication()); } }经过一系列的调用,最终调用到该类的如下方法:
protected void addPropertySources(ConfigurableEnvironment environment, ResourceLoader resourceLoader) { RandomValuePropertySource.addToEnvironment(environment); new Loader(environment, resourceLoader).load(); }其中Loader类为ConfigFileApplicationListener内部类,提供了具体处理配置文件优先级、profile、加载解析等功能。
public void load() { this.profiles = new LinkedList<>(); this.processedProfiles = new LinkedList<>(); this.activatedProfiles = false; this.loaded = new LinkedHashMap<>(); initializeProfiles(); while (!this.profiles.isEmpty()) { Profile profile = this.profiles.poll(); if (profile != null && !profile.isDefaultProfile()) { addProfileToEnvironment(profile.getName()); } load(profile, this::getPositiveProfileFilter, addToLoaded(MutablePropertySources::addLast, false)); this.processedProfiles.add(profile); } resetEnvironmentProfiles(this.processedProfiles); load(null, this::getNegativeProfileFilter, addToLoaded(MutablePropertySources::addFirst, true)); addLoadedPropertySources(); } private void initializeProfiles() { // The default profile for these purposes is represented as null. We add it // first so that it is processed first and has lowest priority. this.profiles.add(null); Set<Profile> activatedViaProperty = getProfilesActivatedViaProperty(); this.profiles.addAll(getOtherActiveProfiles(activatedViaProperty)); // Any pre-existing active profiles set via property sources (e.g. // System properties) take precedence over those added in config files. addActiveProfiles(activatedViaProperty); if (this.profiles.size() == 1) { // only has null profile for (String defaultProfileName : this.environment.getDefaultProfiles()) { Profile defaultProfile = new Profile(defaultProfileName, true); this.profiles.add(defaultProfile); } } } private Set<Profile> getProfilesActivatedViaProperty() { //当前环境是否有配置是否有spring.profiles.active属性和spring.profiles.include属性 //如果都没有配置就会返回一个空集合 if (!this.environment.containsProperty(ACTIVE_PROFILES_PROPERTY) && !this.environment.containsProperty(INCLUDE_PROFILES_PROPERTY)) { return Collections.emptySet(); } Binder binder = Binder.get(this.environment); Set<Profile> activeProfiles = new LinkedHashSet<>(); //如果有配置的话就会将以上两个属性值获取到并加载到activeProfiles集合中 activeProfiles.addAll(getProfiles(binder, INCLUDE_PROFILES_PROPERTY)); activeProfiles.addAll(getProfiles(binder, ACTIVE_PROFILES_PROPERTY)); return activeProfiles; }比如,在Loader类的load方法中便有如下一段代码:
private void load(String location, String name, Profile profile, DocumentFilterFactory filterFactory, DocumentConsumer consumer) { ...... Set<String> processed = new HashSet<>(); for (PropertySourceLoader loader : this.propertySourceLoaders) { for (String fileExtension : loader.getFileExtensions()) { if (processed.add(fileExtension)) { loadForFileExtension(loader, location + name, "." + fileExtension, profile, filterFactory, consumer); } } } }该代码遍历PropertySourceLoader列表,并进行对应配置文件的解析,而这里的列表中的PropertySourceLoader同样配置在spring.factories中:
# PropertySource Loaders org.springframework.boot.env.PropertySourceLoader=\ org.springframework.boot.env.PropertiesPropertySourceLoader,\ org.springframework.boot.env.YamlPropertySourceLoader查看这两PropertySourceLoader的源代码,会发现SpringBoot默认支持的配置文件格式及解析方法。
public class PropertiesPropertySourceLoader implements PropertySourceLoader { private static final String XML_FILE_EXTENSION = ".xml"; @Override public String[] getFileExtensions() { return new String[] { "properties", "xml" }; } @Override public List<PropertySource<?>> load(String name, Resource resource) throws IOException { Map<String, ?> properties = loadProperties(resource); if (properties.isEmpty()) { return Collections.emptyList(); } return Collections.singletonList(new OriginTrackedMapPropertySource(name, properties)); } @SuppressWarnings({ "unchecked", "rawtypes" }) private Map<String, ?> loadProperties(Resource resource) throws IOException { String filename = resource.getFilename(); if (filename != null && filename.endsWith(XML_FILE_EXTENSION)) { return (Map) PropertiesLoaderUtils.loadProperties(resource); } return new OriginTrackedPropertiesLoader(resource).load(); } }比如PropertiesPropertySourceLoader中支持了xml和properties两种格式的配置文件,并分别提供了PropertiesLoaderUtils和OriginTrackedPropertiesLoader两个类进行相应的处理。
同样的YamlPropertySourceLoader支持yml和yaml格式的配置文件,并且采用OriginTrackedYamlLoader类进行解析。
public class YamlPropertySourceLoader implements PropertySourceLoader { @Override public String[] getFileExtensions() { return new String[] { "yml", "yaml" }; } @Override public List<PropertySource<?>> load(String name, Resource resource) throws IOException { if (!ClassUtils.isPresent("org.yaml.snakeyaml.Yaml", null)) { throw new IllegalStateException( "Attempted to load " + name + " but snakeyaml was not found on the classpath"); } List<Map<String, Object>> loaded = new OriginTrackedYamlLoader(resource).load(); if (loaded.isEmpty()) { return Collections.emptyList(); } List<PropertySource<?>> propertySources = new ArrayList<>(loaded.size()); for (int i = 0; i < loaded.size(); i++) { String documentNumber = (loaded.size() != 1) ? " (document #" + i + ")" : ""; propertySources.add(new OriginTrackedMapPropertySource(name + documentNumber, loaded.get(i))); } return propertySources; } }当然,在ConfigFileApplicationListener类中还实现了上面提到的如何拼接默认配置文件和profile的实现,相关代码如下:
private void loadForFileExtension(PropertySourceLoader loader, String prefix, String fileExtension, Profile profile, DocumentFilterFactory filterFactory, DocumentConsumer consumer) { DocumentFilter defaultFilter = filterFactory.getDocumentFilter(null); DocumentFilter profileFilter = filterFactory.getDocumentFilter(profile); if (profile != null) { // Try profile-specific file & profile section in profile file (gh-340) String profileSpecificFile = prefix + "-" + profile + fileExtension; load(loader, profileSpecificFile, profile, defaultFilter, consumer); load(loader, profileSpecificFile, profile, profileFilter, consumer); // Try profile specific sections in files we've already processed for (Profile processedProfile : this.processedProfiles) { if (processedProfile != null) { String previouslyLoaded = prefix + "-" + processedProfile + fileExtension; load(loader, previouslyLoaded, profile, profileFilter, consumer); } } } // Also try the profile-specific section (if any) of the normal file load(loader, prefix + fileExtension, profile, profileFilter, consumer); }ConfigFileApplicationListener类中还实现了其他更多的功能,大家感兴趣的话可以debug进行阅读。
参考: https://my.oschina.net/lixin91/blog/671055?nocache=1490058787388
https://www.cnblogs.com/itplay/p/10736340.html
https://www.jianshu.com/p/ec17e4df1ed4
https://www.cnblogs.com/jingmoxukong/p/10151785.html
https://www.jianshu.com/p/99dd27da31dd
https://www.cnblogs.com/secbro/p/12088267.html