监听器模式
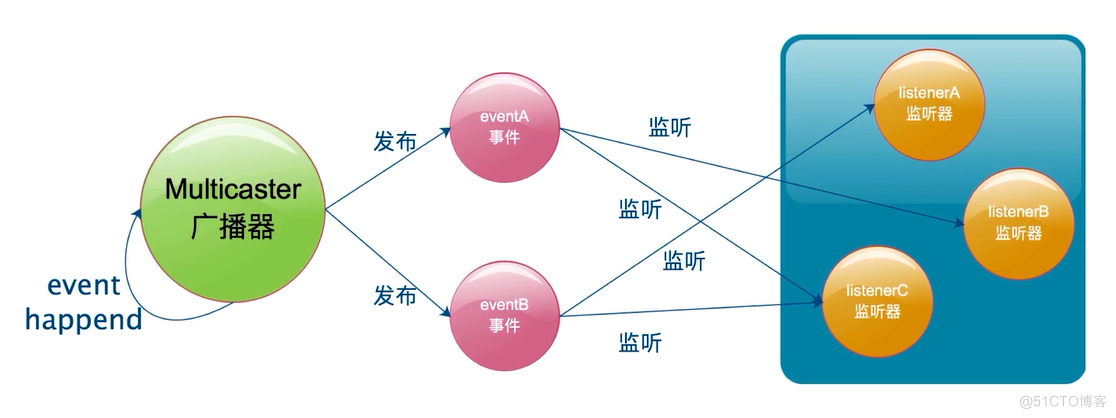
监听器模式有要素
- 事件
- 监听器
- 广播器
- 触发机制
系统监听器
监听器 ApplicationListener
@FunctionalInterface public interface ApplicationListener<E extends ApplicationEvent> extends EventListener { /** * Handle an application event. * @param event the event to respond to */ void onApplicationEvent(E event); }FunctionalInterface是jdk8新增的,表示ApplicationListener接口只有一个方法,如果大于一个方法,就不能使用这注解。
接口中有个泛型<E extends ApplicationEvent>,继承自ApplicationEvent。就代表这实现这个接口时,可以声明对哪些事件(如ApplicationEvent)感兴趣,在触发监听器的时候,对感兴趣的事件进行过滤。
系统广播器ApplicationEventMulticaster接口
public interface ApplicationEventMulticaster { void addApplicationListener(ApplicationListener<?> listener); void addApplicationListenerBean(String listenerBeanName); void removeApplicationListener(ApplicationListener<?> listener); void removeApplicationListenerBean(String listenerBeanName); void removeAllListeners(); void multicastEvent(ApplicationEvent event); void multicastEvent(ApplicationEvent event, @Nullable ResolvableType eventType); }ApplicationEventMulticaster接口主要有三类方法,增加监听器,删除监听器,广播方法
系统事件,SpringBoot框架事件

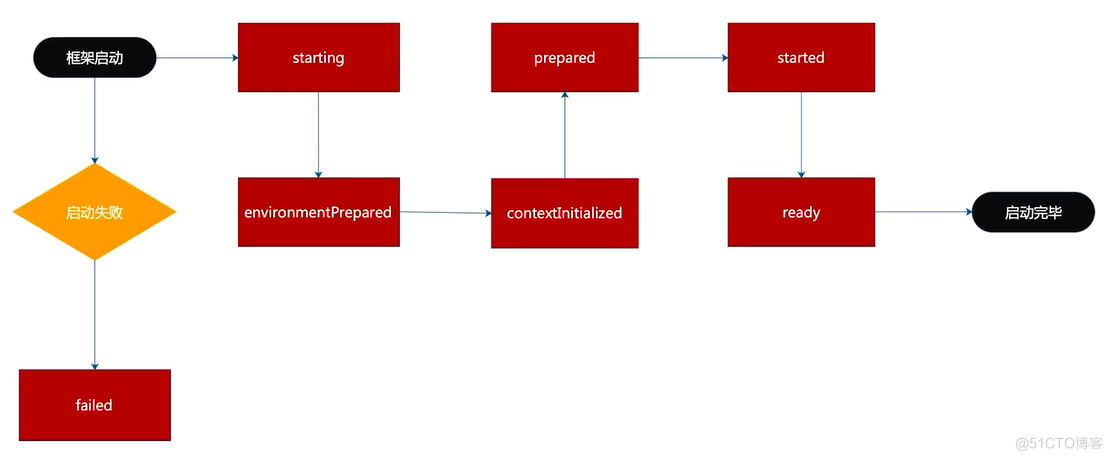
SpringBoot中的事件发送顺序
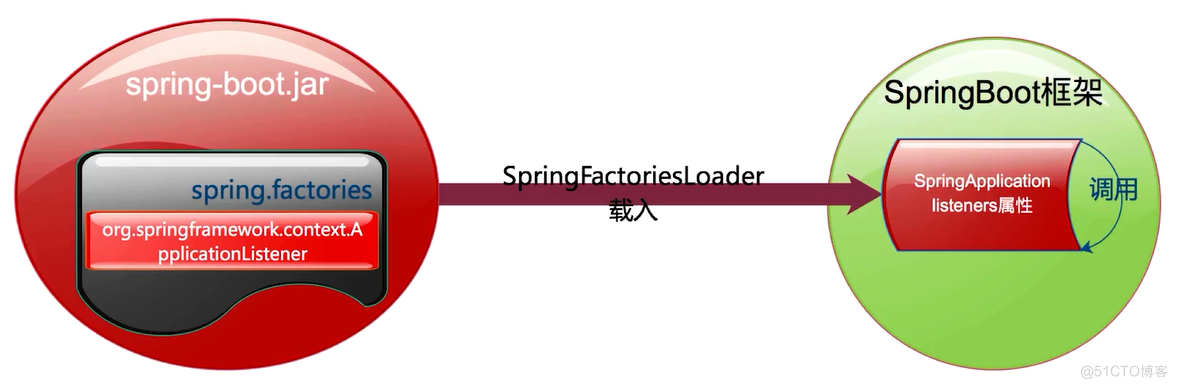
注册监听器(Listener)
public class SpringApplication { public SpringApplication(ResourceLoader resourceLoader, Class<?>... primarySources) { ...... this.resourceLoader = resourceLoader; Assert.notNull(primarySources, "PrimarySources must not be null"); this.primarySources = new LinkedHashSet(Arrays.asList(primarySources)); this.webApplicationType = WebApplicationType.deduceFromClasspath(); this.setInitializers(this.getSpringFactoriesInstances(ApplicationContextInitializer.class)); //设置监听器 this.setListeners(this.getSpringFactoriesInstances(ApplicationListener.class)); this.mainApplicationClass = this.deduceMainApplicationClass(); } }我们还是跟进代码看看getSpringFactoriesInstances
public class SpringApplication { // 这里的入参type是:org.springframework.context.ApplicationListener.class private <T> Collection<T> getSpringFactoriesInstances(Class<T> type) { return this.getSpringFactoriesInstances(type, new Class[0]); } private <T> Collection<T> getSpringFactoriesInstances(Class<T> type, Class<?>[] parameterTypes, Object... args) { ClassLoader classLoader = this.getClassLoader(); Set<String> names = new LinkedHashSet(SpringFactoriesLoader.loadFactoryNames(type, classLoader)); List<T> instances = this.createSpringFactoriesInstances(type, parameterTypes, classLoader, args, names); AnnotationAwareOrderComparator.sort(instances); return instances; } }可以发现,这个加载相应的类名,然后完成实例化的过程和上面在设置初始化器时如出一辙,同样,还是以spring-boot-autoconfigure这个包中的spring.factories为例,看看相应的Key-Value:
# Application Listeners org.springframework.context.ApplicationListener=\ org.springframework.boot.autoconfigure.BackgroundPreinitializer # Application Listeners org.springframework.context.ApplicationListener=\ org.springframework.boot.ClearCachesApplicationListener,\ org.springframework.boot.builder.ParentContextCloserApplicationListener,\ org.springframework.boot.context.FileEncodingApplicationListener,\ org.springframework.boot.context.config.AnsiOutputApplicationListener,\ org.springframework.boot.context.config.ConfigFileApplicationListener,\ org.springframework.boot.context.config.DelegatingApplicationListener,\ org.springframework.boot.context.logging.ClasspathLoggingApplicationListener,\ org.springframework.boot.context.logging.LoggingApplicationListener,\ org.springframework.boot.liquibase.LiquibaseServiceLocatorApplicationListener这10个监听器会贯穿springBoot整个生命周期。至此,对于SpringApplication实例的初始化过程就结束了。
完成了SpringApplication实例化,下面开始调用run方法:
public ConfigurableApplicationContext run(String... args) { // 计时工具 StopWatch stopWatch = new StopWatch(); stopWatch.start(); ConfigurableApplicationContext context = null; Collection<SpringBootExceptionReporter> exceptionReporters = new ArrayList(); this.configureHeadlessProperty(); // 第一步:获取并启动监听器 SpringApplicationRunListeners listeners = this.getRunListeners(args); listeners.starting(); Collection exceptionReporters; try { ApplicationArguments applicationArguments = new DefaultApplicationArguments(args); // 第二步:根据SpringApplicationRunListeners以及参数来准备环境 ConfigurableEnvironment environment = this.prepareEnvironment(listeners, applicationArguments); this.configureIgnoreBeanInfo(environment); // 准备Banner打印器 - 就是启动Spring Boot的时候打印在console上的ASCII艺术字体 Banner printedBanner = this.printBanner(environment); // 第三步:创建Spring容器 context = this.createApplicationContext(); exceptionReporters = this.getSpringFactoriesInstances(SpringBootExceptionReporter.class, new Class[]{ConfigurableApplicationContext.class}, context); // 第四步:Spring容器前置处理 this.prepareContext(context, environment, listeners, applicationArguments, printedBanner); // 第五步:刷新容器 this.refreshContext(context); // 第六步:Spring容器后置处理 this.afterRefresh(context, applicationArguments); stopWatch.stop(); if (this.logStartupInfo) { (new StartupInfoLogger(this.mainApplicationClass)).logStarted(this.getApplicationLog(), stopWatch); } // 第七步:发出结束执行的事件 listeners.started(context); this.callRunners(context, applicationArguments); } catch (Throwable var10) { this.handleRunFailure(context, var10, exceptionReporters, listeners); throw new IllegalStateException(var10); } try { // 第八步:执行Runners listeners.running(context); // 返回容器 return context; } catch (Throwable var9) { this.handleRunFailure(context, var9, exceptionReporters, (SpringApplicationRunListeners)null); throw new IllegalStateException(var9); } }- 第一步:获取并启动监听器
- 第二步:根据SpringApplicationRunListeners以及参数来准备环境
- 第三步:创建Spring容器
- 第四步:Spring容器前置处理
- 第五步:刷新容器
- 第六步:Spring容器后置处理
- 第七步:发出结束执行的事件
- 第八步:执行Runners
这里主要分析监听器相关的步骤
第一步:获取并启动监听器
获取监听器 跟进getRunListeners方法:
private SpringApplicationRunListeners getRunListeners(String[] args) { Class<?>[] types = new Class[]{SpringApplication.class, String[].class}; return new SpringApplicationRunListeners(logger, this.getSpringFactoriesInstances(SpringApplicationRunListener.class, types, this, args)); }这里仍然利用了getSpringFactoriesInstances方法来获取实例,大家可以看看前面的这个方法分析,从META-INF/spring.factories中读取Key为org.springframework.boot.SpringApplicationRunListener的Values:
# Run Listeners org.springframework.boot.SpringApplicationRunListener=\ org.springframework.boot.context.event.EventPublishingRunListenergetSpringFactoriesInstances中反射获取实例时会触发EventPublishingRunListener的构造函数,我们来看看EventPublishingRunListener的构造函数:
public class EventPublishingRunListener implements SpringApplicationRunListener, Ordered { private final SpringApplication application; private final String[] args; //广播器 private final SimpleApplicationEventMulticaster initialMulticaster; public EventPublishingRunListener(SpringApplication application, String[] args) { this.application = application; this.args = args; this.initialMulticaster = new SimpleApplicationEventMulticaster(); Iterator var3 = application.getListeners().iterator(); while(var3.hasNext()) { ApplicationListener<?> listener = (ApplicationListener)var3.next(); //将上面设置到SpringApplication的十一个监听器全部添加到SimpleApplicationEventMulticaster这个广播器中 this.initialMulticaster.addApplicationListener(listener); } } ...... }我们看到EventPublishingRunListener里面有一个广播器,EventPublishingRunListener 的构造方法将SpringApplication的十一个监听器全部添加到SimpleApplicationEventMulticaster这个广播器中,我们来看看是如何添加到广播器:
public abstract class AbstractApplicationEventMulticaster implements ApplicationEventMulticaster, BeanClassLoaderAware, BeanFactoryAware { //广播器的父类中存放保存监听器的内部内 private final ListenerRetriever defaultRetriever = new ListenerRetriever(false); ...... @Override public void addApplicationListener(ApplicationListener<?> listener) { synchronized (this.retrievalMutex) { // Explicitly remove target for a proxy, if registered already, // in order to avoid double invocations of the same listener. Object singletonTarget = AopProxyUtils.getSingletonTarget(listener); if (singletonTarget instanceof ApplicationListener) { this.defaultRetriever.applicationListeners.remove(singletonTarget); } //内部类对象 this.defaultRetriever.applicationListeners.add(listener); this.retrieverCache.clear(); } } private class ListenerRetriever { //保存所有的监听器 public final Set<ApplicationListener<?>> applicationListeners = new LinkedHashSet<>(); public final Set<String> applicationListenerBeans = new LinkedHashSet<>(); private final boolean preFiltered; public ListenerRetriever(boolean preFiltered) { this.preFiltered = preFiltered; } public Collection<ApplicationListener<?>> getApplicationListeners() { List<ApplicationListener<?>> allListeners = new ArrayList<>( this.applicationListeners.size() + this.applicationListenerBeans.size()); allListeners.addAll(this.applicationListeners); if (!this.applicationListenerBeans.isEmpty()) { BeanFactory beanFactory = getBeanFactory(); for (String listenerBeanName : this.applicationListenerBeans) { try { ApplicationListener<?> listener = beanFactory.getBean(listenerBeanName, ApplicationListener.class); if (this.preFiltered || !allListeners.contains(listener)) { allListeners.add(listener); } } catch (NoSuchBeanDefinitionException ex) { // Singleton listener instance (without backing bean definition) disappeared - // probably in the middle of the destruction phase } } } if (!this.preFiltered || !this.applicationListenerBeans.isEmpty()) { AnnotationAwareOrderComparator.sort(allListeners); } return allListeners; } } }上述方法定义在SimpleApplicationEventMulticaster父类AbstractApplicationEventMulticaster中。关键代码为this.defaultRetriever.applicationListeners.add(listener);,这是一个内部类,用来保存所有的监听器。也就是在这一步,将spring.factories中的监听器传递到SimpleApplicationEventMulticaster中。我们现在知道EventPublishingRunListener中有一个广播器SimpleApplicationEventMulticaster,SimpleApplicationEventMulticaster广播器中又存放所有的监听器。
启动监听器
我们上面一步通过getRunListeners方法获取的监听器为EventPublishingRunListener,从名字可以看出是启动事件发布监听器,主要用来发布启动事件。
public class EventPublishingRunListener implements SpringApplicationRunListener, Ordered { private final SpringApplication application; private final String[] args; private final SimpleApplicationEventMulticaster initialMulticaster;我们先来看看SpringApplicationRunListener这个接口
public interface SpringApplicationRunListener { // 在run()方法开始执行时,该方法就立即被调用,可用于在初始化最早期时做一些工作 void starting(); // 当environment构建完成,ApplicationContext创建之前,该方法被调用 void environmentPrepared(ConfigurableEnvironment environment); // 当ApplicationContext构建完成时,该方法被调用 void contextPrepared(ConfigurableApplicationContext context); // 在ApplicationContext完成加载,但没有被刷新前,该方法被调用 void contextLoaded(ConfigurableApplicationContext context); // 在ApplicationContext刷新并启动后,CommandLineRunners和ApplicationRunner未被调用前,该方法被调用 void started(ConfigurableApplicationContext context); // 在run()方法执行完成前该方法被调用 void running(ConfigurableApplicationContext context); // 当应用运行出错时该方法被调用 void failed(ConfigurableApplicationContext context, Throwable exception); }SpringApplicationRunListener接口在Spring Boot 启动初始化的过程中各种状态时执行,我们也可以添加自己的监听器,在SpringBoot初始化时监听事件执行自定义逻辑,我们先来看看SpringBoot启动时第一个启动事件listeners.starting():
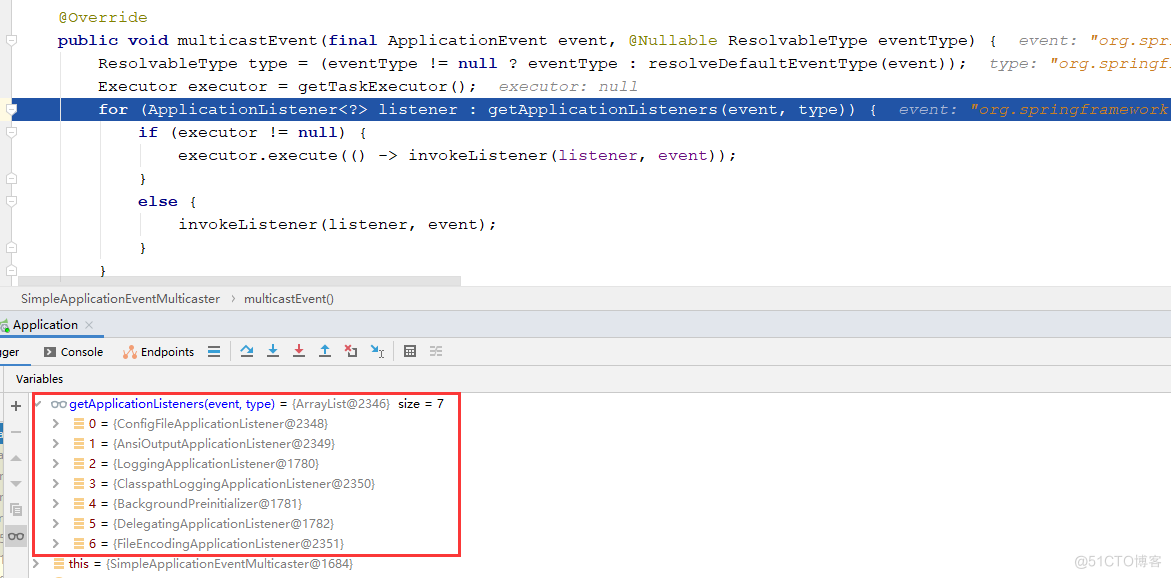
public class EventPublishingRunListener implements SpringApplicationRunListener, Ordered { public void starting() { //关键代码,先创建application启动事件`ApplicationStartingEvent` this.initialMulticaster.multicastEvent(new ApplicationStartingEvent(this.application, this.args)); } }这里先创建了一个启动事件ApplicationStartingEvent,我们继续跟进SimpleApplicationEventMulticaster,有个核心方法:
public class SimpleApplicationEventMulticaster extends AbstractApplicationEventMulticaster { @Override public void multicastEvent(ApplicationEvent event) { multicastEvent(event, resolveDefaultEventType(event)); } @Override public void multicastEvent(final ApplicationEvent event, @Nullable ResolvableType eventType) { ResolvableType type = (eventType != null ? eventType : resolveDefaultEventType(event)); //获取线程池,如果为空则同步处理。这里线程池为空,还未没初始化。 Executor executor = getTaskExecutor(); //通过事件类型ApplicationStartingEvent获取对应的监听器 for (ApplicationListener<?> listener : getApplicationListeners(event, type)) { if (executor != null) { //异步发送事件 executor.execute(() -> invokeListener(listener, event)); } else { //同步发送事件 invokeListener(listener, event); } } } }这里会根据事件类型ApplicationStartingEvent获取对应的监听器,在容器启动之后执行响应的动作,有如下4种监听器:

因为我们的事件类型为ApplicationEvent,所以会执行onApplicationStartedEvent((ApplicationStartedEvent) event);。springBoot会在运行过程中的不同阶段,发送各种事件,来执行对应监听器的对应方法。
第二步:环境构建
ConfigurableEnvironment environment = this.prepareEnvironment(listeners, applicationArguments);跟进去该方法:
private ConfigurableEnvironment prepareEnvironment(SpringApplicationRunListeners listeners, ApplicationArguments applicationArguments) { //获取对应的ConfigurableEnvironment ConfigurableEnvironment environment = this.getOrCreateEnvironment(); //配置 this.configureEnvironment((ConfigurableEnvironment)environment, applicationArguments.getSourceArgs()); ConfigurationPropertySources.attach((Environment)environment); //发布环境已准备事件,这是第二次发布事件 listeners.environmentPrepared((ConfigurableEnvironment)environment); this.bindToSpringApplication((ConfigurableEnvironment)environment); if (!this.isCustomEnvironment) { environment = (new EnvironmentConverter(this.getClassLoader())).convertEnvironmentIfNecessary((ConfigurableEnvironment)environment, this.deduceEnvironmentClass()); } ConfigurationPropertySources.attach((Environment)environment); return (ConfigurableEnvironment)environment; }来看一下getOrCreateEnvironment()方法,前面已经提到,environment已经被设置了servlet类型,所以这里创建的是环境对象是StandardServletEnvironment。
private ConfigurableEnvironment getOrCreateEnvironment() { if (this.environment != null) { return this.environment; } else { switch(this.webApplicationType) { case SERVLET: return new StandardServletEnvironment(); case REACTIVE: return new StandardReactiveWebEnvironment(); default: return new StandardEnvironment(); } } }接下来看一下listeners.environmentPrepared(environment);,上面已经提到了,这里是第二次发布事件。什么事件呢?来看一下根据事件类型获取到的监听器:
 主要来看一下ConfigFileApplicationListener,该监听器非常核心,主要用来处理项目配置。项目中的 properties 和yml文件都是其内部类所加载。具体来看一下:
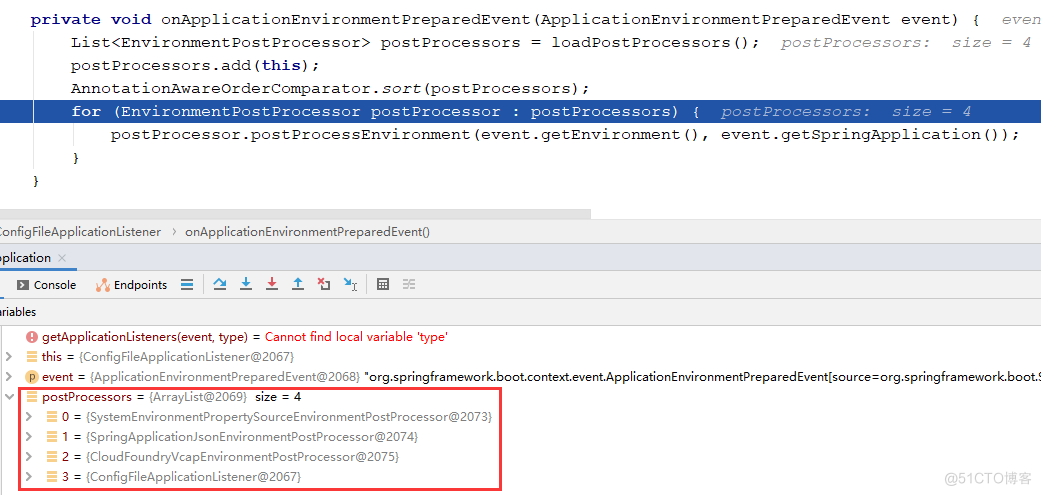 首先还是会去读spring.factories 文件,List<EnvironmentPostProcessor> postProcessors = loadPostProcessors();获取的处理类有以下四种:
在执行完上述三个监听器流程后,ConfigFileApplicationListener会执行该类本身的逻辑。由其内部类Loader加载项目制定路径下的配置文件:
private static final String DEFAULT_SEARCH_LOCATIONS = "classpath:/,classpath:/config/,file:./,file:./config/";至此,项目的变量配置已全部加载完毕,来一起看一下:
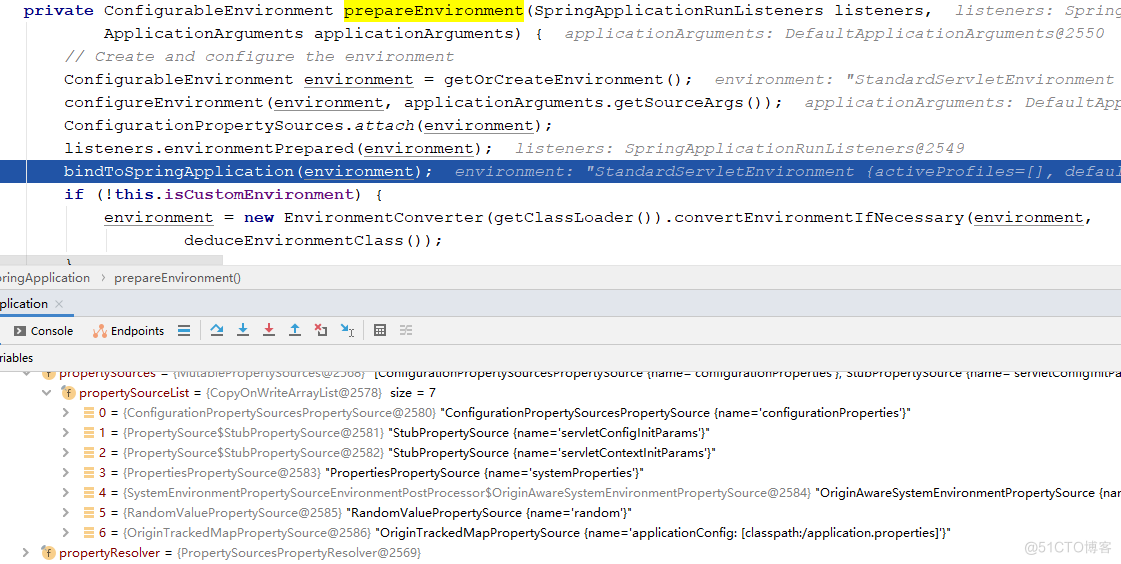 这里一共7个配置文件,取值顺序由上到下。也就是说前面的配置变量会覆盖后面同名的配置变量。项目配置变量的时候需要注意这点。
监听事件触发机制
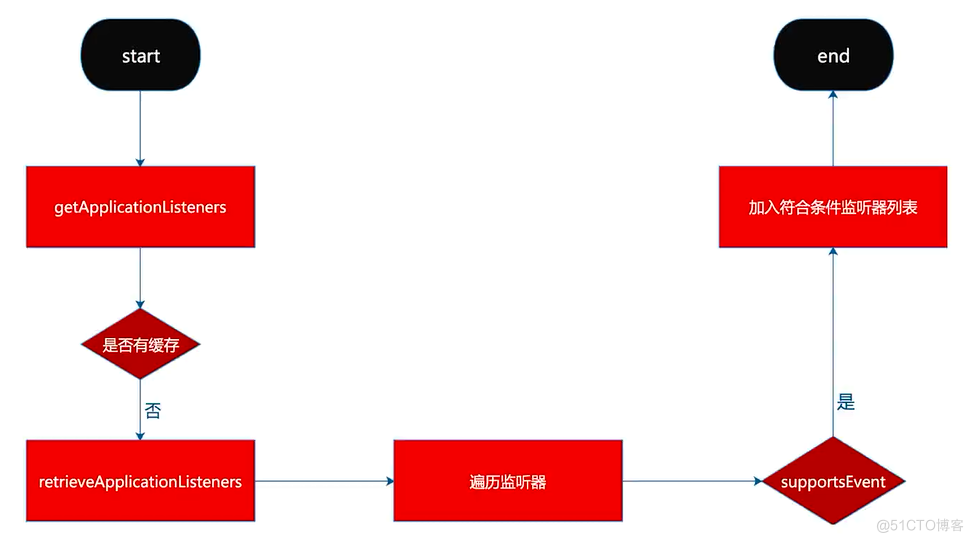
获取监听器列表
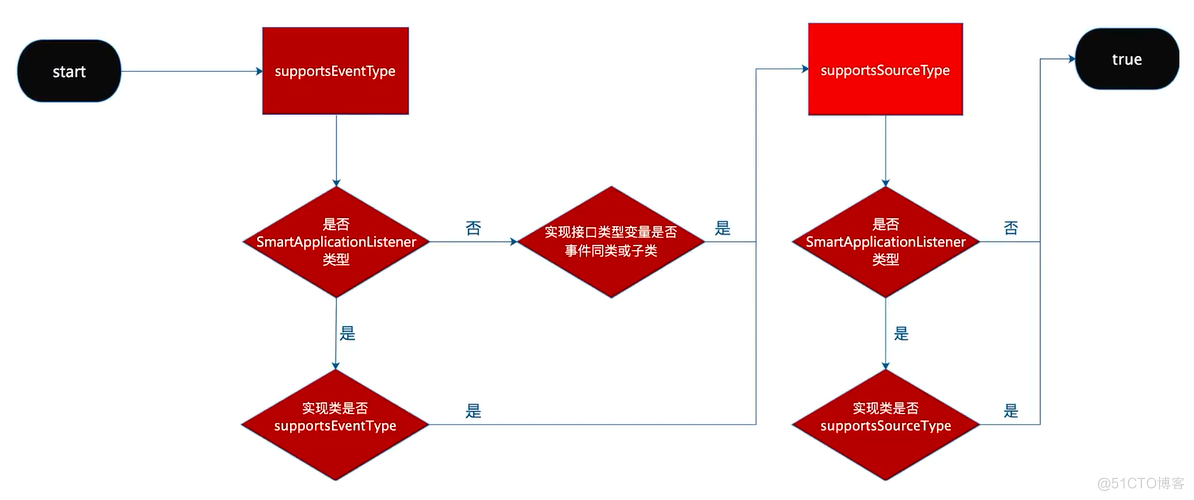
通用触发条件
自定义监听器
实现方式一
- 1、实现ApplicationListener接口
- 2、利用SPI机制在META-INF/spring.factories中添加配置项进行注册
实现方式二
- 1、实现ApplicationListener接口
- 2、SpringApplication初始化后设置进去
实现方式三
- 1、实现ApplicationListener接口
- 2、appplication.properties内填写接口实现
实现方式四
- 1、实现SmartApplicationListener接口
- 2、需要重写supportsEventType方法
- 3、使用前三种方式注入框架
总结
- 1、实现ApplicationListener接口针对单一事件监听
- 2、实现SmartApplicationListener接口针对多种事件监听
- 3、Order值越小越先执行
- 4、application.properties中定义的优于其他方式
参考: https://www.cnblogs.com/linlf03/p/12273052.html
https://www.cnblogs.com/java-chen-hao/p/11829344.html