前言
业务系统的数据,一般最后都会落入到数据库中,例如 MySQL、Oracle 等主流数据库,不可避免的,在数据更新时,有可能会遇到错误,这时需要将之前的数据更新操作撤回,避免错误数据。
Spring 的声明式事务能帮我们处理回滚操作,让我们不需要去关注数据库底层的事务操作,可以不用在出现异常情况下,在 try / catch / finaly 中手写回滚操作。
Spring 的事务保证程度比行业中其它技术(例如 TCC / 2PC / 3PC 等)稍弱一些,但使用 Spring 事务已经满足大部分场景,所以它的使用和配置规则也是值得学习的。
事务属性和行为
ACID属性
提到事务,不可避免需要涉及到事务的ACID属性:
- 原子性(Atomicity):事务作为一个整体被执行,包含在其中的对数据库的操作要么全部被执行,要么都不执行。
- 一致性(Consistency):事务应确保数据库的状态从一个一致状态转变为另一个一致状态。一致状态的含义是数据库中的数据应满足完整性约束。
- 隔离性(Isolation):多个事务并发执行时,一个事务的执行不应影响其他事务的执行。
- 持久性(Durability):已被提交的事务对数据库的修改应该永久保存在数据库中。
我们将严格遵循ACID属性的事务称为刚性事务。与之相对,期望最终一致性,在事务执行的中间状态允许暂时不遵循ACID属性的事务称为柔性事务,柔性事务的使用涉及到分布式事务方案,这里我们先将注意集中在事务实现原理上。
隔离级别
根据SQL92标准,MySQL的InnoDB引擎提供四种隔离级别(即ACID中的I):读未提交(READ UNCOMMITTED)、读已提交(READ COMMITTED)、可重复读(REPEATABLE READ)和串行化(SERIALIZABLE),InnoDB默认的隔离级别是REPEATABLE READ,其可避免脏读和不可重复读,但不能避免幻读,需要指出的是,InnoDB引擎的多版本并发控制机制(MVCC)并没有完全避免幻读。
事物传播行为
支持当前事务
支持当前事务的传播机制有三种,分别是
-
REQUIRED (必须有) 含义:如果当前方法没有事务,新建一个事务,如果已经存在一个事务中,则加入到这个事务中。
-
SUPPORTS (可有可无) 含义:支持当前事务,如果当前没有事务,就以非事务方式执行
-
MANDATORY (强制) 含义:使用当前的事务,如果当前没有事务,就抛出异常。
不支持当前事务
-
REQUIRES_NEW 含义:新建事务,如果当前存在事务,把当前事务挂起。
-
NOT_SUPPORTED 含义:以非事务方式执行操作,如果当前存在事务,就把当前事务挂起。
-
NEVER 含义: 以非事务方式执行,如果当前存在事务,则抛出异常。
NESTED
含义: 如果当前存在事务,则在嵌套事务内执行。如果当前没有事务,则执行与PROPAGATION_REQUIRED类似的操作。
事务行为
事务的行为包括事务开启、事务提交和事务回滚。InnoDB所有的用户SQL执行都在事务控制之内,在默认情况下,autocommit设置为true,单条SQL执行成功后,MySQL会自动提交事务,或者如果SQL执行出错,则根据异常类型执行事务提交或者回滚。可以使用START TRANSACTION(SQL标准)或者BEGIN开启事务,使用COMMIT和ROLLBACK提交和回滚事务;也可以通过设置autocommit属性来控制事务行为,当设置autocommit为false时,其后执行的多条SQL语句将在一个事务内,直到执行COMMIT或者ROLLBACK事务才会提交或者回滚。
AOP增强
Spring使用AOP(面向切面编程)来实现声明式事务,后续在讲Spring事务具体实现的时候会详细说明,说下动态代理和AOP增强。
动态代理是Spring实现AOP的默认方式,分为两种:JDK动态代理和CGLIB动态代理。JDK动态代理面向接口,通过反射生成目标代理接口的匿名实现类;CGLIB动态代理则通过继承,使用字节码增强技术(或者objenesis类库)为目标代理类生成代理子类。Spring默认对接口实现使用JDK动态代理,对具体类使用CGLIB,同时也支持配置全局使用CGLIB来生成代理对象。
我们在切面配置中会使用到**@Aspect注解,这里用到了Aspectj**的切面表达式。Aspectj是java语言实现的一个AOP框架,使用静态代理模式,拥有完善的AOP功能,与Spring AOP互为补充。Spring采用了Aspectj强大的切面表达式定义方式,但是默认情况下仍然使用动态代理方式,并未使用Aspectj的编译器和织入器,当然也支持配置使用Aspectj静态代理替代动态代理方式。Aspectj功能更强大,比方说它支持对字段、POJO类进行增强,与之相对,Spring只支持对Bean方法级别进行增强。
Spring对方法的增强有五种方式:
- 前置增强(org.springframework.aop.BeforeAdvice):在目标方法执行之前进行增强;
- 后置增强(org.springframework.aop.AfterReturningAdvice):在目标方法执行之后进行增强;
- 环绕增强(org.aopalliance.intercept.MethodInterceptor):在目标方法执行前后都执行增强;
- 异常抛出增强(org.springframework.aop.ThrowsAdvice):在目标方法抛出异常后执行增强;
- 引介增强(org.springframework.aop.IntroductionInterceptor):为目标类添加新的方法和属性。
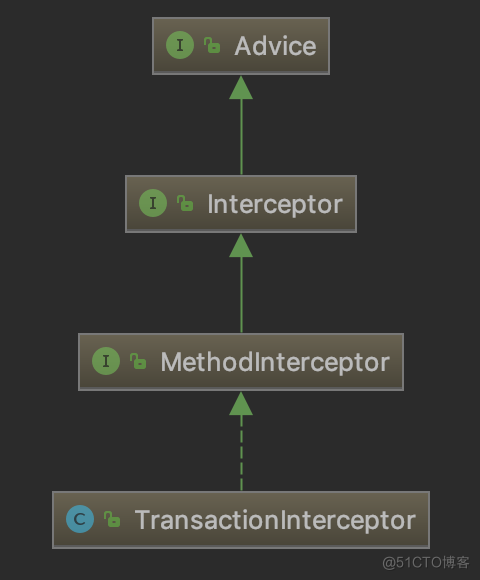
声明式事务的实现就是通过环绕增强的方式,在目标方法执行之前开启事务,在目标方法执行之后提交或者回滚事务,事务拦截器的继承关系图可以体现这一点:
Spring事务抽象
统一一致的事务抽象是Spring框架的一大优势,无论是全局事务还是本地事务,JTA、JDBC、Hibernate还是JPA,Spring都使用统一的编程模型,使得应用程序可以很容易地在全局事务与本地事务,或者不同的事务框架之间进行切换。下图是Spring事务抽象的核心类图:
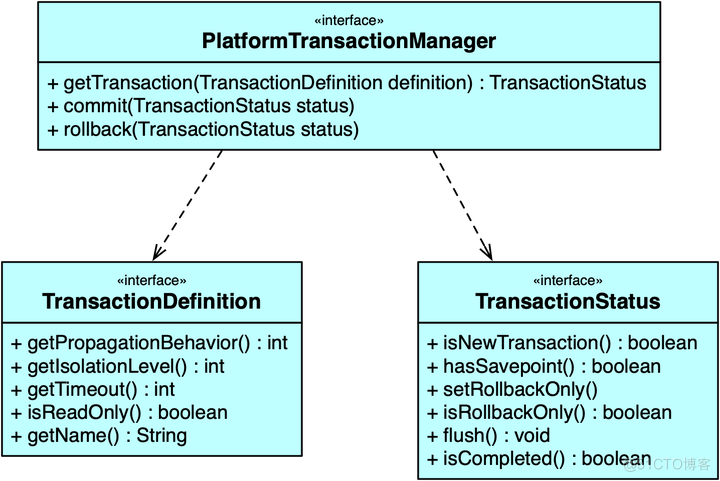
接口PlatformTransactionManager定义了事务操作的行为,其依赖TransactionDefinition和TransactionStatus接口,其实大部分的事务属性和行为我们以MySQL数据库为例已经有过了解,这里再对应介绍下。
PlatformTransactionManager:事务管理器
- getTransaction方法:事务获取操作,根据事务属性定义,获取当前事务或者创建新事物;
- commit方法:事务提交操作,注意这里所说的提交并非直接提交事务,而是根据当前事务状态执行提交或者回滚操作;
- rollback方法:事务回滚操作,同样,也并非一定直接回滚事务,也有可能只是标记事务为只读,等待其他调用方执行回滚。
TransactionDefinition:事务属性定义
- getPropagationBehavior方法:返回事务的传播属性,默认是PROPAGATION_REQUIRED;
- getIsolationLevel方法:返回事务隔离级别,事务隔离级别只有在创建新事务时才有效,也就是说只对应传播属性PROPAGATION_REQUIRED和PROPAGATION_REQUIRES_NEW;
- getTimeout方法:返回事务超时时间,以秒为单位,同样只有在创建新事务时才有效;
- isReadOnly方法:是否优化为只读事务,支持这项属性的事务管理器会将事务标记为只读,只读事务不允许有写操作,不支持只读属性的事务管理器需要忽略这项设置,这一点跟其他事务属性定义不同,针对其他不支持的属性设置,事务管理器应该抛出异常。
- getName方法:返回事务名称,声明式事务中默认值为“类的完全限定名.方法名”。
TransactionStatus:当前事务状态
- isNewTransaction方法:当前方法是否创建了新事务(区别于使用现有事务以及没有事务);
- hasSavepoint方法:在嵌套事务场景中,判断当前事务是否包含保存点;
- setRollbackOnly和isRollbackOnly方法:只读属性设置(主要用于标记事务,等待回滚)和查询;
- flush方法:刷新底层会话中的修改到数据库,一般用于刷新如Hibernate/JPA的会话,是否生效由具体事务资源实现决定;
- isCompleted方法:判断当前事务是否已完成(已提交或者已回滚)。
部分Spring包含的对PlatformTransactionManager的实现类如下图所示:
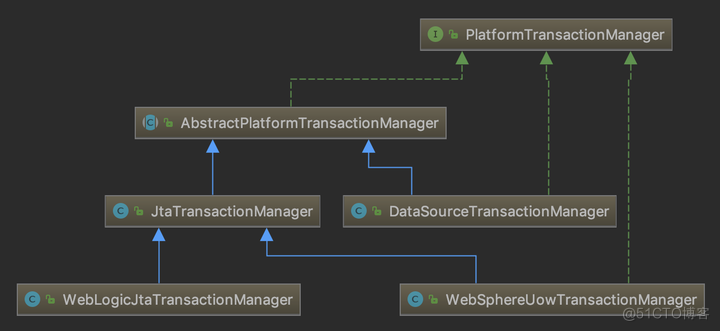
AbstractPlatformTransactionManager抽象类实现了Spring事务的标准流程,其子类DataSourceTransactionManager是我们使用较多的JDBC单数据源事务管理器,而JtaTransactionManager是JTA(Java Transaction API)规范的实现类,另外两个则分别是JavaEE容器WebLogic和WebSphere的JTA事务管理器的具体实现。
Spring事务切面
之前提到,Spring采用AOP来实现声明式事务,那么事务的AOP切面是如何织入的呢?这一点涉及到AOP动态代理对象的生成过程。
代理对象生成的核心类是AbstractAutoProxyCreator,实现了BeanPostProcessor接口,会在Bean初始化完成之后,通过postProcessAfterInitialization方法生成代理对象。
看一下AbstractAutoProxyCreator类的核心代码,主要关注三个方法:postProcessAfterInitialization、wrapIfNecessary和createProxy,为了突出核心流程,以注释代替了部分代码的具体实现,后续的源码分析也采用相同的处理。
public abstract class AbstractAutoProxyCreator extends ProxyProcessorSupport implements SmartInstantiationAwareBeanPostProcessor, BeanFactoryAware { @Override public Object postProcessAfterInitialization(@Nullable Object bean, String beanName) { if (bean != null) { Object cacheKey = getCacheKey(bean.getClass(), beanName); //当 Bean 被循环引用, 并且被暴露了, // 则会通过 getEarlyBeanReference 来创建代理类; // 通过判断 earlyProxyReferences 中 // 是否存在 beanName 来决定是否需要对 target 进行动态代理 if (this.earlyProxyReferences.remove(cacheKey) != bean) { //该方法将会返回代理类 return wrapIfNecessary(bean, beanName, cacheKey); } } return bean; } protected Object wrapIfNecessary(Object bean, String beanName, Object cacheKey) { //已经被处理过 // 1.判断当前bean是否在targetSourcedBeans缓存中存在(已经处理过),如果存在,则直接返回当前bean if (StringUtils.hasLength(beanName) && this.targetSourcedBeans.contains(beanName)) { return bean; } //不需要被织入逻辑的 // 2.在advisedBeans缓存中存在,并且value为false,则代表无需处理 if (Boolean.FALSE.equals(this.advisedBeans.get(cacheKey))) { return bean; } //是不是基础的bean 是不是需要跳过的 // 3.bean的类是aop基础设施类 || bean应该跳过,则标记为无需处理,并返回 if (isInfrastructureClass(bean.getClass()) || shouldSkip(bean.getClass(), beanName)) { this.advisedBeans.put(cacheKey, Boolean.FALSE); return bean; } // Create proxy if we have advice. // 返回匹配当前Bean的所有Advice\Advisor\Interceptor Object[] specificInterceptors = getAdvicesAndAdvisorsForBean(bean.getClass(), beanName, null); // 5.如果存在增强器则创建代理 if (specificInterceptors != DO_NOT_PROXY) { this.advisedBeans.put(cacheKey, Boolean.TRUE); //创建Bean对应的代理,SingletonTargetSource用于封装实现类的信息 // 5.1 创建代理对象:这边SingletonTargetSource的target属性存放的就是我们原来的bean实例(也就是被代理对象), // 用于最后增加逻辑执行完毕后,通过反射执行我们真正的方法时使用(method.invoke(bean, args)) Object proxy = createProxy( bean.getClass(), beanName, specificInterceptors, new SingletonTargetSource(bean)); // 5.2 创建完代理后,将cacheKey -> 代理类的class放到缓存 this.proxyTypes.put(cacheKey, proxy.getClass()); // 返回代理对象 return proxy; } //该Bean是不需要进行代理的,下次就不需要重复生成了 this.advisedBeans.put(cacheKey, Boolean.FALSE); return bean; } protected Object createProxy(Class<?> beanClass, @Nullable String beanName, @Nullable Object[] specificInterceptors, TargetSource targetSource) { //如果beanFactory是ConfigurableListableBeanFactory的类型,暴露目标类 if (this.beanFactory instanceof ConfigurableListableBeanFactory) { AutoProxyUtils.exposeTargetClass((ConfigurableListableBeanFactory) this.beanFactory, beanName, beanClass); } //创建一个ProxyFactory,当前ProxyCreator在创建代理时将需要用到的字段赋值到ProxyFactory中去 ProxyFactory proxyFactory = new ProxyFactory(); //将 当前的AnnotationAwareAspectJAutoProxyCreator 对象的属性赋值给ProxyFactory对象 proxyFactory.copyFrom(this); // 处理 proxyTargetClass 属性 // 如果希望使用 CGLIB 来代理接口,可以配置 // proxy-target-class="true",这样不管有没有接口,都使用 CGLIB 来生成代理: // <aop:config proxy-target-class="true"></aop:config> if (!proxyFactory.isProxyTargetClass()) { // 检查preserveTargetClass属性,判断beanClass是应该基于类代理还是基于接口代理 if (shouldProxyTargetClass(beanClass, beanName)) { // 如果是基于类代理,则将proxyTargetClass赋值为true proxyFactory.setProxyTargetClass(true); } else { // 评估bean的代理接口 // 1. 有接口的,调用一次或多次:proxyFactory.addInterface(ifc); // 2. 没有接口的,调用:proxyFactory.setProxyTargetClass(true); evaluateProxyInterfaces(beanClass, proxyFactory); } } // 这个方法主要来对前面传递进来的横切逻辑实例进行包装 // 注意:如果 specificInterceptors 中有 Advice 和 Interceptor,它们也会被包装成 Advisor // 方法会整理合并得到最终的advisors (毕竟interceptorNames还指定了一些拦截器的) // 至于调用的先后顺序,通过方法里的applyCommonInterceptorsFirst参数可以进行设置, // 若applyCommonInterceptorsFirst为true,interceptorNames属性指定的Advisor优先调用。默认为true Advisor[] advisors = buildAdvisors(beanName, specificInterceptors); // 将advisors添加到proxyFactory proxyFactory.addAdvisors(advisors); // 设置要代理的类,将targetSource赋值给proxyFactory的targetSource属性,之后可以通过该属性拿到被代理的bean的实例 proxyFactory.setTargetSource(targetSource); // 这个方法是交给子类的,子类可以继续去定制此proxyFactory customizeProxyFactory(proxyFactory); // 用来控制proxyFactory被配置之后,是否还允许修改通知。默认值为false(即在代理被配置之后,不允许修改代理类的配置) proxyFactory.setFrozen(this.freezeProxy); // 设置preFiltered的属性值,默认是false。子类:AbstractAdvisorAutoProxyCreator修改为true // preFiltered字段意思为:是否已为特定目标类筛选Advisor // 这个字段和DefaultAdvisorChainFactory.getInterceptorsAndDynamicInterceptionAdvice获取所有的Advisor有关 //CglibAopProxy和JdkDynamicAopProxy都会调用此方法,然后递归执行所有的Advisor if (advisorsPreFiltered()) { proxyFactory.setPreFiltered(true); } // 使用proxyFactory获取代理 return proxyFactory.getProxy(getProxyClassLoader()); } }最后是通过调用ProxyFactory#getProxy(java.lang.ClassLoader)方法来创建代理对象:
public class ProxyFactory extends ProxyCreatorSupport { public Object getProxy(@Nullable ClassLoader classLoader) { // 首先获取AopProxy对象,其主要有两个实现:JdkDynamicAopProxy和ObjenesisCglibAopProxy, // 分别用于Jdk和Cglib代理类的生成,其getProxy()方法则用于获取具体的代理对象 // 1.createAopProxy:创建AopProxy // 2.getProxy(classLoader):获取代理对象实例 return createAopProxy().getProxy(classLoader); } } public class ProxyCreatorSupport extends AdvisedSupport { private AopProxyFactory aopProxyFactory; public ProxyCreatorSupport() { this.aopProxyFactory = new DefaultAopProxyFactory(); } protected final synchronized AopProxy createAopProxy() { //主要是为了激活AdvisedSupportListener监听器 if (!this.active) { activate(); } // 2.创建AopProxy return getAopProxyFactory().createAopProxy(this); } }ProxyFactory的父类构造器实例化了DefaultAopProxyFactory类,从其源代码我们可以看到Spring动态代理方式选择策略的实现:如果目标类optimize,proxyTargetClass属性设置为true或者未指定需要代理的接口,则使用CGLIB生成代理对象,否则使用JDK动态代理。
public class DefaultAopProxyFactory implements AopProxyFactory, Serializable { @Override public AopProxy createAopProxy(AdvisedSupport config) throws AopConfigException { // 1.判断使用JDK动态代理还是Cglib代理 // optimize:用于控制通过cglib创建的代理是否使用激进的优化策略。除非完全了解AOP如何处理代理优化, // 否则不推荐使用这个配置,目前这个属性仅用于cglib代理,对jdk动态代理无效 // proxyTargetClass:默认为false,设置为true时,强制使用cglib代理,设置方式:<aop:aspectj-autoproxy proxy-target-class="true" /> // hasNoUserSuppliedProxyInterfaces:config是否存在代理接口或者只有SpringProxy一个接口 if (config.isOptimize() || config.isProxyTargetClass() || hasNoUserSuppliedProxyInterfaces(config)) { // 拿到要被代理的对象的类型 Class<?> targetClass = config.getTargetClass(); if (targetClass == null) { // TargetSource无法确定目标类:代理创建需要接口或目标。 throw new AopConfigException("TargetSource cannot determine target class: " + "Either an interface or a target is required for proxy creation."); } // 要被代理的对象是接口 || targetClass是Proxy class 已经是个JDK的代理类(Proxy的子类,所有的JDK代理类都是此类的子类) // 当且仅当使用getProxyClass方法或newProxyInstance方法动态生成指定的类作为代理类时,才返回true。 if (targetClass.isInterface() || Proxy.isProxyClass(targetClass)) { // JDK动态代理,这边的入参config(AdvisedSupport)实际上是ProxyFactory对象 // 具体为:AbstractAutoProxyCreator中的proxyFactory.getProxy发起的调用,在ProxyCreatorSupport使用了this作为参数, // 调用了的本方法,这边的this就是发起调用的proxyFactory对象,而proxyFactory对象中包含了要执行的的拦截器 return new JdkDynamicAopProxy(config); } // Cglib代理 return new ObjenesisCglibAopProxy(config); } else { // JDK动态代理 return new JdkDynamicAopProxy(config); } } }Spring事务拦截
我们已经了解了AOP切面织入生成代理对象的过程,当Bean方法通过代理对象调用时,会触发对应的AOP增强拦截器,前面提到声明式事务是一种环绕增强,对应接口为MethodInterceptor,事务增强对该接口的实现为TransactionInterceptor,类图如下:
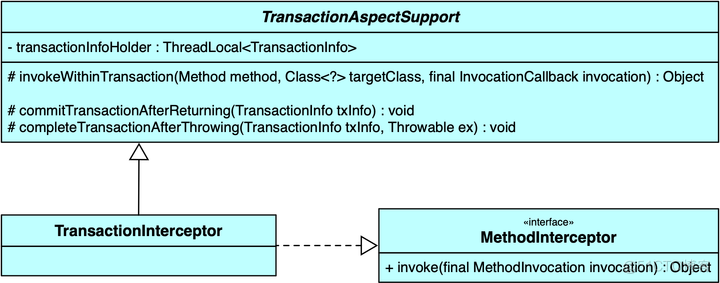
事务拦截器TransactionInterceptor在invoke方法中,通过调用父类TransactionAspectSupport的invokeWithinTransaction方法进行事务处理,该方法支持声明式事务和编程式事务。
public abstract class TransactionAspectSupport implements BeanFactoryAware, InitializingBean { // invokeWithinTransaction最为核心的处理事务的模版方法了: //protected修饰,不允许其他包和无关类调用 @Nullable protected Object invokeWithinTransaction(Method method, @Nullable Class<?> targetClass, final InvocationCallback invocation) throws Throwable { // If the transaction attribute is null, the method is non-transactional. // 查询目标方法事务属性、确定事务管理器、构造连接点标识(用于确认事务名称) TransactionAttributeSource tas = getTransactionAttributeSource(); final TransactionAttribute txAttr = (tas != null ? tas.getTransactionAttribute(method, targetClass) : null); // 根据事务的属性获取beanFactory中的PlatformTransactionManager(spring事务管理器的顶级接口), // 一般这里或者的是DataSourceTransactiuonManager final TransactionManager tm = determineTransactionManager(txAttr); if (this.reactiveAdapterRegistry != null && tm instanceof ReactiveTransactionManager) { ReactiveTransactionSupport txSupport = this.transactionSupportCache.computeIfAbsent(method, key -> { if (KotlinDetector.isKotlinType(method.getDeclaringClass()) && KotlinDelegate.isSuspend(method)) { throw new TransactionUsageException( "Unsupported annotated transaction on suspending function detected: " + method + ". Use TransactionalOperator.transactional extensions instead."); } ReactiveAdapter adapter = this.reactiveAdapterRegistry.getAdapter(method.getReturnType()); if (adapter == null) { throw new IllegalStateException("Cannot apply reactive transaction to non-reactive return type: " + method.getReturnType()); } return new ReactiveTransactionSupport(adapter); }); return txSupport.invokeWithinTransaction( method, targetClass, invocation, txAttr, (ReactiveTransactionManager) tm); } PlatformTransactionManager ptm = asPlatformTransactionManager(tm); // 目标方法唯一标识(类.方法,如service.UserServiceImpl.save) final String joinpointIdentification = methodIdentification(method, targetClass, txAttr); //如果txAttr为空或者tm 属于非CallbackPreferringPlatformTransactionManager,执行目标增强 if (txAttr == null || !(ptm instanceof CallbackPreferringPlatformTransactionManager)) { // Standard transaction demarcation with getTransaction and commit/rollback calls. //事务获取 看是否有必要创建一个事务,根据事务传播行为,做出相应的判断 TransactionInfo txInfo = createTransactionIfNecessary(ptm, txAttr, joinpointIdentification); Object retVal; try { // This is an around advice: Invoke the next interceptor in the chain. // This will normally result in a target object being invoked. //回调方法执行,执行目标方法(原有的业务逻辑) retVal = invocation.proceedWithInvocation(); } catch (Throwable ex) { // target invocation exception // 目标方法执行抛出异常,根据异常类型执行事务提交或者回滚操作 completeTransactionAfterThrowing(txInfo, ex); throw ex; } finally { // 清理当前线程事务信息 cleanupTransactionInfo(txInfo); } if (vavrPresent && VavrDelegate.isVavrTry(retVal)) { // Set rollback-only in case of Vavr failure matching our rollback rules... TransactionStatus status = txInfo.getTransactionStatus(); if (status != null && txAttr != null) { retVal = VavrDelegate.evaluateTryFailure(retVal, txAttr, status); } } // 目标方法执行成功,提交事务 commitTransactionAfterReturning(txInfo); return retVal; } //编程式事务处理(CallbackPreferringPlatformTransactionManager) 不做重点分析 else { final ThrowableHolder throwableHolder = new ThrowableHolder(); //省略编程式事务处理相关代码 } } }在讲Spring事务抽象时,有提到事务抽象的核心接口为PlatformTransactionManager,它负责管理事务行为,包括事务的获取、提交和回滚。在invokeWithinTransaction方法中,我们可以看到createTransactionIfNecessary、commitTransactionAfterReturning和completeTransactionAfterThrowing都是针对该接口编程,并不依赖于特定事务管理器,这里是对Spring事务抽象的实现。
public abstract class TransactionAspectSupport implements BeanFactoryAware, InitializingBean { // 若有需要 创建一个TransactionInfo (具体的事务从事务管理器里面getTransaction()出来~) protected TransactionInfo createTransactionIfNecessary(@Nullable PlatformTransactionManager tm, @Nullable TransactionAttribute txAttr, final String joinpointIdentification) { // If no name specified, apply method identification as transaction name. // 如果没有名称指定则使用方法唯一标识,并使用 DelegatingTransactionAttribute 包装 txAttr if (txAttr != null && txAttr.getName() == null) { txAttr = new DelegatingTransactionAttribute(txAttr) { @Override public String getName() { return joinpointIdentification; } }; } // 从事务管理器里,通过txAttr拿出来一个TransactionStatus TransactionStatus status = null; if (txAttr != null) { if (tm != null) { // 获取 TransactionStatus status = tm.getTransaction(txAttr); } else { if (logger.isDebugEnabled()) { logger.debug("Skipping transactional joinpoint [" + joinpointIdentification + "] because no transaction manager has been configured"); } } } // 根据指定的属性与 status 等,转换成一个通用的TransactionInfo return prepareTransactionInfo(tm, txAttr, joinpointIdentification, status); } protected TransactionInfo prepareTransactionInfo(@Nullable PlatformTransactionManager tm, @Nullable TransactionAttribute txAttr, String joinpointIdentification, @Nullable TransactionStatus status) { // 构造一个TransactionInfo TransactionInfo txInfo = new TransactionInfo(tm, txAttr, joinpointIdentification); if (txAttr != null) { //省略部分代码...... // 如果已存在不兼容的Tx,设置status txInfo.newTransactionStatus(status); } //省略部分代码...... // 这句话是最重要的:把生成的TransactionInfo并绑定到当前线程的ThreadLocal txInfo.bindToThread(); return txInfo; } //提交事务 protected void commitTransactionAfterReturning(@Nullable TransactionInfo txInfo) { if (txInfo != null && txInfo.getTransactionStatus() != null) { if (logger.isTraceEnabled()) { logger.trace("Completing transaction for [" + txInfo.getJoinpointIdentification() + "]"); } // 提交事务 txInfo.getTransactionManager().commit(txInfo.getTransactionStatus()); } } protected void completeTransactionAfterThrowing(@Nullable TransactionInfo txInfo, Throwable ex) { if (txInfo != null && txInfo.getTransactionStatus() != null) { if (logger.isTraceEnabled()) { logger.trace("Completing transaction for [" + txInfo.getJoinpointIdentification() + "] after exception: " + ex); } if (txInfo.transactionAttribute != null && txInfo.transactionAttribute.rollbackOn(ex)) { try { // 异常类型为回滚异常,执行事务回滚 txInfo.getTransactionManager().rollback(txInfo.getTransactionStatus()); } catch (TransactionSystemException ex2) { logger.error("Application exception overridden by rollback exception", ex); ex2.initApplicationException(ex); throw ex2; } catch (RuntimeException | Error ex2) { logger.error("Application exception overridden by rollback exception", ex); throw ex2; } } else { try { // 异常类型为非回滚异常,仍然执行事务提交 txInfo.getTransactionManager().commit(txInfo.getTransactionStatus()); } catch (TransactionSystemException ex2) { logger.error("Application exception overridden by commit exception", ex); ex2.initApplicationException(ex); throw ex2; } catch (RuntimeException | Error ex2) { logger.error("Application exception overridden by commit exception", ex); throw ex2; } } } } protected static final class TransactionInfo { @Nullable private final PlatformTransactionManager transactionManager; } }另外,在获取事务时,AbstractPlatformTransactionManager#doBegin方法负责开启新事务,在DataSourceTransactionManager有如下代码:
public class DataSourceTransactionManager extends AbstractPlatformTransactionManager implements ResourceTransactionManager, InitializingBean { private DataSource dataSource; @Override protected void doBegin(Object transaction, TransactionDefinition definition) { DataSourceTransactionObject txObject = (DataSourceTransactionObject) transaction; Connection con = null; try { if (!txObject.hasConnectionHolder() || txObject.getConnectionHolder().isSynchronizedWithTransaction()) { // 从DataSource里获取一个连接(这个DataSource一般是有连接池的) Connection newCon = obtainDataSource().getConnection(); if (logger.isDebugEnabled()) { logger.debug("Acquired Connection [" + newCon + "] for JDBC transaction"); } // 把这个链接用ConnectionHolder包装一下 txObject.setConnectionHolder(new ConnectionHolder(newCon), true); } txObject.getConnectionHolder().setSynchronizedWithTransaction(true); con = txObject.getConnectionHolder().getConnection(); // 设置isReadOnly、设置隔离界别等 Integer previousIsolationLevel = DataSourceUtils.prepareConnectionForTransaction(con, definition); txObject.setPreviousIsolationLevel(previousIsolationLevel); txObject.setReadOnly(definition.isReadOnly()); // Switch to manual commit if necessary. This is very expensive in some JDBC drivers, // so we don't want to do it unnecessarily (for example if we've explicitly // configured the connection pool to set it already). // 这里非常的关键,先看看Connection 是否是自动提交的 // 如果是 就con.setAutoCommit(false) 要不然数据库默认没执行一条SQL都是一个事务,就没法进行事务的管理了 if (con.getAutoCommit()) { txObject.setMustRestoreAutoCommit(true); if (logger.isDebugEnabled()) { logger.debug("Switching JDBC Connection [" + con + "] to manual commit"); } //开启事务,设置autoCommit为false con.setAutoCommit(false); } // ====因此从这后面,通过此Connection执行的所有SQL语句只要没有commit就都不会提交给数据库的===== // 这个方法特别特别有意思 它自己`Statement stmt = con.createStatement()`拿到一个Statement // 然后执行了一句SQL:`stmt.executeUpdate("SET TRANSACTION READ ONLY");` // 所以:如果你仅仅只是查询。把事务的属性设置为readonly=true Spring对帮你对SQl进行优化的 // 需要注意的是:readonly=true 后,只能读,不能进行dml操作) // (只能看到设置事物前数据的变化,看不到设置事物后数据的改变) prepareTransactionalConnection(con, definition); txObject.getConnectionHolder().setTransactionActive(true); int timeout = determineTimeout(definition); if (timeout != TransactionDefinition.TIMEOUT_DEFAULT) { txObject.getConnectionHolder().setTimeoutInSeconds(timeout); } // Bind the connection holder to the thread. // 这一步:就是把当前的链接 和当前的线程进行绑定 if (txObject.isNewConnectionHolder()) { //这里将当前的connection放入TransactionSynchronizationManager中持有,如果下次调用可以判断为已有的事务 TransactionSynchronizationManager.bindResource(obtainDataSource(), txObject.getConnectionHolder()); } } catch (Throwable ex) { // 如果是新创建的链接,那就释放 if (txObject.isNewConnectionHolder()) { DataSourceUtils.releaseConnection(con, obtainDataSource()); txObject.setConnectionHolder(null, false); } throw new CannotCreateTransactionException("Could not open JDBC Connection for transaction", ex); } } }这里才真正开启了数据库事务。
Spring事务同步
提到事务传播机制时,我们经常提到一个条件“如果当前已有事务”,那么Spring是如何知道当前是否已经开启了事务呢?在AbstractPlatformTransactionManager中是这样做的:
public abstract class AbstractPlatformTransactionManager implements PlatformTransactionManager, Serializable { // 最为重要的一个方法,根据实物定义,获取到一个事务TransactionStatus @Override public final TransactionStatus getTransaction(@Nullable TransactionDefinition definition) throws TransactionException { // Use defaults if no transaction definition given. TransactionDefinition def = (definition != null ? definition : TransactionDefinition.withDefaults()); //doGetTransaction()方法是抽象方法,具体的实现由具体的事务处理器提供(下面会以DataSourceTransactionManager为例子) Object transaction = doGetTransaction(); boolean debugEnabled = logger.isDebugEnabled(); //检查当前线程是否存在事务 isExistingTransaction此方法默认返回false 但子类都复写了此方法 if (isExistingTransaction(transaction)) { // Existing transaction found -> check propagation behavior to find out how to behave. // handleExistingTransaction方法为处理已经存在事务的情况 // 这个方法的实现也很复杂,总之还是对一些传播属性进行解析,各种情况的考虑~~~~~ 如果有新事务产生 doBegin()就会被调用~~~~ return handleExistingTransaction(def, transaction, debugEnabled); } // Check definition settings for new transaction. // 超时时间的简单校验~~~~ if (def.getTimeout() < TransactionDefinition.TIMEOUT_DEFAULT) { throw new InvalidTimeoutException("Invalid transaction timeout", def.getTimeout()); } // 处理事务属性中配置的事务传播特性============== // No existing transaction found -> check propagation behavior to find out how to proceed. // PROPAGATION_MANDATORY 如果已经存在一个事务,支持当前事务。如果没有一个活动的事务,则抛出异常 if (def.getPropagationBehavior() == TransactionDefinition.PROPAGATION_MANDATORY) { throw new IllegalTransactionStateException( "No existing transaction found for transaction marked with propagation 'mandatory'"); } //如果事务传播特性为required、required_new或nested else if (def.getPropagationBehavior() == TransactionDefinition.PROPAGATION_REQUIRED || def.getPropagationBehavior() == TransactionDefinition.PROPAGATION_REQUIRES_NEW || def.getPropagationBehavior() == TransactionDefinition.PROPAGATION_NESTED) { // 挂起,但是doSuspend()由子类去实现~~~ // 挂起操作,触发相关的挂起注册的事件,把当前线程事物的所有属性都封装好,放到一个SuspendedResourcesHolder // 然后清空清空一下`当前线程事务` SuspendedResourcesHolder suspendedResources = suspend(null); if (debugEnabled) { logger.debug("Creating new transaction with name [" + def.getName() + "]: " + def); } try { // 创建一个新的事务状态 就是new DefaultTransactionStatus() 把个属性都赋值上 return startTransaction(def, transaction, debugEnabled, suspendedResources); } catch (RuntimeException | Error ex) { //重新开始 doResume由子类去实现 resume(null, suspendedResources); throw ex; } } // 走到这里 传播属性就是不需要事务的 那就直接创建一个 else { // Create "empty" transaction: no actual transaction, but potentially synchronization. if (def.getIsolationLevel() != TransactionDefinition.ISOLATION_DEFAULT && logger.isWarnEnabled()) { logger.warn("Custom isolation level specified but no actual transaction initiated; " + "isolation level will effectively be ignored: " + def); } // 这个方法相当于先newTransactionStatus,再prepareSynchronization这两步~~~ // 显然和上面的区别是:中间不回插入调用doBegin()方法,因为没有事务 begin个啥 boolean newSynchronization = (getTransactionSynchronization() == SYNCHRONIZATION_ALWAYS); return prepareTransactionStatus(def, null, true, newSynchronization, debugEnabled, null); } } private TransactionStatus startTransaction(TransactionDefinition definition, Object transaction, boolean debugEnabled, @Nullable SuspendedResourcesHolder suspendedResources) { boolean newSynchronization = (getTransactionSynchronization() != SYNCHRONIZATION_NEVER); //创建一个新的事务状态 就是new DefaultTransactionStatus() 把个属性都赋值上 DefaultTransactionStatus status = newTransactionStatus( definition, transaction, true, newSynchronization, debugEnabled, suspendedResources); // 开启事物,抽象方法,由子类去实现~ doBegin(transaction, definition); // 初始化事物同步属性 //初始化和同步事务状态 是TransactionSynchronizationManager这个类 它内部维护了很多的ThreadLocal prepareSynchronization(status, definition); return status; } }注意getTransaction方法是final的,无法被子类覆盖,保证了获取事务流程的一致和稳定。抽象方法doGetTransaction获取当前事务对象,方法isExistingTransaction判断当前事务对象是否存在活跃事务,具体逻辑由特定事务管理器实现,看下我们使用最多的DataSourceTransactionManager对应的实现:
public class DataSourceTransactionManager extends AbstractPlatformTransactionManager implements ResourceTransactionManager, InitializingBean { // 这里返回的是一个`DataSourceTransactionObject` // 它是一个`JdbcTransactionObjectSupport`,所以它是SavepointManager、实现了SmartTransactionObject接口 @Override protected Object doGetTransaction() { DataSourceTransactionObject txObject = new DataSourceTransactionObject(); txObject.setSavepointAllowed(isNestedTransactionAllowed()); ConnectionHolder conHolder = (ConnectionHolder) TransactionSynchronizationManager.getResource(obtainDataSource()); txObject.setConnectionHolder(conHolder, false); return txObject; } // 检查当前事务是否active @Override protected boolean isExistingTransaction(Object transaction) { DataSourceTransactionObject txObject = (DataSourceTransactionObject) transaction; return (txObject.hasConnectionHolder() && txObject.getConnectionHolder().isTransactionActive()); } }可以看到,获取当前事务对象时,使用了TransactionSynchronizationManager#getResource方法,类图如下:
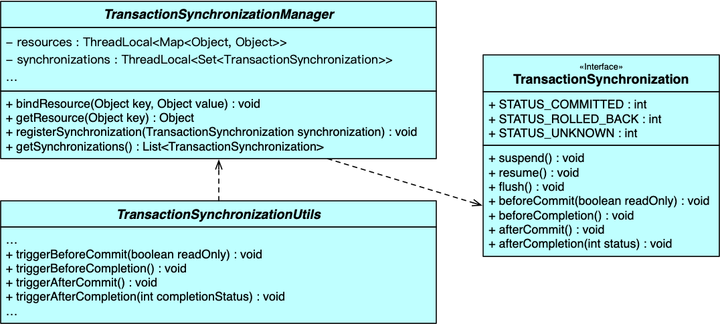
TransactionSynchronizationManager通过ThreadLocal对象在当前线程记录了resources和synchronizations属性。resources是一个HashMap,用于记录当前参与事务的事务资源,方便进行事务同步,在DataSourceTransactionManager的例子中就是以dataSource作为key,保存了数据库连接,这样在同一个线程中,不同的方法调用就可以通过dataSource获取相同的数据库连接,从而保证所有操作在一个事务中进行。synchronizations属性是一个TransactionSynchronization对象的集合,AbstractPlatformTransactionManager类中定义了事务操作各个阶段的调用流程,以事务提交为例:
public abstract class AbstractPlatformTransactionManager implements PlatformTransactionManager, Serializable { private void processCommit(DefaultTransactionStatus status) throws TransactionException { try { boolean beforeCompletionInvoked = false; try { boolean unexpectedRollback = false; prepareForCommit(status); triggerBeforeCommit(status); triggerBeforeCompletion(status); beforeCompletionInvoked = true; if (status.hasSavepoint()) { if (status.isDebug()) { logger.debug("Releasing transaction savepoint"); } unexpectedRollback = status.isGlobalRollbackOnly(); // 释放保存点信息 status.releaseHeldSavepoint(); } else if (status.isNewTransaction()) { if (status.isDebug()) { logger.debug("Initiating transaction commit"); } unexpectedRollback = status.isGlobalRollbackOnly(); /* 独立事务则提交 */ doCommit(status); } else if (isFailEarlyOnGlobalRollbackOnly()) { unexpectedRollback = status.isGlobalRollbackOnly(); } // Throw UnexpectedRollbackException if we have a global rollback-only // marker but still didn't get a corresponding exception from commit. if (unexpectedRollback) { throw new UnexpectedRollbackException( "Transaction silently rolled back because it has been marked as rollback-only"); } } catch (UnexpectedRollbackException ex) { // can only be caused by doCommit triggerAfterCompletion(status, TransactionSynchronization.STATUS_ROLLED_BACK); throw ex; } catch (TransactionException ex) { // can only be caused by doCommit if (isRollbackOnCommitFailure()) { // 提交异常则回滚 doRollbackOnCommitException(status, ex); } else { triggerAfterCompletion(status, TransactionSynchronization.STATUS_UNKNOWN); } throw ex; } catch (RuntimeException | Error ex) { if (!beforeCompletionInvoked) { triggerBeforeCompletion(status); } doRollbackOnCommitException(status, ex); throw ex; } // Trigger afterCommit callbacks, with an exception thrown there // propagated to callers but the transaction still considered as committed. try { triggerAfterCommit(status); } finally { triggerAfterCompletion(status, TransactionSynchronization.STATUS_COMMITTED); } } finally { // 清理事务信息 cleanupAfterCompletion(status); } } }我们可以看到,有很多trigger前缀的方法,这些方法用于在事务操作的各个阶段触发回调,从而可以精确控制在事务执行的不同阶段所要执行的操作,这些回调实际上都通过TransactionSynchronizationUtils来实现,它会遍历TransactionSynchronizationManager#synchronizations集合中的TransactionSynchronization对象,然后分别触发集合中各个元素对应方法的调用。例如:
TransactionSynchronizationManager.registerSynchronization(new TransactionSynchronizationAdapter() { @Override public void afterCommit() { // do something after commit } });这段代码就在当前线程的事务synchronizations属性中,添加了一个自定义同步类,如果当前存在事务,那么在事务管理器执行事务提交之后,就会触发afterCommit方法,可以通过这种方式在事务执行的不同阶段自定义一些操作。
到这里,我们已经对Spring事务的实现原理和处理流程有了一定的了解。
小结
在声明式的事务处理中,主要有以下几个处理步骤:
- 获取事务的属性:tas.getTransactionAttribute(method, targetClass)
- 加载配置中配置的TransactionManager**:determineTransactionManager(txAttr);
- 在目标方法执行前获取事务并收集事务信息:createTransactionIfNecessary(tm, txAttr, joinpointIdentification)
- 执行目标方法:invocation.proceed()
- 出现异常,尝试异常处理:completeTransactionAfterThrowing(txInfo, ex);
- 提交事务前的事务信息消除:cleanupTransactionInfo(txInfo)
- 提交事务:commitTransactionAfterReturning(txInfo)
参考: https://zhuanlan.zhihu.com/p/54067384
https://segmentfault.com/a/1190000022754620
https://blog.csdn.net/f641385712/article/details/89673753
https://www.cnblogs.com/chihirotan/p/6739748.html
