目录 react-native-doc-viewer文档预览 具体步骤如下 react-native初体验的总结 一、前提知识点 二、开发前后相关的一些配置 三、开发项目中用到的知识 四、ui库 五、项目搭建 六、根据需要安
目录
- react-native-doc-viewer文档预览
- 具体步骤如下
- react-native初体验的总结
- 一、前提知识点
- 二、开发前后相关的一些配置
- 三、开发项目中用到的知识
- 四、ui库
- 五、项目搭建
- 六、根据需要安装对应依赖
- 七、开发和调试
react-native-doc-viewer文档预览
react-native项目要求实现word,excel,pdf,mp4,png等格式附件图片的在线预览,最终选用react-native-doc-viewer实现,
具体步骤如下
1、安装react-native-doc-viewer
(1) npm install react-native-doc-viewer --save
(2) react-native link react-native-doc-viewer
2、修改源代码
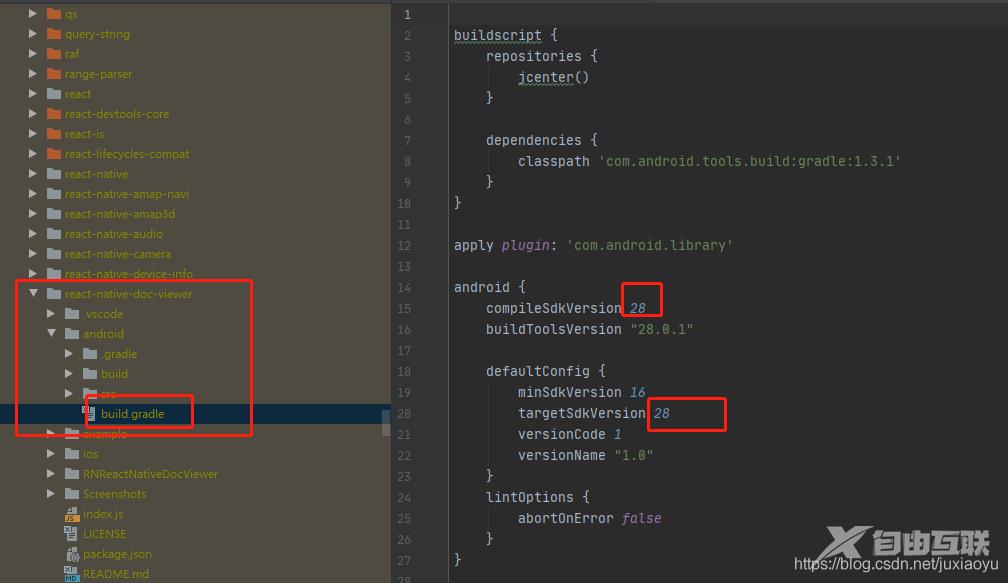
(1) 因为react-native-doc-viewer已经很久没有更新了,所以SdkVersion是23,比较低,将它修改成如下图所示:

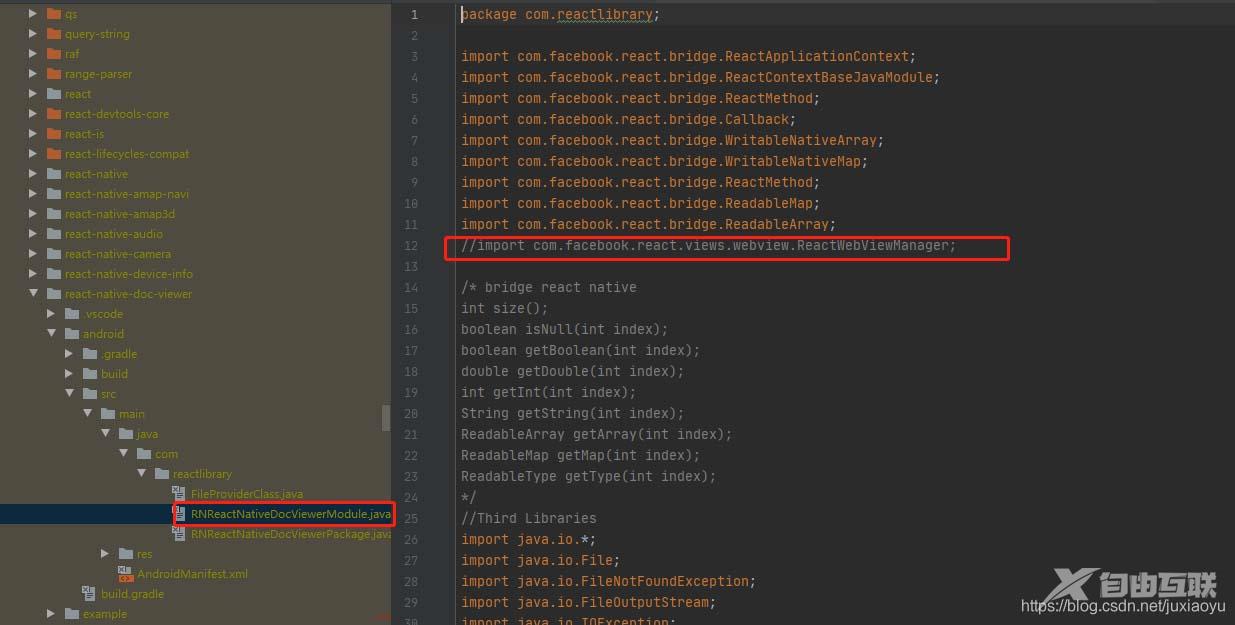
(2)找到下图中左侧的文件,将右侧红圈圈里面的代码注释掉

至此,所以安装和配置完成,下面是写代码步骤
3、代码实现
import OpenFile from 'react-native-doc-viewer';
//预览附件
viewAttachment(attachment) {
   let fileTypeArr = ['xls', 'ppt', 'doc', 'xlsx', 'pptx', 'docx', 'png', 'jpg', 'pdf', 'mp4', 'txt'];
   if (fileTypeArr.indexOf(attachment.fileSuffix) >= 0) {
      if (Platform.OS === 'ios') {
         OpenFile.openDoc([{
            url: attachment.filePath,
            fileNameOptional: attachment.fileName
         }], (error, url) => {
            if (error) {
               console.log(error);
            } else {
               console.log(url)
            }
         })
      } else {
         OpenFile.openDoc([{
            url: attachment.filePath,
            fileName: attachment.fileName,
            cache: false,
            fileType: attachment.fileSuffix
         }], (error, url) => {
            if (error) {
               console.error(error);
            } else {
               console.log(url)
            }
         });
      }
   } else {
      Toast.show('app端暂不支持此种格式附件预览,请去pc端预览');
   }
}
应用会打开手机上对应的第三方软件,做预览。
react-native初体验的总结
一、前提知识点
- RN中文网链接 https://www.react-native.cn/docs/getting-started
- html、JavaScript、css基础
- es6+等新的概念
- react、redux相关知识
- 如果需要用ts语法,还需要了解typescript相关知识点
- 数据请求,官方中有推荐的,我这里选择axios
二、开发前后相关的一些配置
react-native相关知识点可以参考官方文档进行学习,总结了几点基本的
- RN开发需要的环境(mac,windows),参考官方文档即可
- RN开发利用相关脚手架初始化项目,参考官方文档即可
- RN打包需要用的签名创建,及打包流程,参考官方文档即可
- RN开发过程中用到的模拟器(我这里用的mumu模拟器)
- RN开发过程中用到的debugger工具(推荐使用react-native-debugger)
三、开发项目中用到的知识
学习的时候,我这里主要从以下几方面进行学习的,列出的大部分是npm包名
- 设置app启动图片 react-native-splash-screen
- 页面跳转 react-navigation 起到路由的作用
- 数据存储 @react-native-async-storage/async-storage
- 嵌入web react-native-webview
- 使用相机 react-native-camera
- 扫描二维码 react-native-qrcode-scanner
- 文件上传 react-native-document-picker react-native-doc-viewer
- 图片上传 react-native-image-picker
- 轮播图 react-native-swiper
- 背景渐变 react-native-linear-gradient
- 顶部状态栏 react-native 提供的组件 StatusBar
- toast提示 react-native-root-toast,会用到 react-native-root-siblings
- 手势 react-native-gesture-handler
- 高德地图 react-native-amap3d
四、ui库
- react-native-element
- and-design-mobile-rn
- teaset
五、项目搭建
官网中提供的初始化模板
npx react-native init projectName --template react-native-template-typescript
六、根据需要安装对应依赖
建议加上npm进行依赖搜索,或者去npm官网搜索,eg: react-native-camera npm
因为我这里项目初始化的rn版本为0.63.4,所以大部分依赖都是直接link之后就可以正常使用的。
七、开发和调试
静态页面的开发其实跟web端一样,组件的合理利用就行。会涉及一些交互
1.物理返回键
const handle = ()=>{
    // 响应事件处理
}
// 订阅
BackHandler.addEventListener('hardwareBackPress', handle);
// 移除
BackHandler.removeEventListener('hardwareBackPress', handle);
2.跨页面通信
const handle = (params)=>{
    // 响应事件处理
}
// 订阅
DeviceEventEmitter.addListener('eventKey', handle);
// 移除
DeviceEventEmitter.removeListener('eventKey', handle);
// 触发
DeviceEventEmitter.emit('eventKey', params);
3. formData文件上传
图片或者文件上传的时候,需要关闭debugger模式,不然会出现异常。
以上为个人经验,希望能给大家一个参考,也希望大家多多支持易盾网络。
