目录 Vue表单切换实现效果 首先给两个链接定义 一个num Vue table切换组件 Vue表单切换实现效果 点击第一个链接 出现以下数据 点击第二个链接 ,我没有写后台所以没有数据, 可以自己写方
目录
- Vue表单切换实现效果
- 首先给两个链接定义 一个num
- Vue table切换组件
Vue表单切换实现效果
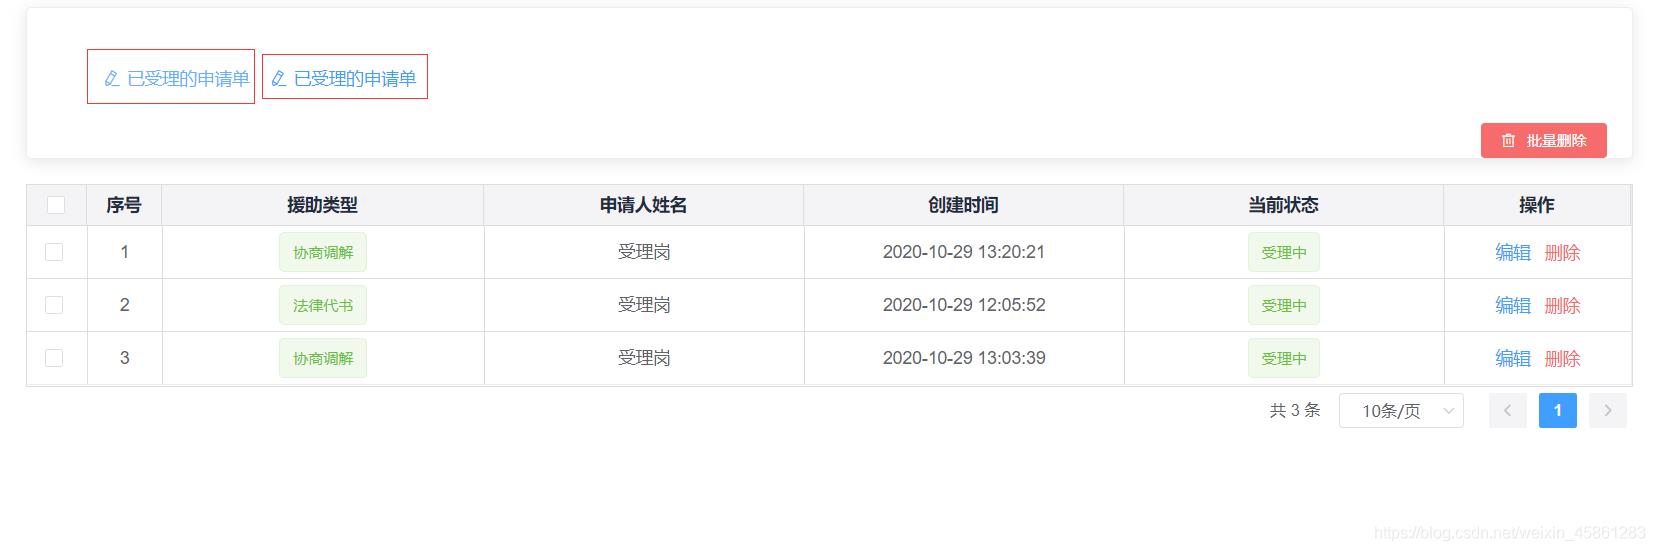
点击第一个链接 出现以下数据
点击第二个链接 ,我没有写后台所以没有数据, 可以自己写方法去获取数据复制给v-model 绑定的数组

首先给两个链接定义 一个num

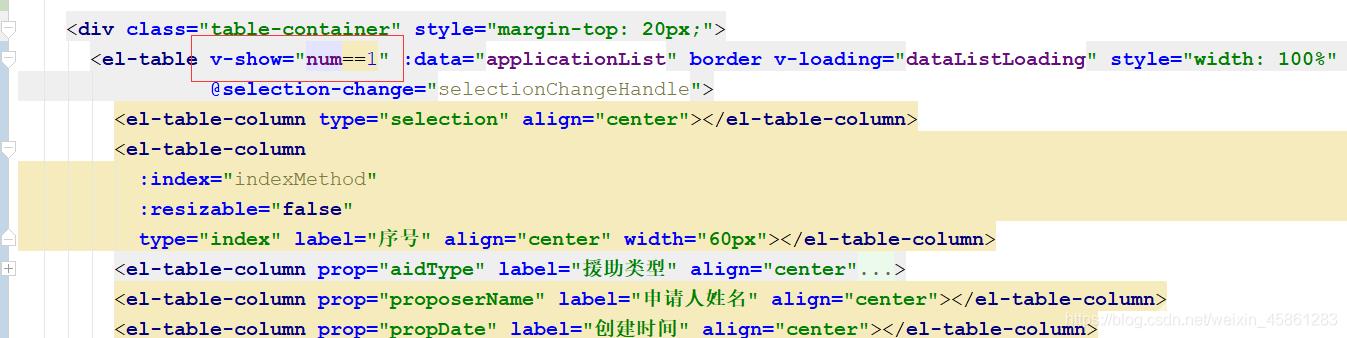
点击第一个按钮时 设置num等于1 , 这样在table列表处定义 v-show ="num==1 ",当等于1 时 显示第一个table 当等于num 等于 2时 等于第二个table 这样就能实现 table 的转换

table代码在这里插入代码片
<el-table v-show="num==1" :data="applicationList" border v-loading="dataListLoading" style="width: 100%"
@selection-change="selectionChangeHandle">
<el-table-column type="selection" align="center"></el-table-column>
<el-table-column
:index="indexMethod"
:resizable="false"
type="index" label="序号" align="center" width="60px"></el-table-column>
<el-table-column label="操作" align="center" width="150px">
<div slot-scope="scope" class="g-operation-column">
<el-link type="primary" size="mini" @click="show(scope.row)">编辑</el-link>
 
<el-link type="danger" size="mini" @click="del(scope.row)">删除</el-link>
</div>
</el-table-column>
</el-table>
Data处定义 num

num 默认值设定为1 这样默认就打开 第一个table 设置为0 就是都不打开
Vue table切换组件
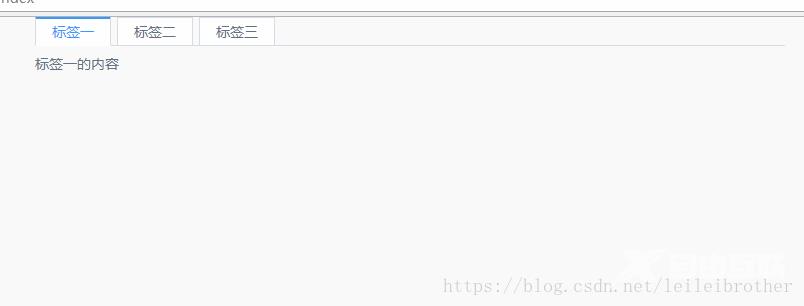
如果vue单页开发没有使用ui组件,table切换的功能还是比较烦人的。闲暇时间看书写了一个table切换的组件,和大家分享一下,效果图如下:
主要有两个组件页面,第一个是 tabs.vue,这个页面上会循环出table标签和每个标签对应的内容,大部分的事件处理也在这个页面上。代码如下:
<template>
    <div class="tabs">
        <div class="tabs-bar">
            <div v-for="(item, index) in navList" @click="handleChange(index)" :class="tabCls(item)">
                {{item.label}}
            </div>
        </div>
        <div class="tabs-content">
            <slot></slot>
        </div>
    </div>
</template>
<script>
    export default {
        name: "tabs",
        props: {
            value: {
                type: [String, Number]
            }
        },
        data(){
            return{
                currentValue: this.value,
                navList: []
            }
        },
        methods: {
            tabCls: function (item) {
                return [
                    'tabs-tab',
                    {
                        'tabs-tab-active': item.name === this.currentValue
                    }
                ]
            },
            getTabs: function () {
                return this.$children.filter(function (item) {
                    return item.$options.name === 'pane';
                })
            },
            updateNav: function () {
                this.navList = [];
                let _this = this;
                this.getTabs().forEach(function (pane, index) {
                    _this.navList.push({
                        label: pane.label,
                        name: pane.name || index
                    });
                    if(!pane.name){
                        pane.name = index;
                    }
                    if(index === 0){
                        if(!_this.currentValue){
                            _this.currentValue = pane.name || index;
                        }
                    }
                });
                this.updateStatus();
            },
            updateStatus: function () {
                let tabs = this.getTabs();
                let _this = this;
                tabs.forEach(function (tab) {
                    return tab.show = tab.name === _this.currentValue;
                })
            },
            handleChange: function (index) {
                let nav = this.navList[index];
                let name = nav.name;
                this.currentValue = name;
                this.$emit('input', name);
                this.$emit('on-click', name);
            }
        },
        watch: {
            value: function (val) {
                this.currentValue = val;
            },
            currentValue: function () {
                this.updateStatus();
            }
        }
    }
</script>

<style scoped>

</style>
第二个组件页面是 pane.vue ,这个页面主要是渲染和控制标签所对应的内容。代码如下:
<template>
    <div class="pane" v-show="show">
        <slot></slot>
    </div>
</template>
<script>
    export default {
        name: "pane",
        props:{
            name:{
                type: String
            },
            label:{
                type: String,
                default: ''
            }
        },
        data(){
            return {
                show: true
            }
        },
        mounted(){
            this.updateNav();
        },
        methods: {
            updateNav: function () {
                this.$parent.updateNav();
            }
        },
        watch: {
            label: function () {
                this.updateNav();
            }
        }
    }
</script>

<style scoped>

</style>
使用这两个页面就很简单了,在页面上引入这两个组件,如下:
<template>
    <div>
        <tabs v-model="activeKey">
            <pane label="标签一" name="1">
                标签一的内容
            </pane>
            <pane label="标签二" name="2">
                标签二的内容
            </pane>
            <pane label="标签三" name="3">
                标签三的内容
            </pane>
        </tabs>
    </div>
</template>
<script>
    import Tabs from "../components/table/tabs";
    import Pane from "../components/table/pane";
    export default {
        name: "tableIndex",
        components: {Tabs,Pane},
        data(){
            return {
                activeKey: '1'
            }
        }
    }
</script>
<style>
    .tabs{
        font-size: 14px;
        color: #657180;
    }
    .tabs-bar:after{
        content:'';
        display: block;
        width: 100%;
        height:1px;
        background: #d7dde4;
        margin-top:-1px;
    }
    .tabs-tab{
        display: inline-block;
        padding: 4px 16px;
        margin-right: 6px;
        background: #fff;
        border: 1px solid #d7dde4;
        cursor: pointer;
        position: relative;
    }
    .tabs-tab-active{
        color: #3399ff;
        border-top: 1px solid #3399ff;
        border-bottom: 1px solid #fff;
    }
    .tabs-tab-active:before{
        content: '';
        display: block;
        height: 1px;
        background: #3399ff;
        position: absolute;
        top: 0;
        left: 0;
        right: 0;
    }
    .tabs-content{
        padding: 8px 0;
    }
</style>
页面上<tabs>标签定义了一个初始值“activeKey”,这是页面初始时显示的内容,通常都是“1”,<pane>标签有个两个属性,一个是label,一个是name,主要是控制table标签主题的。每个table标签对应的内容直接写在<pane></pane>标签里面就好了。组件虽然复杂了点,但是复用起来还是可以的。
页面的样式我是写在全局里面的(最后一个引入组件的页面),没有写在组件页面里面,使用的时候请多多注意
以上为个人经验,希望能给大家一个参考,也希望大家多多支持易盾网络。