本文实例为大家分享了vue+elementUI实现分页效果的具体代码,供大家参考,具体内容如下 页面中渲染的数据不是所有数据,是需要展示的数据,即当前页的数据,默认第一页的数据,这
本文实例为大家分享了vue+elementUI实现分页效果的具体代码,供大家参考,具体内容如下
页面中渲染的数据不是所有数据,是需要展示的数据,即当前页的数据,默认第一页的数据,这里为showDate
template中代码段(渲染数据)
<div style="height:76vh;margin-top:1%">
            <el-table :data="showData"
                      style="width: 100%"
                      :header-cell-style="headClass">
                <el-table-column type="index"
                                 label="编号"
                                 width="80"
                                 header-align="center"
                                 align="center"></el-table-column>
                <el-table-column prop="name"
                                 label="企业名称"
                                 width="180"
                                 header-align="center"
                                 align="center"></el-table-column>
                <el-table-column prop="date"
                                 label="注册时间"
                                 width="150"
                                 header-align="center"
                                 align="center"></el-table-column>
                <el-table-column prop="publishNumber"
                                 label="发布岗位数量"
                                 width="130"
                                 header-align="center"
                                 align="center"></el-table-column>
                <el-table-column prop="checkTimes"
                                 label="查看简历次数"
                                 width="130"
                                 header-align="center"
                                 align="center"></el-table-column>
                <el-table-column prop="companyStatus"
                                 label="岗位发布权限"
                                 width="130"
                                 header-align="center"
                                 align="center">
                    <template slot-scope="scope">
                        <span v-if="scope.row.companyStatus == 1">否</span>
                        <span v-else-if="scope.row.companyStatus == 0">是</span>
                    </template>
                </el-table-column>
                <el-table-column prop="companyStatus"
                                 label="查看人才权限"
                                 width="130"
                                 header-align="center"
                                 align="center">
                    <template slot-scope="scope">
                        <span v-if="scope.row.companyStatus == 1">否</span>
                        <span v-else-if="scope.row.companyStatus == 0">是</span>
                    </template>
                </el-table-column>

                <el-table-column prop="RecruitmentTimes"
                                 label="现场招聘次数"
                                 width="130"
                                 header-align="center"
                                 align="center"></el-table-column>

                <el-table-column prop="windowPublishTimes"
                                 label="橱窗发布次数"
                                 width="130"
                                 header-align="center"
                                 align="center"></el-table-column>

                <el-table-column prop="companyStatus"
                                 label="企业状态"
                                 width="130"
                                 header-align="center"
                                 align="center">
                    <template slot-scope="scope">
                        <span v-if="scope.row.companyStatus == 1"
                              style="color: #1ec6df">启用</span>
                        <span v-else-if="scope.row.companyStatus == 0"
                              style="color: #df721e">禁用</span>
                    </template>
                </el-table-column>

                <el-table-column fixed="right"
                                 label="操作"
                                 width="280">

                    <template>
                        <el-link :underline="false"
                                 href="#" rel="external nofollow"  rel="external nofollow"
                                 class="alink">岗位列表</el-link>
                        <el-link :underline="false"
                                 href="#" rel="external nofollow"  rel="external nofollow"
                                 class="alink">开通记录</el-link>
                    </template>
                </el-table-column>
      </el-table>
</div>
template中代码段(分页部分,与上一段代码同层级)
<div class="block">
            <el-pagination :page-size="pagesize"
                           :current-page="currentPage"
                           layout="prev, pager, next"
                           :total="companyData.length"
                           @current-change="handleCurrentChange"
                           @prev-click="upChange"
                           @next-click="nextChange"
                           style="text-align: center;">
        </el-pagination>
</div>
下面是逻辑实现
1.定义数组
2.初始化赋值第一页的数据
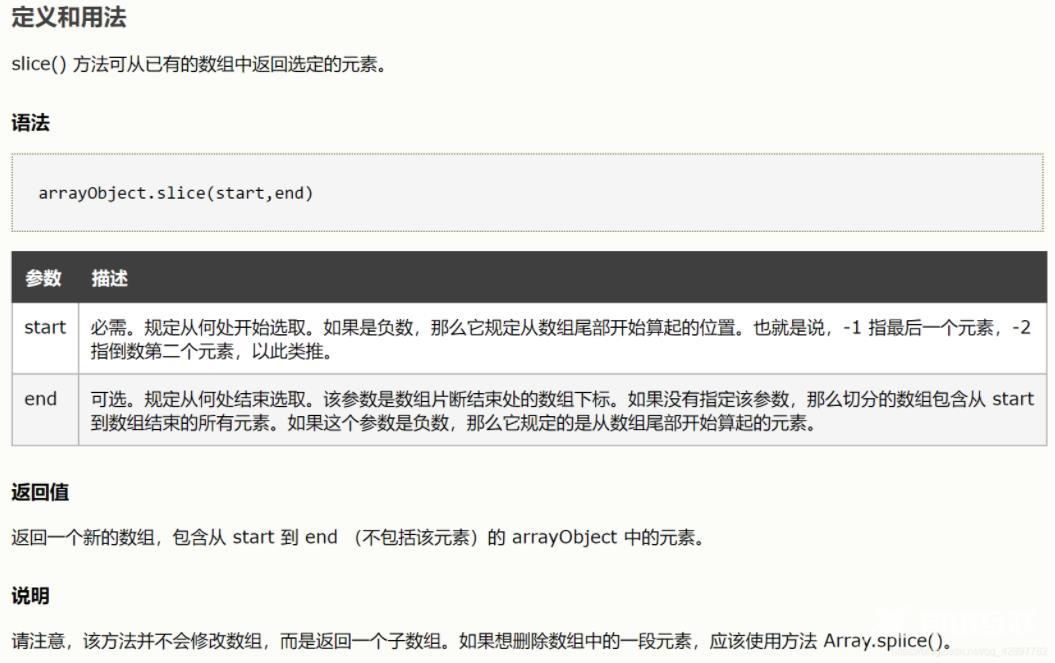
slice()
<script>
export default {
    //页面第一次加载 显示的数据
    created() {
        this.showData = this.companyData.slice(0, this.pagesize);
        console.log("显示的数据");
        console.log(this.showData);
    },
    data() {
        return {
            // 企业名称
            companyName: "",
            showData: [], //显示的数据
            pagesize: 3, //一页的数据条数
            currentPage: 1, //当前页是从哪页开始
            companyData: [
                {
                    name: "企业名称1",
                    date: "2016-05-04",
                    publishNumber: 12,
                    checkTimes: 10,
                    RecruitmentTimes: 110,
                    windowPublishTimes: 120,
                    companyStatus: 0,
                },
                {
                    name: "企业名称2",
                    date: "2016-05-04",
                    publishNumber: 12,
                    checkTimes: 10,
                    RecruitmentTimes: 110,
                    windowPublishTimes: 120,
                    companyStatus: 0,
                },
                {
                    name: "企业名称3",
                    date: "2016-05-04",
                    publishNumber: 12,
                    checkTimes: 10,
                    RecruitmentTimes: 110,
                    windowPublishTimes: 120,
                    companyStatus: 1,
                },
                {
                    name: "企业名称4",
                    date: "2016-05-04",
                    publishNumber: 12,
                    checkTimes: 10,
                    RecruitmentTimes: 110,
                    windowPublishTimes: 120,
                    companyStatus: 1,
                },
                {
                    name: "企业名称5",
                    date: "2016-05-04",
                    publishNumber: 12,
                    checkTimes: 10,
                    RecruitmentTimes: 110,
                    windowPublishTimes: 120,
                    companyStatus: 1,
                },
                {
                    name: "企业名称6",
                    date: "2016-05-04",
                    publishNumber: 12,
                    checkTimes: 10,
                    RecruitmentTimes: 110,
                    windowPublishTimes: 120,
                    companyStatus: 1,
                },
                {
                    name: "企业名称7",
                    date: "2016-05-04",
                    publishNumber: 12,
                    checkTimes: 10,
                    RecruitmentTimes: 110,
                    windowPublishTimes: 120,
                    companyStatus: 1,
                },
            ],
        };
    },
    methods: {
        //选择页
        handleCurrentChange(val) {
            this.currentPage = val; //动态改变
            this.showData = this.companyData.slice(
                (this.currentPage - 1) * this.pagesize,
                this.currentPage * this.pagesize
            );
        },
        //上一页
        upChange(val) {
            console.log(val);
            this.currentPage -= 1; //动态改变
            this.showData = this.companyData.slice(
                (this.currentPage - 1) * this.pagesize,
                this.currentPage * this.pagesize
            );
        },
        //下一页
        nextChange(val) {
            this.currentPage += 1; //动态改变
            this.showData = this.companyData.slice(
                (this.currentPage - 1) * this.pagesize,
                this.currentPage * this.pagesize
            );
        },

    },
};
</script>
以上就是本文的全部内容,希望对大家的学习有所帮助,也希望大家多多支持易盾网络。