在uni-ui中找不到对应的工具 后面想想也是 移动端取色干什么? 没办法 也挂不住特殊需求 因为去应用市场下载 这总东西 又不是很有必要 那么 下面这个组件或许能解决您的烦恼 templ
在uni-ui中找不到对应的工具
后面想想也是 移动端取色干什么?
没办法 也挂不住特殊需求
因为去应用市场下载 这总东西 又不是很有必要
那么 下面这个组件或许能解决您的烦恼
<template>
	<view class="content">
		<view class="dialog">
			<view id="colorBg" class="colorBg" @touchstart="startTouch" @touchmove="moveIng"
				@touchend="endTouch">
				<view class="roundBuff" :catchtouchmove="true" @c.stop="()=>{}" :style="'transform:rotate(' +degrees +'deg)'"></view>
				<view class="colorPan" :style="'color:'+getColorByDeg(this.degrees)">拖转轮播取色</view>
			</view>
			<view class="flex" style="margin-top: 100rpx;">
				<button class="lee_btn" @click.stop = "close" type="default">取消</button>
				<button class="lee_btn" @click.stop = "readColor" type="default">确认</button>
			</view>
		</view>
	</view>
</template>

<script>
	export default {
		data() {
			return {
				pointerShow: true,
				colorPanWidth: 20,
				colorPanRadius: 0,
				pointerBox: {},
				degrees: 0
			}
		},
		mounted() {
			uni.getSystemInfo({
				success: (res) => {
					uni.createSelectorQuery().select('#colorBg').boundingClientRect((rect) => {
						this.pointerBox = rect
					}).exec()
					this.colorPanRadius = res.screenWidth * 0.4
				}
			})
		},
		methods: {
			close(){
                this.$emit('close');
			},
			readColor(){
				let colro = this.getColorByDeg(this.degrees);
				this.$emit('change',colro);
			},
            rbg2Hex(r, g, b) {
                return '#' + ((1 << 24) + (r << 16) + (g << 8) + b).toString(16).slice(1);
            },
            calculationScheme(deg) {
              deg = 360- deg + 120
		      const r = Math.round(Math.sin((deg * 2 * Math.PI) / 360) * 255)
		      const g = Math.round(Math.sin(((deg + 120) * 2 * Math.PI) / 360) * 255)
		      const b = Math.round(Math.sin(((deg + 240) * 2 * Math.PI) / 360) * 255)
              return this.colorRgbToHex(`rgb(${r},${g},${b})`);
            },
			startTouch(e) {
				const {
					pageX,
					pageY
				} = e.touches[0]
				this.rotatePointer(pageX, pageY)
			},
			endTouch(e) {
				const {
					pageX,
					pageY
				} = e.changedTouches[0]
				this.rotatePointer(pageX, pageY)
			},
			moveIng(e) {
				const {
					pageX,
					pageY
				} = e.touches[0]
				this.rotatePointer(pageX, pageY)
			},
			rotatePointer(pageX = 0, pageY = 0) {
				const {
					pointerBox,
					colorPanWidth
				} = this
				const mouseX = pageX - colorPanWidth
				const mouseY = pageY - colorPanWidth
				var centerY = pointerBox.top + (pointerBox.height / 2) - 0,
					centerX = pointerBox.left + (pointerBox.height / 2) - 0,
					radians = Math.atan2(mouseX - centerX, mouseY - centerY)
				this.degrees = (radians * (180 / Math.PI) * -1) + 180;
			},
		     getColorByDeg(deg) {
		      deg = 360- deg + 120
		      const r = Math.round(Math.sin((deg * 2 * Math.PI) / 360) * 255)
		      const g = Math.round(Math.sin(((deg + 120) * 2 * Math.PI) / 360) * 255)
		      const b = Math.round(Math.sin(((deg + 240) * 2 * Math.PI) / 360) * 255)
		      return `rgb(${r},${g},${b})`
		    },
			colorRgbToHex(rgbStr) {
				const reg = /^#([0-9a-fA-f]{3}|[0-9a-fA-f]{6}|[0-9a-fA-f]{8}|[0-9a-fA-f]{6}[0-9]{2})$/;
				if (reg.test(rgbStr)) {
					return rgbStr
				} else {
					const rgbArray = rgbStr.replace(/(?:\(|\)|rgba|rgb|RGBA|RGB)*/g, "").split(",");
					let strHex = "#";
					for (let i = 0; i < rgbArray.length; i++) {
					if (i !== 3) {
						if (rgbArray[i] == "0") {
						    strHex += "00"
						} else {
						    let newItem =Number(rgbArray[i]).toString(16)
						if (newItem.length < 2){
							newItem = "0" + newItem
						}
						    strHex += newItem
						}
							} else {
						strHex += rgbArray[i] == "0" ? "" : Number(rgbArray[i]) * 100
					}
					}
					return strHex;
				}
			}
		}
	}
</script>

<style>


	.dialog {
		display: block;
		border-radius: 30rpx;
		background-color: #303030;
		margin: 20rpx;
		padding: 30rpx;
	}

	.flex {
		display: flex;
		justify-content: space-between;
	}

	.colorBg {
		width: 80vw;
		height: 80vw;
		margin: 5vw;
		background: conic-gradient(red,
				yellow,
				lime,
				aqua,
				blue,
				fuchsia,
				red);
		border-radius: 50%;
		position: relative;
		display: flex;
		justify-content: center;
		align-items: center;
	}

	.roundBuff {
		width: 55vw;
		height: 55vw;
		-webkit-transform-origin: center 50%;
		transform-origin: center 50%;
		background: #303030;
		border-radius: 50%;
	}
	.roundBuff::before {
      content: "";
      width: 15px;
      height: 15px;
	  background: #303030;
      border: solid #303030;
      border-width: 10px 10px 0 0;
      transform: translate(-50%, -50%) rotate(-45deg);
      position: absolute;
      left: 50%;
      top: 2%;
}

	.lee_btn {
		background: #00000000;
		color: #FFFFFF;
		width: 36%;
		height: 80rpx;
		line-height: 70rpx;
		text-align: center;
		justify-content: center;
		font-size: 30rpx;
		border-radius: 50rpx;
		border: 5rpx #FFFFFF solid;
		font-weight: bold;
		padding: 1px 20px;
	}

	.colorPan {
		position: absolute;
		color: #FFFFFF;
	}
</style>
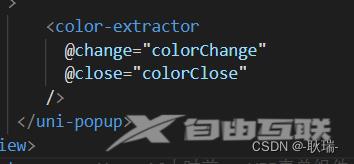
直接将整个组件复制过去 接口使用
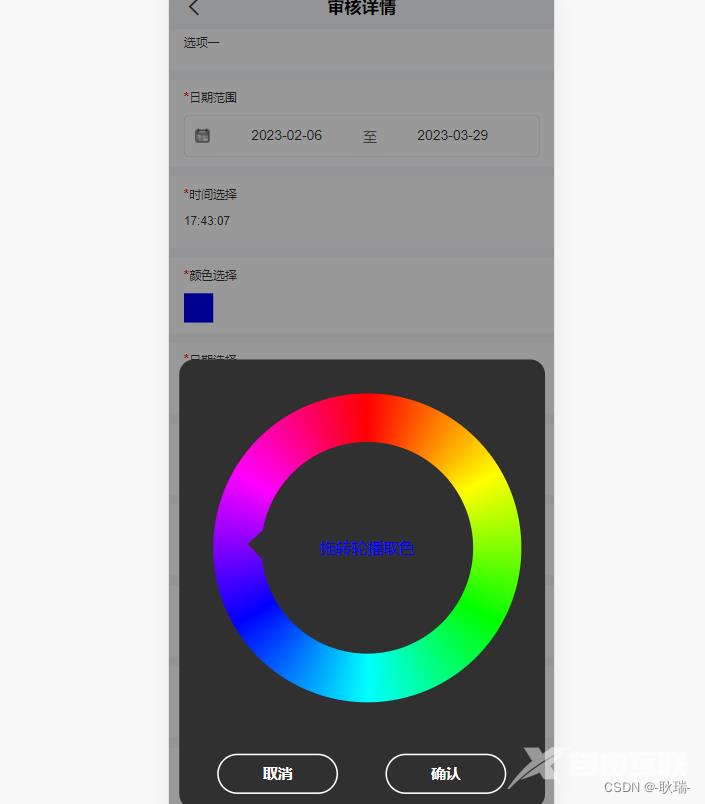
组件有两个方法
- change 当你点击确定时触发 返回 RGB 色码
- close 当你点击取消时触发
总结
到此这篇关于uni-app低成本封装一个取色器组件的文章就介绍到这了,更多相关uni-app封装取色器组件内容请搜索易盾网络以前的文章或继续浏览下面的相关文章希望大家以后多多支持易盾网络!