Apache应用配置日志
拓扑图:
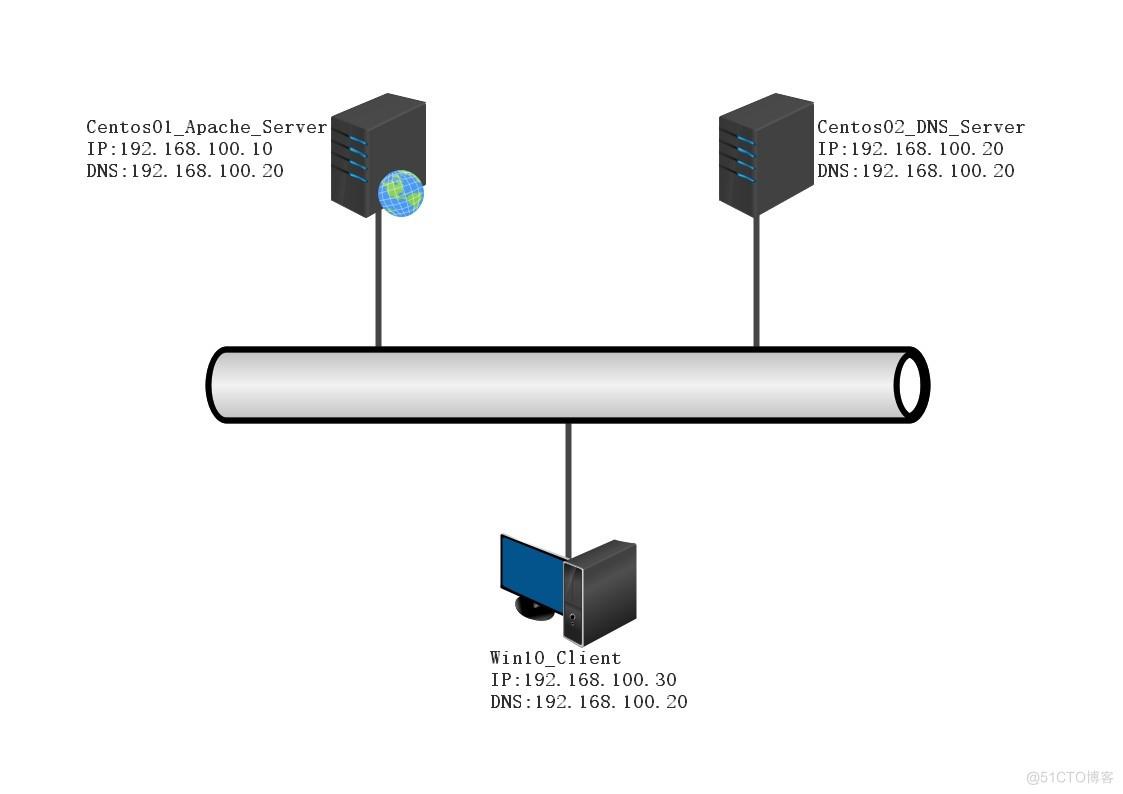
1)在Cenost01上配置apache配置网站,修改apache网站根目录设置/www/设置主页
2)在Centos02上安装DNS使用域名www.stz.com访问日志
3)在Centos01上安装中AWStats监控apache访问
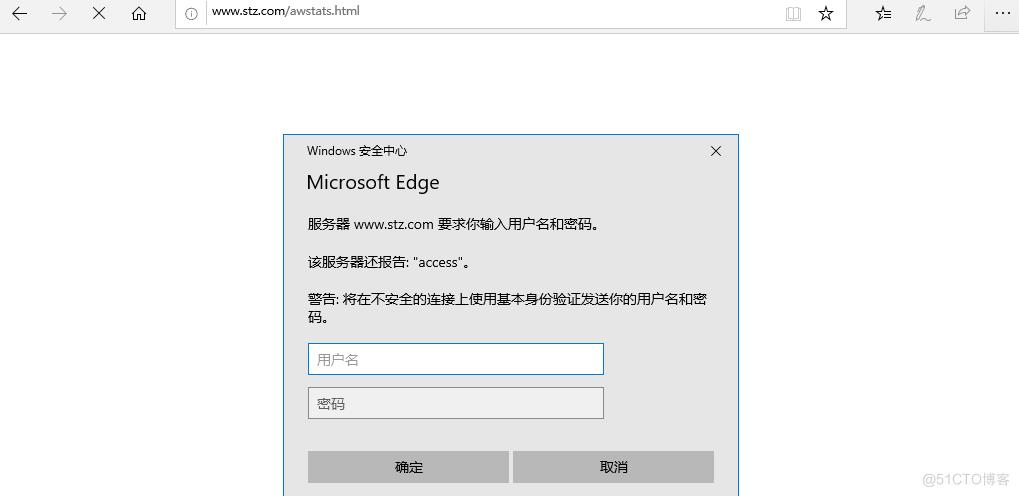
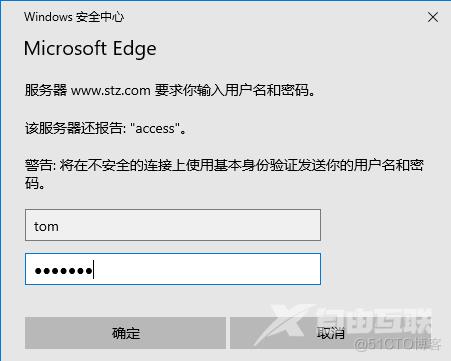
4)在Centos01配置访问AWstats监控页面使用基本验证访问未经授权用户查看监控后台
5)在Centos01上配置安装cronolog日志分析工具及安装每天生成日志
1、在Centos01上配置安装apache
1)挂载光盘
[
root@centos01 ~]# mount /dev/cdrom /mnt/
mount: 在 /dev/sr0 上找不到媒体
2)解压安装包到/usr/src目录下
[root@centos01 ~]# tar zxf /mnt/httpd-2.2.17.tar.gz -C /usr/src/
3)切换目录然后配置httpd
[root@centos01 httpd-2.2.17]# ./configure
--prefix=/usr/local/httpd --enable-so --enable-rewrite --enable-charset-lite
--enable-cgi
4)编译安装httpd
[root@centos01 httpd-2.2.17]# make && make install
5)查看安装上httpd没有
[root@centos01 httpd-2.2.17]# ls /usr/local/
bin  games  include  lib64   sbin   srcetc httpd  lib      libexec share
6)生成服务控制文件
[root@centos01 ~]# cp /usr/local/httpd/bin/apachectl /etc/init.d/httpd
7)这个文件默认没有权限,需要添加执行权限
[root@centos01 ~]# chmod +x /etc/init.d/httpd
8)优化一下
[root@centos01 ~]# ln -s /usr/local/httpd/bin/* /usr/local/bin
9)编辑一下httpd文件
[root@centos01 ~]# vim /etc/init.d/httpd
#!/bin/sh
#chkconfig:35 80 21
#description:Apache Server
10)检查一下修改是否报错
[root@centos01 ~]# chkconfig --add httpd
11)设置apache服务开机自动启动
[root@centos01 ~]# chkconfig --level 35 httpd on
12)检测一下是否出现问题(后面有一个ok’就是没问题)
[root@centos01 ~]# httpd -t
httpd: Could not reliably determine the
server's fully qualified domain name, using fe80::20c:29ff:fecd:d0a for
ServerName
Syntax OK
13)备份apache主配置文件,防止配置出现错误
[root@centos01 ~]# cp /usr/local/httpd/conf/httpd.conf /usr/local/httpd/conf/httpd.conf.bak
14)配置apache主配置文件开启保持连接功能
[root@centos01 ~]# vim
/usr/local/httpd/conf/httpd.conf
(配置内容,前面数字是行号)
398 Include conf/extra/httpd-default.conf
15)查看是否错误
[root@centos01 ~]# httpd -t
httpd: Could not reliably determine the
server's fully qualified domain name, using fe80::20c:29ff:fecd:d0a for
ServerName
Syntax OK
16)修改保持配置文件功能
[root@centos01 ~]# vim
/usr/local/httpd/conf/extra/httpd-default.conf
Timeout 3                     (超时时间设置为3秒)
KeepAlive On                  (开启保持连接功能)
KeepAliveTimeout 5            (一次连接多次请求间隔时间)
MaxKeepAliveRequests 1000     (保持连接最大并发数)
17)重新启动httpd服务
[root@centos01 ~]# systemctl restart httpd
18)设置www网站和配置
[root@centos01 ~]# mkdir /www
[root@centos01 ~]# echo "www.stz.com" > /www/index.html
[root@centos01 ~]# vim /usr/local/httpd/conf/httpd.conf
105 DocumentRoot "/www"
133 <Directory "/www">
134     Options Indexes FollowSymLinks
135     AllowOverride None
136     Order allow,deny
137     Allow from all
138 </Directory>
19)配置完成检查是否错误
[root@centos01 ~]# httpd -t
httpd: Could not reliably determine the
server's fully qualified domain name, using fe80::20c:29ff:fecd:d0a for
ServerName
Syntax OK
20)重新启动httpd
[root@centos01 ~]# systemctl restart httpd
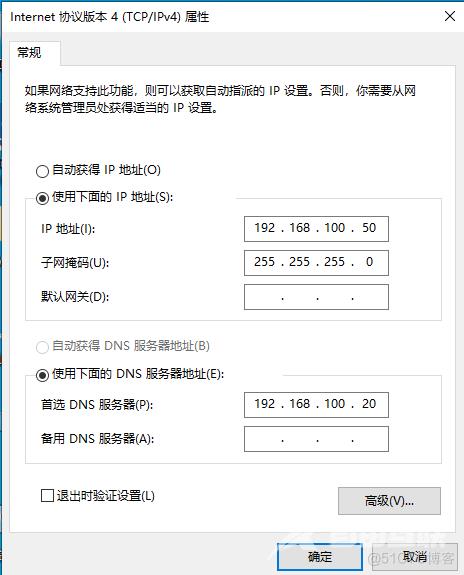
21)在win10客户端上配置ip和DNS
22)访问ip查看内容

2、在Centso02上安装DNS查看网址日志
1)在Centos01和02上配置DNS
[root@centos01 ~]# vim /etc/sysconfig/network-scripts/ifcfg-ens32
TYPE=Ethernet
BOOTPROTO=static
NAME=ens32
DEVICE=ens32
ONBOOT=yes
IPADDR=192.168.100.10
NETMASK=255.255.255.0
DNS1=192.168.100.20
[root@centos02 ~]# vim /etc/sysconfig/network-scripts/ifcfg-ens32
TYPE=Ethernet
BOOTPROTO=static
NAME=ens32
DEVICE=ens32
ONBOOT=yes
IPADDR=192.168.100.20
NETMASK=255.255.255.0
DNS1=192.168.100.20
2)挂载光盘安装依赖
[root@centos02 ~]# mount /dev/cdrom /mnt/
mount: /dev/sr0 写保护,将以只读方式挂载
[root@centos02 ~]# rpm -ivh
/mnt/Packages/bind-9.9.4-50.el7.x86_64.rpm
[root@centos02 ~]# rpm -ivh
/mnt/Packages/bind-chroot-9.9.4-50.el7.x86_64.rpm
3)清楚named文件然后配置
[root@centos02 ~]# echo "" > /etc/named.conf
[root@centos02 ~]# vim /etc/named.conf
options {

listen-on port 53 { any; };

directory "/var/named/";
};
zone "stz.com" IN {

type master;

file "/var/named/stz.com.zone";
};
4)查看一下有没有出错
[root@centos02 ~]# named-checkconf /etc/named.conf
5)配置文件
[root@centos02 ~]# vim /var/named/stz.com.zone
$TTL            86400
@               SOA             stz.com.      root.stz.com. (
                2023010215
                1H
                15M
                1W
                1D
)
@               NS              centos02.stz.com.
centos02        A               192.168.100.20
www             A               192.168.100.10
6)检查配置是否正确
[root@centos02 ~]# named-checkzone stz.com /var/named/stz.com.zone
zone benet.com/IN: loaded serial 2023010215
OK
7)启动named监听一下看启动没有启动
[root@centos02 ~]# systemctl start named
[root@centos02 ~]# systemctl enable named
[root@centos02 ~]# netstat -anptu | grep
named
tcp
0      0 192.168.100.20:53       0.0.0.0:*               LISTEN      40540/named
tcp
0      0 127.0.0.1:53            0.0.0.0:*               LISTEN      40540/named
tcp
0      0 127.0.0.1:953           0.0.0.0:*               LISTEN      40540/named
tcp6
0      0 ::1:953                 :::*                    LISTEN
40540/named
udp
0      0 192.168.122.1:53        0.0.0.0:*                           40540/named
udp
0      0 192.168.100.20:53       0.0.0.0:*                           40540/named
udp
0      0 127.0.0.1:53            0.0.0.0:*                           40540/named
8)查看是否能解析出
[root@centos02 ~]# nslookup www.stz.com
Server:           192.168.100.20
Address: 192.168.100.20#53

Name:    www.stz.com
Address: 192.168.100.10
9)客户端使用域名访问

3、apahce配置日志切割
1)首先先查看日志保存在哪里
[root@centos01 ~]# ls /usr/local/httpd/logs/
access_log
error_log  httpd.pid
2)创建存储归档日志目录
[root@centos01 ~]# mkdir /apache_log
3)修改apahce主配置文件配置为每天切割一次成功和失败日志
[root@centos01 ~]# which rotatelogs /usr/local/bin/rotatelogs
[root@centos01 ~]# vim /usr/local/httpd/conf/httpd.conf
166 ErrorLog "| /usr/local/bin/rotatelogs -l /apache_log/www.stz.com.error_%Y%m%d.log 86400"
196    CustomLog "| /usr/local/bin/rotatelogs -l /apache_log/www.stz.com-access_%Y%m%d.log 86400" common
4)检查配置是否出错
[root@centos01 ~]# httpd -t
httpd: Could not reliably determine the
server's fully qualified domain name, using fe80::20c:29ff:fecd:d0a for
ServerName
Syntax OK
5)重新启动apahce服务(如果第一次报错,多试次试试)
[root@centos01 ~]# systemctl restart httpd
[root@centos01 ~]# netstat -anptu | grep httpd
tcp6
0      0 :::80                   :::*                    LISTEN      93350/httpd
6)修改一下时间
[root@centos01 ~]# date -s 02/02/2023
2023年 02月 02日 星期四
7)查看一下日志
[root@centos01 ~]# ls /apache_log/
www.stz.com.error_20230203.log
8)删除日志
[root@centos01 ~]# rm -rf /apache_log/*
[root@centos01 ~]# ls /apache_log/
9)在重新启动一下
[root@centos01 ~]# systemctl restart httpd
10)查看日志
[root@centos01 ~]# date -s 02/04/2023
2023年 02月 04日 星期六
[root@centos01 ~]# ls /apache_log/
www.stz.com.error_20230202.log
11)用客户端访问然后查看日志

[root@centos01 ~]# ls /apache_log/
www.stz.com-access_20230204.log  www.stz.com.error_20230202.log
12)安装日志切割软件
[root@centos01 ~]# tar zxf /mnt/cronolog-1.6.2.tar.gz -C /usr/src/
[root@centos01 ~]# cd /usr/src/cronolog-1.6.2/
[root@centos01 cronolog-1.6.2]# ./configure && make && make install
13)修改apache主配置文件
[root@centos01 ~]# vim /usr/local/httpd/conf/httpd.conf
ErrorLog "| /usr/local/sbin/cronolog -l /apache_log/www.stz.com.error_%Y%m%d.log 86400"
CustomLog "| /usr/local/sbin/cronolog -l /apache_log/www.stz.com-access_%Y%m%d.log 86400" common
14)检查配置文件
[root@centos01 ~]# httpd -t
httpd: Could not reliably determine the
server's fully qualified domain name, using fe80::20c:29ff:fecd:d0a for
ServerName
Syntax OK
15)重新启动httpd
[root@centos01 ~]# systemctl restart httpd
16)查看日志
[root@centos01 ~]# ls /apache_log/
www.stz.com.error_%Y%m%d.log
4、AWStats日志分析
1)安装软件
[root@centos01 ~]# tar zxf /mnt/awstats-7.3.tar.gz -C /usr/src/
[root@centos01 ~]# mv /usr/src/awstats-7.3/ /usr/local/awstats
2)配置工具添加执行权限
[root@centos01 ~]# cd /usr/local/awstats/tools/
[root@centos01 tools]# chmod +x ./*
[root@centos01 tools]# vim /usr/local/httpd/conf/httpd.conf
ErrorLog "logs/error_log"
CustomLog "logs/access_log" common
3)配置awstats
[root@centos01 tools]#
./awstats_configure.pl
> /usr/local/httpd/conf/httpd.conf
>www.stz.com)
(后面点任意键)
4)修改Awstats配置文件
[root@centos01 tools]# vim /etc/awstats/awstats.www.stz.com.conf
50  LogFile="/usr/local/httpd/logs"              (指定apache日志位置)
203 DirData="/var/lib/awstats"                   (数据存储的位置)
5)创建awstats数据存储目录
[root@centos01 tools]# mkdir /var/lib/awstats
5、配置AWStats采集日志
1)更新apache日志
[root@centos01 tools]#./awstats_updateall.pl now
[root@centos01 tools]# cd
2)设置计划任务每间隔两分钟更新一次
[root@centos01 ~]# crontab -e
*/2    *       *       *      *       /usr/local/awstats/tools/awstats_updateall.pl
3)客户端查看
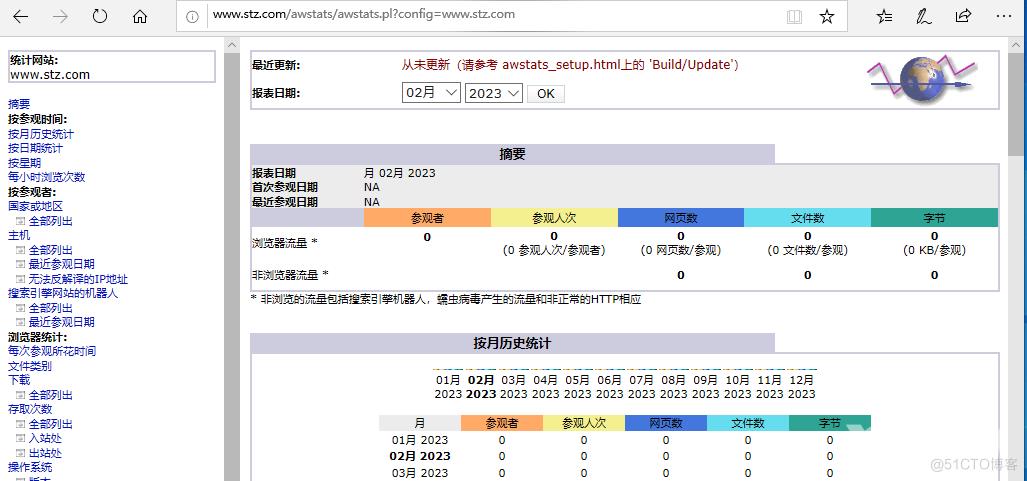
4)配置页面跳转
[root@centos01 tools]# vim
/www/awstats.html
<html>
<head>
<meta http-equiv=refresh content="0; url=http://www.stz.com/awstats/awstats.pl?config=www.stz.com">
</head>
<body></body>
</html>
5)客户端展示

6、配置AWStats身份验证
1)安装软件
[root@centos01 ~]# rpm -ivh /mnt/Packages/httpd-tools-2.4.6-67.el7.centos.x86_64.rpm
2)生成验证数据库
[root@centos01 ~]# htpasswd -c /usr/local/httpd/password bob
New password:
Re-type new password:
Adding password for user bob
[root@centos01 ~]# htpasswd /usr/local/httpd/password tom
New password:
Re-type new password:
Adding password for user tom
3)修改apache主配置文件加载身份验证
[root@centos01 ~]# vim
/usr/local/httpd/conf/httpd.conf
<Directory "/usr/local/awstats/wwwroot">
   Options None
   AllowOverride None
   Order allow,deny
   Allow from all
   AuthName "access"
   AuthType Basic
   AuthUserFile /usr/local/httpd/password
   Require valid-user
</Directory>
4)查看配置是否错误
[root@centos01 ~]# httpd -t
httpd: Could not reliably determine the
server's fully qualified domain name, using fe80::20c:29ff:fecd:d0a for
ServerName
Syntax OK
5)重新启动
[root@centos01 ~]# systemctl restart httpd
7、客户端验证是否有身份验证
