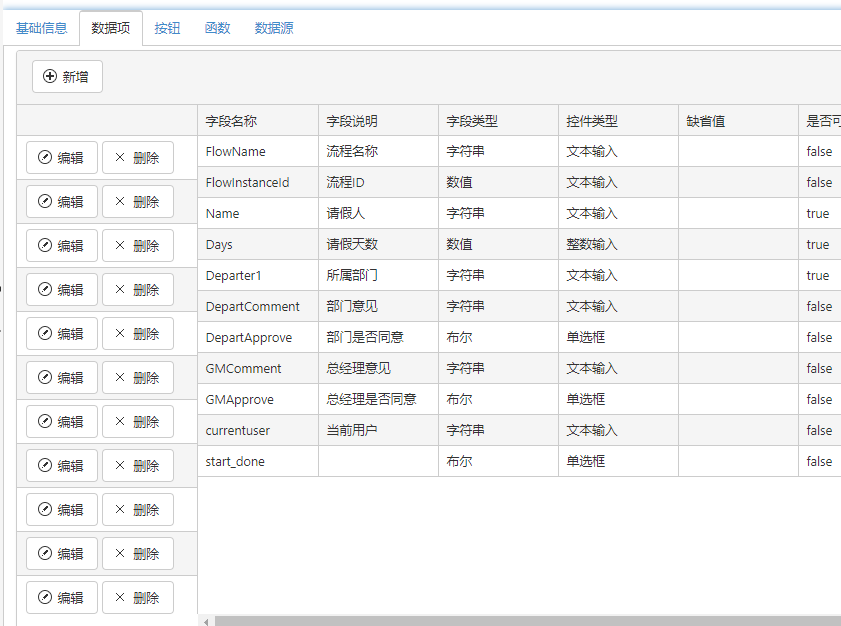
Kendo UI Grid控件的功能强大,这里将常用的一些功能总结一下。
Kendo UI Grid 固定列在使用Gird控件显示数据时,如果数据列过多,会出现横向滚动条,很多情况下,我们希望某些列固定,这些列固定显示,不随滚动条发生变化。这时,可以在数据列上使用locked属性,比如,下面是使用mvvm定义grid的示例,编辑按钮被设置为固定列:
                <div id="fieldgrid" class="grid"
                     data-role="grid"
                     data-sortable="true"
                     data-height="580"
                     data-toolbar="['create']"
                     data-bind="source: fieldSource"
                     data-editable='{"mode": "popup" }'
                     data-columns='[
                                  {"field":"Name","title":"字段名称",  "width": "120px"},
                                  {"field":"Title","title":"字段说明",  "width": "120px"},
                                  {"field":"DataType","title":"字段类型","values":dsDataType,  "width": "120px"},
                                 {"field":"ControlType","title":"控件类型", "values":dsControlType,  "width": "120px"},
                                 {"field":"DefaultValue","title":"缺省值",  "width": "120px"},
                                 {"field":"Editable","title":"是否可编辑",  "width": "80px"},
                                 {"field":"Visible","title":"是否可见",  "width": "80px"},
                                 {"field":"DisplayOrder","title":"显示顺序", editor: numberEditor,  "width": "80px"},
                                         {"field":"IsCascade","title":"是否级联",  "width": "80px"},
                                         {"field":"CascadeSubField","title":"级联下级",  "width": "120px"},
                                         {"field":"CascadeParentField","title":"级联上级",  "width": "120px"},
                                     {"command": [ "edit", "destroy" ],  "width": "180px","locked":"true"}
                                     ]'
                     data-scrollable="true">
需要注意的是,1)固定列总是显示在最左边,2)带有固定列网格在初始化过程时,必须是可见的。如果网格在初始化时不可以见,会出现不可预知的问题。比如这种的场景,如果网格在分页中,初始化时是不可见的,那么,界面可能是这样的:

Kendo UI Grid控件自带弹出窗编辑,只要在数据源中定义schema,就可以自动生成编辑界面,代码如下:
 <div class="form container" id="divForm">
        <div id="divGrid">
            <div id="mygrid" class="grid"
                 data-role="grid"
                 data-sortable="true"
                 data-toolbar="['create']"
                 data-bind="source: dataSource"
                 data-editable='{"mode": "popup" }'
                 data-columns='[
             {"field":"Id","title":"ID"},
             {"field":"Name","title":"姓名"},
             {"field":"Age","title":"年龄"},
             {"field":"JoinDate","title":"入职日期","format": "{0:yyyy-MM-dd}"},
             {"field":"Sex","title":"性别","template": "#if (Sex==1){# 女 #}else{# 男 #}# "},
             {"field":"Married","title":"婚姻状况","template": "#if (Married){# 已婚 #}else{# 未婚 #}# "},
             {"command": [ "edit", "destroy" ], "filterable": false, "sortable": false, "width:": "240px"}
             ]'
                 data-scrollable="false">
            </div>
        </div>
    </div>
    <script>

        $(document).ready(function () {
            var viewModel = kendo.observable({
                dsSex: [{ value: 0, text: '男' }, { value: 1, text: '女' }],
                dataSource: new kendo.data.DataSource(
                    {
                        data: [],
                        schema: {
                            model: {
                                id: "Id",
                                fields: {
                                    Id: { editable: true, nullable: false },
                                    Name: { validation: { required: true } },
                                    Age: { type: "number" },
                                    Sex: { editable: true },
                                    JoinDate: { type: "date", editable: true },
                                    Married: { type: "boolean", editable: true }
                                }
                            }
                        }

                    })

            });

            kendo.bind($("#divForm"), viewModel);

        });

    </script>
自动生成的编辑界面对于基本数据类型的字段够用了,但在实际中,会有更复杂的要求,比如,某些字段需要使用下拉框或者更复杂的控件,或者我们希望字段多列排列,这时,需要用到自定义的模板,上面的网格的自定义编辑模板如下:
 <script id="popup_editor" type="text/x-kendo-template">
        <div class="form container">
            <div class="form-group row">
                 <label class="col-sm-2 control-label" for="Id">ID</label>
                 <div class="col-sm-4">
                    <input type='number' class='k-textbox' data-bind="value: Id" />
                    <span class="k-invalid-msg" data-for="Id"></span>
                </div>
            <!--</div>
            <div class="form-group row">-->

                <label class="col-sm-2" for="Name">姓名</label>


                <div class="col-sm-4 ">
                    <input type='text' name="Name" class='k-input k-textbox k-valid' data-bind="value: Name" required="required" />
                    <span class="k-invalid-msg" data-for="Name"></span>
                </div>
            </div>
            <div class="form-group row">
                <label class="col-sm-2 control-label" for="Age">年龄</label>
                <div class="col-sm-4">
                    <input type='number' style="" data-role="numerictextbox" class='form-control' data-bind="value: Age" />
                    <span class="k-invalid-msg" data-for="Age"></span>
                </div>
            </div>
            <div class="form-group row">
                <label class="col-sm-2 control-label" for="val_JoinDate">参加日期</label>
                <div class="col-sm-4">
                    <input data-role="datepicker" data-culture="zh-CN" style="" class='form-control' data-bind="value: JoinDate," />
                    <span class="k-invalid-msg" data-for="JoinDate"></span>
                </div>
            </div>
            <div class="form-group row">
                <label class="col-sm-2 control-label" for="val_Married">已婚</label>
                <div class="col-sm-4">
                    <input type="checkbox" style="" data-bind="checked: Married," />
                    <span class="k-invalid-msg" data-for="Married"></span>
                </div>
            </div>
            <div class="form-group row">

                <label class="col-sm-2 control-label" for="val_Sex">性别</label>
                <div class="col-sm-4">
                    <select data-role="dropdownlist" class='form-control' data-text-field="text"
                            data-value-field="value" data-bind="source:dsSex,value: Sex">
                    </select>
                    <span class="k-invalid-msg" data-for="Sex"></span>
                </div>
            </div>

        </div>
    </script>
模板使用script标记,类型为text/x-kendo-template,说明是kendo的模板。模板语言就是html,其中的data标记与kendo MVVM一致。模板中有几点需要注意:
- 模板中需要验证的字段,需要定义name属性,如果不定义,验证信息无法显示
- 需要定义 用于显示验证信息
- 如果需要多列显示,需要在页面中定义自定义的样式:
<style>
        .k-edit-form-container {
            width: 700px;
        }

            .k-edit-form-container div {
                box-sizing: border-box;
            }
            .k-edit-form-container label {
                box-sizing: border-box;
            }

    </style>
需要将相关元素的box-sizing 设置为border-box
为Grid创建详细显示信息KendoUI Grid支持在网格行中显示该行数据的详细信息,示例界面如下:

详细信息部分是在Grid控件的detailInit事件中创建的,如果采用mvvm方式定义,示例代码如下:
                       <div id="functiongrid" class="grid"
                             data-role="grid"
                             data-sortable="true"
                             data-toolbar="['create']"
                             data-bind="source: functionSource, events: { dataBound: fn_dataBound }"
                             data-editable='{"mode": "popup" }'
                             data-detail-init="viewModel.functiongrid_detailInit"
                             data-detail-template='functiongridsubtemp'
                             data-columns='[
                                 {"field":"FunctionName","title":"名称"},
                                 {"field":"Desc","title":"说明"},
                                 {"field":"ExecuteUrl","title":"地址"},
                                 {"field":"ViewName","title":"函数类型名"},
                                 {"command": [ "edit", "destroy" ], "filterable": false, "sortable": false, "width:": "240px"}
                                 ]'
                             data-scrollable="false"
                             >

                        </div>
上面的代码中,detailInit事件需要写为mvvm的方式,也就是需要用data开头,不同的单词中间用“-”分隔,全部为小写,这样,detailInit就需要写为data-detail-init。这个事件定义的函数在视图模型中,还有一个需要定义的属性是detailTemplate,用于定义显示模板,相关部分的代码如下:
        functiongrid_detailInit: function (e) {
                    e.detailRow.find(".functionTab").kendoTabStrip(
                        {
                            animation: {
                                open: {
                                    effects: "fadeIn"
                                }
                            }
                        }
                    );
                    if (!e.data.InParas) e.data.InParas = [];
                    if (!e.data.OutParas) e.data.OutParas = [];
                    if (!e.data.ExProps) e.data.ExProps = [];
                    var dsIn = new kendo.data.DataSource({
                        data: e.data.InParas,
                        schema: {
                            model: {
                                id: "FieldName",
                                fields: {
                                    FieldName: { editable: true, validation: { required: true } },
                                    ParaName: { editable: true, validation: { required: true } }
                                }
                            }
                        }
                    });
                    e.detailRow.find(".inparagrid").kendoGrid({
                        dataSource: dsIn,
                        editable: "popup",
                        toolbar: ['create'],
                        columns: [{
                            title: "字段名称",
                            field: "FieldName"
                        }, {
                            title: "Api参数名",
                                field: "ParaName"
                        }, {
                            command: ["edit", "destroy"]
                        }
                        ]
                    });
                    var dsOut = new kendo.data.DataSource({
                        data: e.data.OutParas,
                        schema: {
                            model: {
                                id: "FieldName",
                                fields: {
                                    FieldName: { editable: true, validation: { required: true } },
                                    ParaName: { editable: true, validation: { required: true } }
                                }
                            }
                        }
                    });
                    e.detailRow.find(".outparagrid").kendoGrid({
                        dataSource: dsOut,
                        editable: "popup",
                        toolbar: ['create'],
                        columns: [{
                            title: "字段名称",
                            field: "FieldName"
                        }, {
                            title: "Api参数名",
                            field: "ParaName"
                        }, {
                            command: ["edit", "destroy"]
                        }
                        ]
                    });
                    var dsEx = new kendo.data.DataSource({
                        data: e.data.ExProps,
                        schema: {
                            model: {
                                id: "PropName",
                                fields: {
                                    PropName: { editable: true, validation: { required: true } },
                                    PropValue: { editable: true, validation: { required: true } }
                                }
                            }
                        }
                    });
                    e.detailRow.find(".expropgrid").kendoGrid({
                        dataSource: dsEx,
                        editable: "popup",
                        toolbar: ['create'],
                        columns: [{
                            title: "属性名称",
                            field: "PropName"
                        }, {
                            title: "属性值",
                                field: "PropValue"
                        }, {
                            command: ["edit", "destroy"]
                        }
                        ]
                    });
                },
还要定义绑定函数如下:
                fn_dataBound: function (e) {
                   e.sender.expandRow(e.sender.tbody.find("tr.k-master-row").first());
                }
模板的定义如下:
    <script id="functiongridsubtemp" type="text/x-kendo-template">
        <div class="functionTab">
            <ul>
                <li >输入参数</li>
                <li>输出参数</li>
                <li>附加属性</li>
            </ul>
            <div>
                <div class='inparagrid'></div>
            </div>
            <div>
                <div class='outparagrid'></div>
            </div>
            <div>
                <div class='expropgrid'></div>
            </div>
        </div>

    </script>
这个模板相对复杂,在一个分页控件中显示三个网格,用于显示函数的输入参数、输出参数和附加参数。需要注意的是,模板中不能用id进行标记,因为在页面中,每一行都需要使用模板创建一组元素,在模板中定义id,不能保证id唯一。因此在函数中,需要使用class来获取相关的元素。
Grid弹出编辑窗下拉框控件如果在Grid弹出窗中有下拉框控件,可以使用values属性直接绑定到数组,在弹出编辑窗中自动生成下拉框,示例代码如下:
                       <div id="fieldgrid" class="grid"
                             data-role="grid"
                             data-sortable="true"
                             data-toolbar="['create']"
                             data-bind="source: fieldSource"
                             data-editable='{"mode": "popup" }'
                             data-columns='[
                                  {"field":"Name","title":"字段名称"},
                                  {"field":"Title","title":"字段说明"},
                                  {"field":"DataType","title":"字段类型","values":dsDataType},
                                 {"field":"ControlType","title":"控件类型", "values":dsControlType},
                                 {"field":"DefaultValue","title":"缺省值"},
                                 {"field":"Editable","title":"是否可编辑"},
                                 {"field":"Visible","title":"是否可见"},
                                 {"field":"DisplayOrder","title":"显示顺序", editor: numberEditor},
                                         {"field":"IsCascade","title":"是否级联"},
                                         {"field":"CascadeSubField","title":"级联下级"},
                                         {"field":"CascadeParentField","title":"级联上级"},

                                     {"command": [ "edit", "destroy" ], "filterable": false, "sortable": false, "width:": "240px"}
                                     ]'
                             data-scrollable="false">
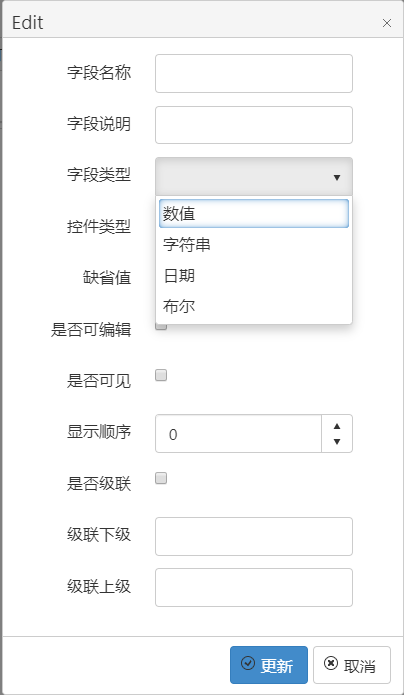
上面的代码使用了mvvm的定义模式,其中DataType和ControlType字段的values绑定到数组,数组定义示例如下:
var dsDataType = [
    { value: 'number', text: '数值' },
    { value: 'string', text: '字符串' },
    { value: 'date', text: '日期' },
    { value: 'boolean', text: '布尔' }];
var dsControlType = [
   { value: 'InputNumber', text: '数字输入' },
   { value: 'InputText', text: '文本输入' },
   { value: 'DatePicker', text: '日期输入' },
   { value: 'Checkbox', text: '单选框' },
   { value: 'Selection', text: '下拉框' },
   { value: 'ComboBox', text: '级联下拉框' }
        ];
数组定义时值字段名为value,显示字段名为text。在弹出编辑窗中,会自动创建为下拉框,显示结果如下:

使用这种方法,就不需要为下拉框定制显示控件了。
Kendo UI Grid控件自带弹出窗编辑,只要在数据源中定义schema,就可以自动生成编辑界面,代码如下:
 <div class="form container" id="divForm">
        <div id="divGrid">
            <div id="mygrid" class="grid"
                 data-role="grid"
                 data-sortable="true"
                 data-toolbar="['create']"
                 data-bind="source: dataSource"
                 data-editable='{"mode": "popup" }'
                 data-columns='[
             {"field":"Id","title":"ID"},
             {"field":"Name","title":"姓名"},
             {"field":"Age","title":"年龄"},
             {"field":"JoinDate","title":"入职日期","format": "{0:yyyy-MM-dd}"},
             {"field":"Sex","title":"性别","template": "#if (Sex==1){# 女 #}else{# 男 #}# "},
             {"field":"Married","title":"婚姻状况","template": "#if (Married){# 已婚 #}else{# 未婚 #}# "},
             {"command": [ "edit", "destroy" ], "filterable": false, "sortable": false, "width:": "240px"}
             ]'
                 data-scrollable="false">
            </div>
        </div>
    </div>
    <script>

        $(document).ready(function () {
            var viewModel = kendo.observable({
                dsSex: [{ value: 0, text: '男' }, { value: 1, text: '女' }],
                dataSource: new kendo.data.DataSource(
                    {
                        data: [],
                        schema: {
                            model: {
                                id: "Id",
                                fields: {
                                    Id: { editable: true, nullable: false },
                                    Name: { validation: { required: true } },
                                    Age: { type: "number" },
                                    Sex: { editable: true },
                                    JoinDate: { type: "date", editable: true },
                                    Married: { type: "boolean", editable: true }
                                }
                            }
                        }

                    })

            });

            kendo.bind($("#divForm"), viewModel);

        });

    </script>
自动生成的编辑界面对于基本数据类型的字段够用了,但在实际中,会有更复杂的要求,比如,某些字段需要使用下拉框或者更复杂的控件,或者我们希望字段多列排列,这时,需要用到自定义的模板,上面的网格的自定义编辑模板如下:
 <script id="popup_editor" type="text/x-kendo-template">
        <div class="form container">
            <div class="form-group row">
                 <label class="col-sm-2 control-label" for="Id">ID</label>
                 <div class="col-sm-4">
                    <input type='number' class='k-textbox' data-bind="value: Id" />
                    <span class="k-invalid-msg" data-for="Id"></span>
                </div>
            <!--</div>
            <div class="form-group row">-->

                <label class="col-sm-2" for="Name">姓名</label>


                <div class="col-sm-4 ">
                    <input type='text' name="Name" class='k-input k-textbox k-valid' data-bind="value: Name" required="required" />
                    <span class="k-invalid-msg" data-for="Name"></span>
                </div>
            </div>
            <div class="form-group row">
                <label class="col-sm-2 control-label" for="Age">年龄</label>
                <div class="col-sm-4">
                    <input type='number' style="" data-role="numerictextbox" class='form-control' data-bind="value: Age" />
                    <span class="k-invalid-msg" data-for="Age"></span>
                </div>
            </div>
            <div class="form-group row">
                <label class="col-sm-2 control-label" for="val_JoinDate">参加日期</label>
                <div class="col-sm-4">
                    <input data-role="datepicker" data-culture="zh-CN" style="" class='form-control' data-bind="value: JoinDate," />
                    <span class="k-invalid-msg" data-for="JoinDate"></span>
                </div>
            </div>
            <div class="form-group row">
                <label class="col-sm-2 control-label" for="val_Married">已婚</label>
                <div class="col-sm-4">
                    <input type="checkbox" style="" data-bind="checked: Married," />
                    <span class="k-invalid-msg" data-for="Married"></span>
                </div>
            </div>
            <div class="form-group row">

                <label class="col-sm-2 control-label" for="val_Sex">性别</label>
                <div class="col-sm-4">
                    <select data-role="dropdownlist" class='form-control' data-text-field="text"
                            data-value-field="value" data-bind="source:dsSex,value: Sex">
                    </select>
                    <span class="k-invalid-msg" data-for="Sex"></span>
                </div>
            </div>

        </div>
    </script>
模板使用script标记,类型为text/x-kendo-template,说明是kendo的模板。模板语言就是html,其中的data标记与kendo MVVM一致。模板中有几点需要注意:
- 模板中需要验证的字段,需要定义name属性,如果不定义,验证信息无法显示
- 需要定义 用于显示验证信息
- 如果需要多列显示,需要在页面中定义自定义的样式:
<style>
        .k-edit-form-container {
            width: 700px;
        }

            .k-edit-form-container div {
                box-sizing: border-box;
            }
            .k-edit-form-container label {
                box-sizing: border-box;
            }

    </style>
需要将相关元素的box-sizing 设置为border-box
Grid弹出编辑窗自定义编辑控件上节介绍了创建自定义的弹出编辑窗体,这种方法的好处是可以完全控制编辑窗体中的各个控件,但也有些麻烦,如果只需要修改其中的几个控件,完全重写一个编辑窗体就显得没有必要了。这时,可以为单个编辑控件进行定制。示例代码如下:
<div id="commandgrid" class="grid"
                             data-role="grid"
                             data-sortable="true"
                             data-toolbar="['create']"
                             data-bind="source: commandSource"
                             data-editable='{"mode": "popup" }'
                             data-columns='[
                                 {"field":"Name","title":"名称"},
                                 {"field":"Title","title":"文本"},
                                 {"field":"FunctionName","title":"函数名称"},
                                  {"field":"DisplayOrder","title":"显示顺序", editor: numberEditor},
                                 {"command": [ "edit", "destroy" ], "filterable": false, "sortable": false, "width:": "240px"}
                                 ]'
                             data-scrollable="false">
                        </div>
上面的代码使用了mvvm的定义方式,其中DisplayOrder字段使用了自定义的editor,numberEditor是一个自定义的函数,在这个函数里创建自定义的控件并添加到container中:
function numberEditor(container, options) {
            $('<input name="' + options.field + '"/>')
                .appendTo(container)
                .kendoNumericTextBox({
                    format:"n0"
                });
        }
这里定义了数字输入的格式,不显示小数。
根据条件改变行显示在网格显示时,经常需要设置条件,根据网格中的数据,改变网格或者所在行的显示属性。比如如果数据超过某个限度,需要显示报警颜色。这些需求包括当满足一定条件时:
- 整行背景颜色改变
- 字体颜色改变
- 字体加粗
- 增加删除线
- 当网格的第一列时复选框时,自动选中当前行
- 当网格的第一列时复选框时,不允许选择
在Kendo Grid的dataBound事件中,可以实现上述功能。 示例代码如下:
dataBound: function (e) {

                        var rows = e.sender.tbody.children();
                        for (var j = 0; j < rows.length; j++) {
                            var row = $(rows[j]);
                            var dataItem = e.sender.dataItem(row);

                            var age = dataItem.get("AGE");

                            var cells = row.children();
                            if (age > 15) {

                                for (var idx = 0; idx < cells.length; idx++) {
                                    var mytd = cells[idx];
                                    cells[idx].bgColor = "green"; //设置行背景颜色
                                 }

                            }

                            if (age < 15) {
                                for (var idx = 0; idx < cells.length; idx++) {
                                    var mytd = cells[idx];
                                    if (idx == 0) {
                                        var chk = mytd.children[0];
                                        $(chk).prop("checked", true); //设置选择框
                                    }

                                    $(mytd).css("font-weight", "bold"); //设置字体
                                    $(mytd).css("color", "red");//设置字体颜色
                                    $(mytd).css("text-decoration", "line-through");//加删除线
                                    $(mytd).height(100);//设置行高
                                }

                            }

                        }
                    }
