1. 概述
inotify 实现数据实时同步功能已经非常完美了,但 inotify 最大的不足是会产生重复事件,或者同一个目录下多个文件的操作会产生多个事件,例如,当监控目录中有5个文件时,删除目录时会产生6个监控事件,从而导致重复调用rsync命令。另外比如:vim文件时,inotify会监控到临时文件的事件,但这些事件相对于rsync来说是不应该被监控的。
sersync类似inotify,它集成了inotify功能和运行脚本,它也可以用于监控目录数据的变化,它克服了inotify上面的缺点。
sersync 优点:
- sersync是使用c++编写,而且对linux系统文件系统产生的临时文件和重复的文件操作进行过滤,所以在结合rsync同步的时候,节省了运行时耗和网络资源。因此更快。
- sersync配置很简单,其中提供了静态编译好的二进制文件和xml配置文件,直接使用即可。
- sersync使用多线程进行同步,尤其在同步较大文件时,能够保证多个服务器实时保持同步状态。
- sersync有出错处理机制,通过失败队列对出错的文件重新同步,如果仍旧失败,则按设定时长对
同步失败的文件重新同步。
- sersync不仅可以实现实时同步,另外还自带crontab功能,只需在xml配置文件中开启,即也可以
按要求隔一段时间整体同步一次,而无需再额外配置crontab功能。
- sersync 可以二次开发。
sersync项目地址: https://code.google.com/archive/p/sersync/
sersync下载地址: https://code.google.com/archive/p/sersync/downloads
2. 架构和主机
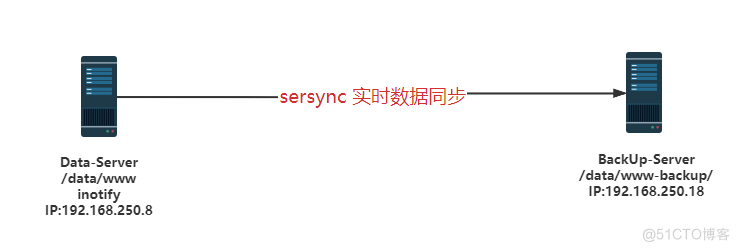
目标及思路:将Data-ServerIP:192.168.250.8 主机的/data/www 目录 实时备份复制到 BackUp-ServerIP:192.168.250.18主机的 /data/www-backup 目录下。
本文我们将用国人二次开发版本 sersync 通过两种方式来实现上述目标,两种方法分别为:基于rsync daemon 实现 sersync 和 基于远程shell 实现 sersync。

1 生产服务器 :
主机名:Data-Server-IP08
操作系统:CentOS 8.4
IP: 192.168.250.8
inotify
2 备份服务器 :
主机名: BackUp-Server-IP18
操作系统:CentOS 8.4
IP: 192.168.250.18
3. 基于rsync daemon 实现 sersync
3.1. 备份服务器配置和调试过程
#### 备份服务器端的调试配置# 生产服务器准备:关闭防火墙、SELinux、同步时间、修改主机名
[root@CentOS84 ]#hostnamectl set-hostname Data-Server-IP08
[root@CentOS84 ]#exit
[root@Data-Server-IP08 ]#hostnamectl set-hostname BackUp-Server-IP18
[root@BackUp-Server-IP18 ]#systemctl enable --now chronyd.service
[root@BackUp-Server-IP18 ]#yum -y install rsync
[root@BackUp-Server-IP18 ]#rpm -q rsync
rsync-3.1.3-12.el8.x86_64
[root@BackUp-Server-IP18 ]#mkdir /data/www-backup
[root@BackUp-Server-IP18 ]#ll /data/
total 0
drwxr-xr-x 2 root root 6 Mar 20 19:15 www-backup
[root@BackUp-Server-IP18 ]#dnf -y install rsync-daemon
[root@BackUp-Server-IP18 ]#rpm -ql rsync-daemon
/etc/rsyncd.conf
/etc/sysconfig/rsyncd
/usr/lib/systemd/system/rsyncd.service
/usr/lib/systemd/system/rsyncd.socket
/usr/lib/systemd/system/rsyncd@.service
/usr/share/man/man5/rsyncd.conf.5.gz
#### 按照好rsync-daemon,会生产一个rsync的默认配置文件,对默认配置文件最简修改,在生产服务器Data-Server-IP08 上可先通过命令行测试到备份服务器rsync工作和通信都正常。
## 配置文件的修改
[root@BackUp-Server-IP18 ]#vim /etc/rsyncd.conf
# /etc/rsyncd: configuration file for rsync daemon mode
uid = root
gid = root
# 上面两个参数的默认均为nobody,我们直接将之指定为生成的文件所有者。省去了给备份的目录授权的步骤,本例直接设成root用户。
# port = 873
# use chroot = no
max connections = 0
ignore errors
exclude = lost+found/
log file = /var/log/rsyncd.log
pid file = /var/run/rsyncd.pid
lock file = /var/run/rsyncd.lock
reverse lookup = no
hosts allow = 192.168.250.0/24
[backup]
path = /data/www-backup/
comment = backup dir
read only = no
auth users = rsyncuser
secrets file = /etc/rsync.passwd
# 准备好存放账号和密码的文件,这个文件内的账号和密码是成对用:隔开,一定要注意格式。修改成只有管理员可读可写
[root@BackUp-Server-IP18 ]#echo "rsyncuser:shone8888" > /etc/rsync.passwd
[root@BackUp-Server-IP18 ]#cat /etc/rsync.passwd
rsyncuser:shone8888
[root@BackUp-Server-IP18 ]#chmod 600 /etc/rsync.passwd
[root@BackUp-Server-IP18 ]#ll /etc/rsync.passwd
-rw------- 1 root root 20 Mar 20 19:21 /etc/rsync.passwd
# 启动rsyncd服务器,并设为开机启动
[root@BackUp-Server-IP18 ]#systemctl enable --now rsyncd
Created symlink /etc/systemd/system/multi-user.target.wants/rsyncd.service → /usr/lib/systemd/system/rsyncd.service.
[root@BackUp-Server-IP18 ]#ss -tln
State Recv-Q Send-Q Local Address:Port Peer Address:Port Process
LISTEN 0 5 [::]:873 [::]:*
##################################################################################################
##################################################################################################
## 上面的配置完成后,切换到 生产服务器Data-Server-IP08 上,安装好 dnf -y install rsync 后,可以输入下面的命令测试到备份服务器的实时备份和通信是否正常,正常再进入下面步骤开始启用 sersync
[root@Data-Server-IP08 ]#rsync 192.168.250.18::
backup backup dir
# 看到上面的信息,基本确认rsync 的备份服务器基本正常工作了,下面再定义好密码文件,再做数据复制测试。 特别提醒下面几个步骤是在生产服务器上进行的。
[root@Data-Server-IP08 ]#echo "shone8888" > /etc/rsync.passwd
[root@Data-Server-IP08 ]#chmod 600 /etc/rsync.passwd
[root@Data-Server-IP08 ]#rsync --password-file=/etc/rsync.passwd rsyncuser@192.168.250.18::backup
drwxr-xr-x 19 2022/03/20 19:26:35 .
-rw-r--r-- 1,024 2022/03/20 19:26:35 group
[root@Data-Server-IP08 ]#
[root@Data-Server-IP08 ]#rsync --password-file=/etc/rsync.passwd /etc/sestatus.conf rsyncuser@192.168.250.18::backup
[root@Data-Server-IP08 ]#
##################################################################################################
##################################################################################################
## 下面再切换到备份服务器上看生产服务器命令方式复制的文件是否成功同步
[root@BackUp-Server-IP18 ]#tree /data/
/data/
└── www-backup
├── group
└── sestatus.conf
1 directory, 2 files
[root@BackUp-Server-IP18 ]#
3.2. 生产服务器配置和调试过程
### 源生产服务器端 Data-Server-IP08 的调试记录# 生产服务器准备:关闭防火墙、SELinux、同步时间、修改主机名
[root@CentOS84 ]#hostnamectl set-hostname Data-Server-IP08
[root@CentOS84 ]#exit
[root@Data-Server-IP08 ]#systemctl enable --now chronyd.service
# 查看并验证内核 inotify
[root@Data-Server-IP08 ]#grep -i inotify /boot/config-4.18.0-305.3.1.el8.x86_64
CONFIG_INOTIFY_USER=y
# 安装 rsync 及 inotify-tools
[root@Data-Server-IP08 ]#rpm -q rsync &> /dev/null || dnf -y install rsync
[root@Data-Server-IP08 ]#rpm -q rsync
rsync-3.1.3-12.el8.x86_64
[root@Data-Server-IP08 ]#rpm -qi rsync
Name : rsync
Version : 3.1.3
....................
[root@Data-Server-IP08 ]#yum -y install inotify-tools
# 创建生产服务器上的 www 目录
[root@Data-Server-IP08 ]#mkdir /data/www
[root@Data-Server-IP08 ]#tree /data/
/data/
└── www
#### 下面的这些命令是测试到备份服务器rsync复制同步工作是否正常的,确保正常才能开始设置后面的自动实时复制任务
[root@Data-Server-IP08 ]#rsync 192.168.250.18::
backup backup dir
[root@Data-Server-IP08 ]#rsync /etc/group rsyncuser@192.168.250.18::backup
Password: #输入备份服务器设定的密码,本例为"shone8888"
# 准备密码文件,格式仅仅就是密码。修改文件权限,仅管理员可读可写,保证安全
[root@Data-Server-IP08 ]#echo "shone8888" > /etc/rsync.passwd
[root@Data-Server-IP08 ]#chmod 600 /etc/rsync.passwd
[root@Data-Server-IP08 ]#rsync --password-file=/etc/rsync.passwd rsyncuser@192.168.250.18::backup
drwxr-xr-x 19 2022/03/20 19:26:35 .
-rw-r--r-- 1,024 2022/03/20 19:26:35 group
[root@Data-Server-IP08 ]#
# 再复制一个/etc/sestatus.conf 到备份服务器,切换到备份服务器上去查看并验证
[root@Data-Server-IP08 ]#rsync --password-file=/etc/rsync.passwd /etc/sestatus.conf rsyncuser@192.168.250.18::backup
#### 上面测试与备份服务器的通信和rsync的实时备份服务是否正常的工作完成,并得到确认均正常工作就可以开始配置 sersync 了。
# sersync二进制安装包是在境外谷歌公司的服务器上的,因为众所周知的原因,需要大家各显神通想法下载到相应的安装包,下载地址在本文前面已经提供了,下载好sersync2.5.4_64bit_binary_stable_final.tar.gz 安装包后传送到服务器上
[root@Data-Server-IP08 ]#rz
rz waiting to receive.
Starting zmodem transfer. Press Ctrl+C to cancel.
Transferring sersync2.5.4_64bit_binary_stable_final.tar.gz...
100% 710 KB 710 KB/sec 00:00:01 0 Errors
# 解压安装包,解压后的文件夹 GNU-Linux-x86
[root@Data-Server-IP08 ]#tar xf sersync2.5.4_64bit_binary_stable_final.tar.gz
[root@Data-Server-IP08 ]#ll
drwxr-xr-x 2 root root 41 Oct 26 2011 GNU-Linux-x86
-rw-r--r-- 1 root root 727290 Sep 1 2021 sersync2.5.4_64bit_binary_stable_final.tar.gz
# 按照常规规范放置好程序包所在目录,并配置环境变量
[root@Data-Server-IP08 ]#cp -a GNU-Linux-x86 /usr/local/sersync
[root@Data-Server-IP08 ]#echo 'PATH=/usr/local/sersync:$PATH' > /etc/profile.d/sersync.sh
[root@Data-Server-IP08 ]#source /etc/profile.d/sersync.sh
# 解压出来两个重要的文件 confxml.xml为配置文件,sersync2为作者编译好的二进制程序文件
[root@Data-Server-IP08 ]#ls /usr/local/sersync/
confxml.xml sersync2
# 上面配置好环境变量,下面这行命令可以不运行,也可以通过下面这行软链接实现相同的环境变量配置的作用
[root@Data-Server-IP08 ]#ln -s /usr/local/sersync/sersync2 /usr/bin/
# 查看并读懂sersync2 的 一些用法
[root@Data-Server-IP08 ]#sersync2 -h
set the system param
execute:echo 50000000 > /proc/sys/fs/inotify/max_user_watches
execute:echo 327679 > /proc/sys/fs/inotify/max_queued_events
parse the command param
_______________________________________________________
参数-d:启用守护进程模式
参数-r:在监控前,将监控目录与远程主机用rsync命令推送一遍
参数-n: 指定开启守护线程的数量,默认为10个
参数-o:指定配置文件,默认使用confxml.xml文件
参数-m:单独启用其他模块,使用 -m refreshCDN 开启刷新CDN模块
参数-m:单独启用其他模块,使用 -m socket 开启socket模块
参数-m:单独启用其他模块,使用 -m http 开启http模块
不加-m参数,则默认执行同步程序
_______________________________________________________
# 备份好confxml.xml文件,并将此配置文件SZ传输到本地电脑,建议用微软的VSCode这类软件软件修改,保存文件格式不能发生变化。也可以用VIM本地修改
[root@Data-Server-IP08 ]#cp /usr/local/sersync/confxml.xml /usr/local/sersync/confxml.xml.bak
[root@Data-Server-IP08 ]#ll /usr/local/sersync/
total 1776
-rwxr-xr-x 1 root root 2214 Oct 26 2011 confxml.xml
-rwxr-xr-x 1 root root 2214 Mar 21 03:27 confxml.xml.bak
[root@Data-Server-IP08 ]#vim /usr/local/sersync/confxml.xml
## 基于rsync daemon 实现sersync实时同步目录需要修改的confxml.xml的内容
<attrib start="true"/>
<localpath watch="/data/www">
<remote ip="192.168.250.18" name="backup"/>
<commonParams params="-auz"/>
<auth start="true" users="rsyncuser" passwordfile="/etc/rsync.passwd"/>
# 查看修改后的完整confxml.xml内容
[root@Data-Server-IP08 ]#cat /usr/local/sersync/confxml.xml
<?xml version="1.0" encoding="ISO-8859-1"?>
<head version="2.5">
<host hostip="localhost" port="8008"></host>
<debug start="false"/>
<fileSystem xfs="false"/>
<filter start="false">
<exclude expression="(.*)\.svn"></exclude>
<exclude expression="(.*)\.gz"></exclude>
<exclude expression="^info/*"></exclude>
<exclude expression="^static/*"></exclude>
</filter>
<inotify>
<delete start="true"/>
<createFolder start="true"/>
<createFile start="false"/>
<closeWrite start="true"/>
<moveFrom start="true"/>
<moveTo start="true"/>
<attrib start="true"/>
<modify start="false"/>
</inotify>
<sersync>
<localpath watch="/data/www">
<remote ip="192.168.250.18" name="backup"/>
<!--<remote ip="192.168.8.39" name="tongbu"/>-->
<!--<remote ip="192.168.8.40" name="tongbu"/>-->
</localpath>
<rsync>
<commonParams params="-artuz"/>
<auth start="true" users="rsyncuser" passwordfile="/etc/rsync.passwd"/>
<userDefinedPort start="false" port="874"/><!-- port=874 -->
<timeout start="false" time="100"/><!-- timeout=100 -->
<ssh start="false"/>
</rsync>
<failLog path="/tmp/rsync_fail_log.sh" timeToExecute="60"/><!--default every 60mins execute once-->
<crontab start="false" schedule="600"><!--600mins-->
<crontabfilter start="false">
<exclude expression="*.php"></exclude>
<exclude expression="info/*"></exclude>
</crontabfilter>
</crontab>
<plugin start="false" name="command"/>
</sersync>
<plugin name="command">
<param prefix="/bin/sh" suffix="" ignoreError="true"/> <!--prefix /opt/tongbu/mmm.sh suffix-->
<filter start="false">
<include expression="(.*)\.php"/>
<include expression="(.*)\.sh"/>
</filter>
</plugin>
<plugin name="socket">
<localpath watch="/opt/tongbu">
<deshost ip="192.168.138.20" port="8009"/>
</localpath>
</plugin>
<plugin name="refreshCDN">
<localpath watch="/data0/htdocs/cms.xoyo.com/site/">
<cdninfo domainname="ccms.chinacache.com" port="80" username="xxxx" passwd="xxxx"/>
<sendurl base="http://pic.xoyo.com/cms"/>
<regexurl regex="false" match="cms.xoyo.com/site([/a-zA-Z0-9]*).xoyo.com/images"/>
</localpath>
</plugin>
</head>
#以后台方式执行同步
[root@Data-Server-IP08 ]#sersync2 -dro /usr/local/sersync/confxml.xml
set the system param
execute:echo 50000000 > /proc/sys/fs/inotify/max_user_watches
execute:echo 327679 > /proc/sys/fs/inotify/max_queued_events
parse the command param
option: -d run as a daemon
option: -r rsync all the local files to the remote servers before the sersync work
option: -o config xml name: /usr/local/sersync/confxml.xml
daemon thread num: 10
parse xml config file
host ip : localhost host port: 8008
daemon start,sersync run behind the console
use rsync password-file :
user is rsyncuser
passwordfile is /etc/rsync.passwd
config xml parse success
please set /etc/rsyncd.conf max connections=0 Manually
sersync working thread 12 = 1(primary thread) + 1(fail retry thread) + 10(daemon sub threads)
Max threads numbers is: 22 = 12(Thread pool nums) + 10(Sub threads)
please according your cpu ,use -n param to adjust the cpu rate
------------------------------------------
rsync the directory recursivly to the remote servers once
working please wait...
#注释:如果同步失败,可以手动执行下面命令,观察过程
execute command: cd /data/www && rsync -artuz -R --delete ./ rsyncuser@192.168.250.18::backup --password-file=/etc/rsync.passwd >/dev/null 2>&1
run the sersync:
watch path is: /data/www
#sersync支持多实例,即同时监控多个目录,只需分别准备好不同配置文件,然后使用sersync2指定对应配置文件运行即可。
至此,基于rsync daemon 实现sersync实时同步目录的工作全部完成,下面在 生产服务器 /data/www 目录下创建、删除、修改等操作,观察并验证是否能实时被同步到备份服务器上。
3.3. 测试验证备份和复制
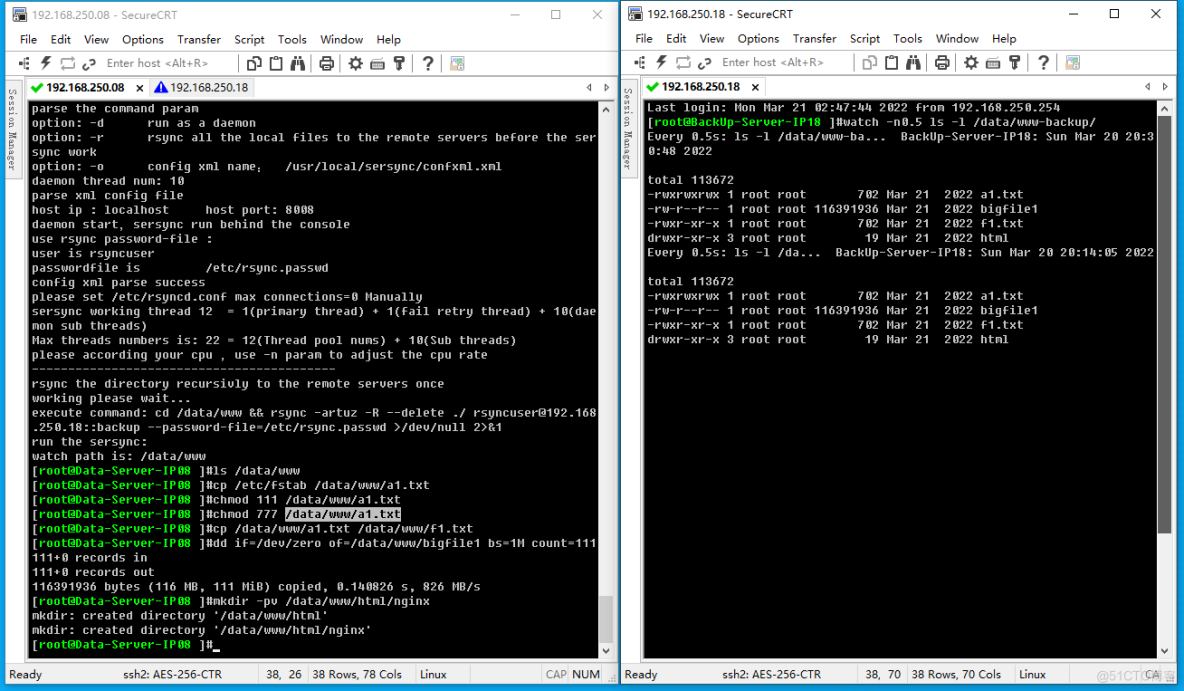
# 完成上面调试后在生产服务器上操作如下命令,观测下图的目录同步效果[root@Data-Server-IP08 ]#ls /data/www
[root@Data-Server-IP08 ]#cp /etc/fstab /data/www/a1.txt
[root@Data-Server-IP08 ]#chmod 111 /data/www/a1.txt
[root@Data-Server-IP08 ]#chmod 777 /data/www/a1.txt
[root@Data-Server-IP08 ]#cp /data/www/a1.txt /data/www/f1.txt
[root@Data-Server-IP08 ]#dd if=/dev/zero of=/data/www/bigfile1 bs=1M count=111111+0 records in
111+0 records out
116391936 bytes (116 MB, 111 MiB) copied, 0.140826 s, 826 MB/s
[root@Data-Server-IP08 ]#mkdir -pv /data/www/html/nginx
mkdir: created directory '/data/www/html'
mkdir: created directory '/data/www/html/nginx'
[root@Data-Server-IP08 ]#
# 第一次监控 是以服务的方式同步的 运行时间比较短,可以借助下面的命令自行观测
Last login: Mon Mar 21 02:47:44 2022 from 192.168.250.254
[root@BackUp-Server-IP18 ]#watch -n0.5 ls -l /data/www-backup/
Every 0.5s: ls -l /data/www-ba... BackUp-Server-IP18: Sun Mar 20 20:30:48 2022
total 113672
-rwxrwxrwx 1 root root 702 Mar 21 2022 a1.txt
-rw-r--r-- 1 root root 116391936 Mar 21 2022 bigfile1
-rwxr-xr-x 1 root root 702 Mar 21 2022 f1.txt
drwxr-xr-x 3 root root 19 Mar 21 2022 html
Every 0.5s: ls -l /da... BackUp-Server-IP18: Sun Mar 20 20:18:52 2022
total 113672
-rwxrwxrwx 1 root root 702 Mar 21 2022 a1.txt
-rw-r--r-- 1 root root 116391936 Mar 21 2022 bigfile1
-rwxr-xr-x 1 root root 702 Mar 21 2022 f1.txt
drwxr-xr-x 3 root root 19 Mar 21 2022 html

4. 基于远程shell实现 sersync
4.1 备份服务器的配置和调试过程
任务内容及实现过程:在生产服务器上生成基于key的密钥文件,复制到备份服务器上,实现生产服务器到备份服务器的免密通讯。再通过sersync的配置文件内置的shell功能实现远程目录实时同步。这样就要停掉并可卸载掉 rsyncd 服务 。
# 停掉并可卸载掉 rsyncd 服务[root@BackUp-Server-IP18 ]#systemctl stop rsyncd
[root@BackUp-Server-IP18 ]#ss -tln
State Recv-Q Send-Q Local Address:Port Peer Address:Port Process
LISTEN 0 128 0.0.0.0:111 0.0.0.0:*
LISTEN 0 32 192.168.122.1:53 0.0.0.0:*
LISTEN 0 128 0.0.0.0:22 0.0.0.0:*
LISTEN 0 5 127.0.0.1:631 0.0.0.0:*
LISTEN 0 128 [::]:111 [::]:*
LISTEN 0 128 [::]:22 [::]:*
LISTEN 0 5 [::1]:631 [::]:*
[root@BackUp-Server-IP18 ]#
4.2 生产服务器的配置和调试过程
# 生产基于key的密钥文件,实现ssh免密通信[root@Data-Server-IP08 ]#ssh-keygen
Generating public/private rsa key pair.
Enter file in which to save the key (/root/.ssh/id_rsa):
Enter passphrase (empty for no passphrase):
Enter same passphrase again:
Your identification has been saved in /root/.ssh/id_rsa.
Your public key has been saved in /root/.ssh/id_rsa.pub.
The key fingerprint is:
SHA256:9SjK6HFfgOGR5xbDvQiM6GiZWjjhnmJ6BRQW091RC5Y root@Data-Server-IP08
The key's randomart image is:
+---[RSA 3072]----+
| =+ . .++. |
| ..o.o.+Eo . |
|... . * = + |
|.=+ . B = + |
|+=o. o S o . |
|+o. .o o o |
|o+ .o + . |
|+ .. o . . |
|.. . . |
+----[SHA256]-----+
[root@Data-Server-IP08 ]#ssh-copy-id 192.168.250.18
/usr/bin/ssh-copy-id: INFO: Source of key(s) to be installed: "/root/.ssh/id_rsa.pub"
/usr/bin/ssh-copy-id: INFO: attempting to log in with the new key(s), to filter out any that are already installed
/usr/bin/ssh-copy-id: INFO: 1 key(s) remain to be installed -- if you are prompted now it is to install the new keys
root@192.168.250.18's password:
Number of key(s) added: 1
Now try logging into the machine, with: "ssh '192.168.250.18'"
and check to make sure that only the key(s) you wanted were added.
# 命令行同步 anaconda-ks.cfg 和/etc/passwd 文件,测试工作是否正常
[root@Data-Server-IP08 ]#rsync anaconda-ks.cfg 192.168.250.18:/opt
[root@Data-Server-IP08 ]#rsync /etc/passwd 192.168.250.18:/opt
[root@Data-Server-IP08 ]#
# 因为前面做基于 rsyncd 的服务的实验时候,sersync的进程都还在,需要手工kill掉,才能进行“基于远程shell实现sersync”的主机配置步骤
[root@Data-Server-IP08 ]#ps aux | grep sersync
root 10280 0.0 0.1 174268 5700 ? Ssl 03:42 0:00 sersync2 -dro /usr/local/sersync/confxml.xml
root 10586 0.0 0.0 12136 1148 pts/0 S+ 04:02 0:00 grep --color=auto sersync
[root@Data-Server-IP08 ]#kill 10280
[root@Data-Server-IP08 ]#ps aux | grep sersync
root 10588 0.0 0.0 12136 1124 pts/0 S+ 04:02 0:00 grep --color=auto sersync
#### 进行“基于远程shell实现sersync”的主生产服务器的配置过程
## 基于远程shell实现 sersync,开始修改的confxml.xml
[root@Data-Server-IP08 ]#vim /usr/local/sersync/confxml.xml
<localpath watch="/data/www">
<remote ip="192.168.250.18" name="/data/www-backup"/>
<auth start="false" users="rsyncuser" passwordfile="/etc/rsync.passwd"/>
<ssh start="true"/>
# 完成修改好的 confxml.xml 文件内容
[root@Data-Server-IP08 ]#cat /usr/local/sersync/confxml.xml
<?xml version="1.0" encoding="ISO-8859-1"?>
<head version="2.5">
<host hostip="localhost" port="8008"></host>
<debug start="false"/>
<fileSystem xfs="false"/>
<filter start="false">
<exclude expression="(.*)\.svn"></exclude>
<exclude expression="(.*)\.gz"></exclude>
<exclude expression="^info/*"></exclude>
<exclude expression="^static/*"></exclude>
</filter>
<inotify>
<delete start="true"/>
<createFolder start="true"/>
<createFile start="false"/>
<closeWrite start="true"/>
<moveFrom start="true"/>
<moveTo start="true"/>
<attrib start="true"/>
<modify start="false"/>
</inotify>
<sersync>
<localpath watch="/data/www">
<remote ip="192.168.250.18" name="/data/www-backup"/>
<!--<remote ip="192.168.8.39" name="tongbu"/>-->
<!--<remote ip="192.168.8.40" name="tongbu"/>-->
</localpath>
<rsync>
<commonParams params="-artuz"/>
<auth start="false" users="rsyncuser" passwordfile="/etc/rsync.passwd"/>
<userDefinedPort start="false" port="874"/><!-- port=874 -->
<timeout start="false" time="100"/><!-- timeout=100 -->
<ssh start="true"/>
</rsync>
<failLog path="/tmp/rsync_fail_log.sh" timeToExecute="60"/><!--default every 60mins execute once-->
<crontab start="false" schedule="600"><!--600mins-->
<crontabfilter start="false">
<exclude expression="*.php"></exclude>
<exclude expression="info/*"></exclude>
</crontabfilter>
</crontab>
<plugin start="false" name="command"/>
</sersync>
<plugin name="command">
<param prefix="/bin/sh" suffix="" ignoreError="true"/> <!--prefix /opt/tongbu/mmm.sh suffix-->
<filter start="false">
<include expression="(.*)\.php"/>
<include expression="(.*)\.sh"/>
</filter>
</plugin>
<plugin name="socket">
<localpath watch="/opt/tongbu">
<deshost ip="192.168.138.20" port="8009"/>
</localpath>
</plugin>
<plugin name="refreshCDN">
<localpath watch="/data0/htdocs/cms.xoyo.com/site/">
<cdninfo domainname="ccms.chinacache.com" port="80" username="xxxx" passwd="xxxx"/>
<sendurl base="http://pic.xoyo.com/cms"/>
<regexurl regex="false" match="cms.xoyo.com/site([/a-zA-Z0-9]*).xoyo.com/images"/>
</localpath>
</plugin>
</head>
[root@Data-Server-IP08 ]#
# 按照修改好的配置运行,这个已经是 基于远程shell实现了 sersync 同步目录的目标
[root@Data-Server-IP08 ]#sersync2 -dro /usr/local/sersync/confxml.xml
set the system param
execute:echo 50000000 > /proc/sys/fs/inotify/max_user_watches
execute:echo 327679 > /proc/sys/fs/inotify/max_queued_events
parse the command param
option: -d run as a daemon
option: -r rsync all the local files to the remote servers before the sersync work
option: -o config xml name: /usr/local/sersync/confxml.xml
daemon thread num: 10
parse xml config file
host ip : localhost host port: 8008
daemon start,sersync run behind the console
config xml parse success
please set /etc/rsyncd.conf max connections=0 Manually
sersync working thread 12 = 1(primary thread) + 1(fail retry thread) + 10(daemon sub threads)
Max threads numbers is: 22 = 12(Thread pool nums) + 10(Sub threads)
please according your cpu ,use -n param to adjust the cpu rate
------------------------------------------
rsync the directory recursivly to the remote servers once
working please wait...
execute command: cd /data/www && rsync -artuz -R --delete ./ -e ssh 192.168.250.18:/data/www-backup >/dev/null 2>&1
run the sersync:
watch path is: /data/www
# 查看新进程已经建立
[root@Data-Server-IP08 ]#ps aux | grep sersync
root 10663 0.0 0.0 157876 1552 ? Ssl 04:07 0:00 sersync2 -dro /usr/local/sersync/confxml.xml
root 10680 0.0 0.0 12136 1156 pts/0 S+ 04:07 0:00 grep --color=auto sersync
4.3 验证实时复制和备份
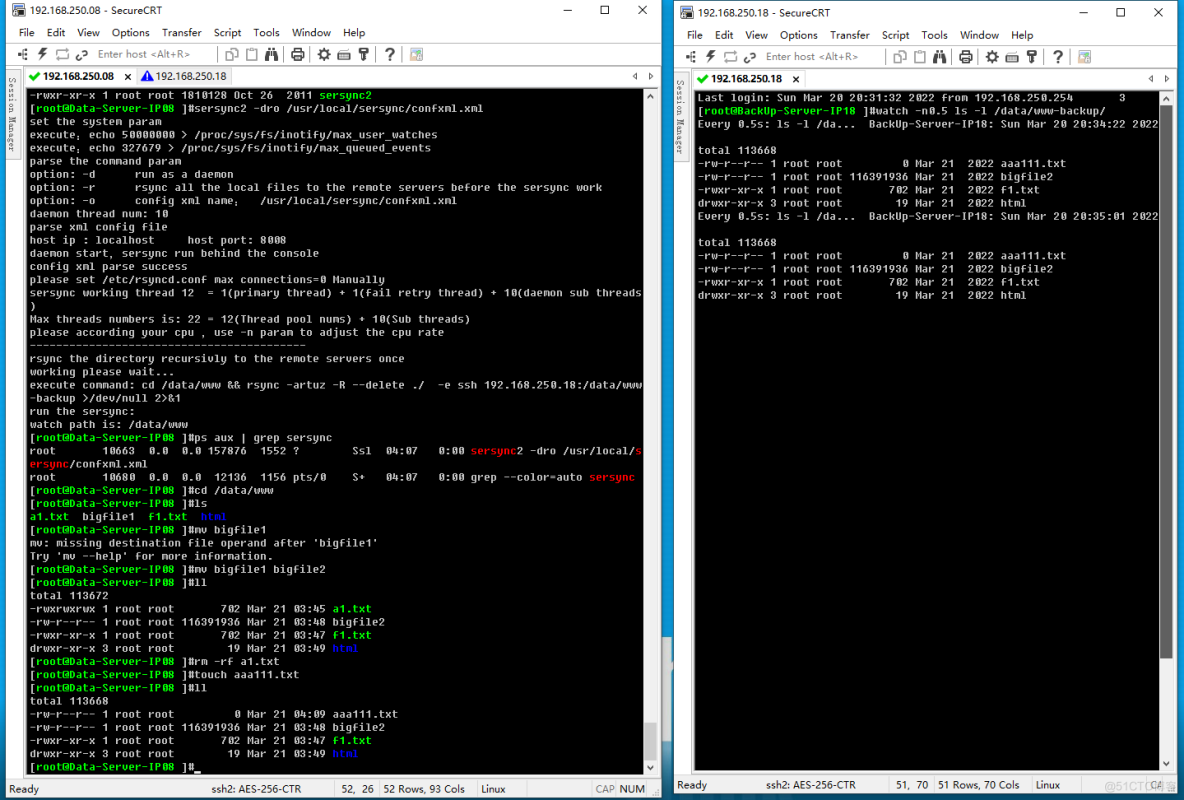
# 下面是在生产服务器上操作的一些命令,在下图可以看到同步目录的效果[root@Data-Server-IP08 ]#cd /data/www
[root@Data-Server-IP08 ]#ls
a1.txt bigfile1 f1.txt html
[root@Data-Server-IP08 ]#mv bigfile1 bigfile2
[root@Data-Server-IP08 ]#ll
total 113672
-rwxrwxrwx 1 root root 702 Mar 21 03:45 a1.txt
-rw-r--r-- 1 root root 116391936 Mar 21 03:48 bigfile2
-rwxr-xr-x 1 root root 702 Mar 21 03:47 f1.txt
drwxr-xr-x 3 root root 19 Mar 21 03:49 html
[root@Data-Server-IP08 ]#rm -rf a1.txt
[root@Data-Server-IP08 ]#touch aaa111.txt
[root@Data-Server-IP08 ]#ll
total 113668
-rw-r--r-- 1 root root 0 Mar 21 04:09 aaa111.txt
-rw-r--r-- 1 root root 116391936 Mar 21 03:48 bigfile2
-rwxr-xr-x 1 root root 702 Mar 21 03:47 f1.txt
drwxr-xr-x 3 root root 19 Mar 21 03:49 html
[root@Data-Server-IP08 ]#
# 第二种情况 以SSH免密验证的方式完成,再备份服务器上watch 目录变化情况。运行时间比较短,可以借助下面的命令自行观测
Last login: Sun Mar 20 20:31:32 2022 from 192.168.250.254 3
[root@BackUp-Server-IP18 ]#watch -n0.5 ls -l /data/www-backup/
Every 0.5s: ls -l /da... BackUp-Server-IP18: Sun Mar 20 20:34:22 2022
total 113668
-rw-r--r-- 1 root root 0 Mar 21 2022 aaa111.txt
-rw-r--r-- 1 root root 116391936 Mar 21 2022 bigfile2
-rwxr-xr-x 1 root root 702 Mar 21 2022 f1.txt
drwxr-xr-x 3 root root 19 Mar 21 2022 html

