使用 spring-security-oauth2 体验 OAuth 2.0 的四种授权模式 目录 背景 相关代码 授权码模式 第一步 访问 GET /oauth/authorize 第二步 访问 POST /oauth/authorize 第三步 访问 POST /oauth/token 简化模式 第一
- 背景
- 相关代码
- 授权码模式
- 第一步 访问
GET /oauth/authorize - 第二步 访问
POST /oauth/authorize - 第三步 访问
POST /oauth/token
- 第一步 访问
- 简化模式
- 第一步 访问
GET /oauth/authorize - 第二步 访问
POST /oauth/authorize
- 第一步 访问
- 密码模式
- 直接访问
POST /oauth/token
- 直接访问
- 客户端模式
- 直接访问
POST /oauth/token
- 直接访问
- 参考
一直对OAuth 2.0的四种授权模式比较好奇,了解的仅限网上的资料,没有使用代码体验过,这次使用spring-security-oauth2来体验这四种模式的整个过程。
pom文件

<dependencies>
        <dependency>
            <groupId>org.springframework.boot</groupId>
            <artifactId>spring-boot-starter-security</artifactId>
            <version>2.1.4.RELEASE</version>
        </dependency>

        <dependency>
            <groupId>org.springframework.boot</groupId>
            <artifactId>spring-boot-starter-web</artifactId>
            <version>2.1.4.RELEASE</version>
        </dependency>

        <dependency>
            <groupId>org.springframework.security.oauth</groupId>
            <artifactId>spring-security-oauth2</artifactId>
            <version>2.0.16.RELEASE</version>
            <exclusions>
                <exclusion>
                    <artifactId>spring-core</artifactId>
                    <groupId>org.springframework</groupId>
                </exclusion>
                <exclusion>
                    <artifactId>spring-context</artifactId>
                    <groupId>org.springframework</groupId>
                </exclusion>
                <exclusion>
                    <artifactId>spring-beans</artifactId>
                    <groupId>org.springframework</groupId>
                </exclusion>
                <exclusion>
                    <artifactId>spring-security-core</artifactId>
                    <groupId>org.springframework.security</groupId>
                </exclusion>
            </exclusions>
        </dependency>

        <dependency>
            <groupId>com.google.guava</groupId>
            <artifactId>guava</artifactId>
            <version>26.0-jre</version>
        </dependency>
    </dependencies>
配置类

@Configuration
@EnableAuthorizationServer
public class MyAuthorizationServerConfigurerAdapter extends AuthorizationServerConfigurerAdapter {

    @Override
    public void configure(ClientDetailsServiceConfigurer clients) throws Exception {
        clients
                .inMemory()
                .withClient("clientUser")
                .secret("{bcrypt}" + new BCryptPasswordEncoder().encode("123456"))
                .authorizedGrantTypes("authorization_code", "implicit", "password", "client_credentials");
    }

    @Override
    public void configure(AuthorizationServerEndpointsConfigurer endpoints) {
        DaoAuthenticationProvider daoAuthenticationProvider = new DaoAuthenticationProvider();
        UserDetails userDetails = User.withUsername("username")
                .password("{bcrypt}" + new BCryptPasswordEncoder().encode("password"))
                .roles("123")
                .build();
        InMemoryUserDetailsManager inMemoryUserDetailsManager = new InMemoryUserDetailsManager(userDetails);
        daoAuthenticationProvider.setUserDetailsService(inMemoryUserDetailsManager);
        AuthenticationManager authenticationManager = new ProviderManager(
                Lists.<AuthenticationProvider>newArrayList(daoAuthenticationProvider));
        endpoints.authenticationManager(authenticationManager);
    }
}

@Configuration
@EnableWebSecurity
public class SecurityConfig extends WebSecurityConfigurerAdapter {
    @Bean
    public InMemoryUserDetailsManager inMemoryUserDetailsManager(
            SecurityProperties properties) {
        SecurityProperties.User user = properties.getUser();
        List<String> roles = user.getRoles();
        return new InMemoryUserDetailsManager(User.withUsername("user")
                .password("{bcrypt}" + new BCryptPasswordEncoder().encode("123456"))
                .roles(StringUtils.toStringArray(roles)).build());
    }
}
启动类

@SpringBootApplication(
        exclude = UserDetailsServiceAutoConfiguration.class
        // excludeName = "org.springframework.boot.autoconfigure.security.servlet.UserDetailsServiceAutoConfiguration"
)
public class SpringSecurityStudyApplication {

    public static void main(String[] args) {
        SpringApplication.run(SpringSecurityStudyApplication.class, args);
    }
}
GET /oauth/authorize
相关代码在org.springframework.security.oauth2.provider.endpoint.AuthorizationEndpoint
org.springframework.security.oauth2.provider.endpoint.WhitelabelApprovalEndpoint
请求参数和返回结果如下:
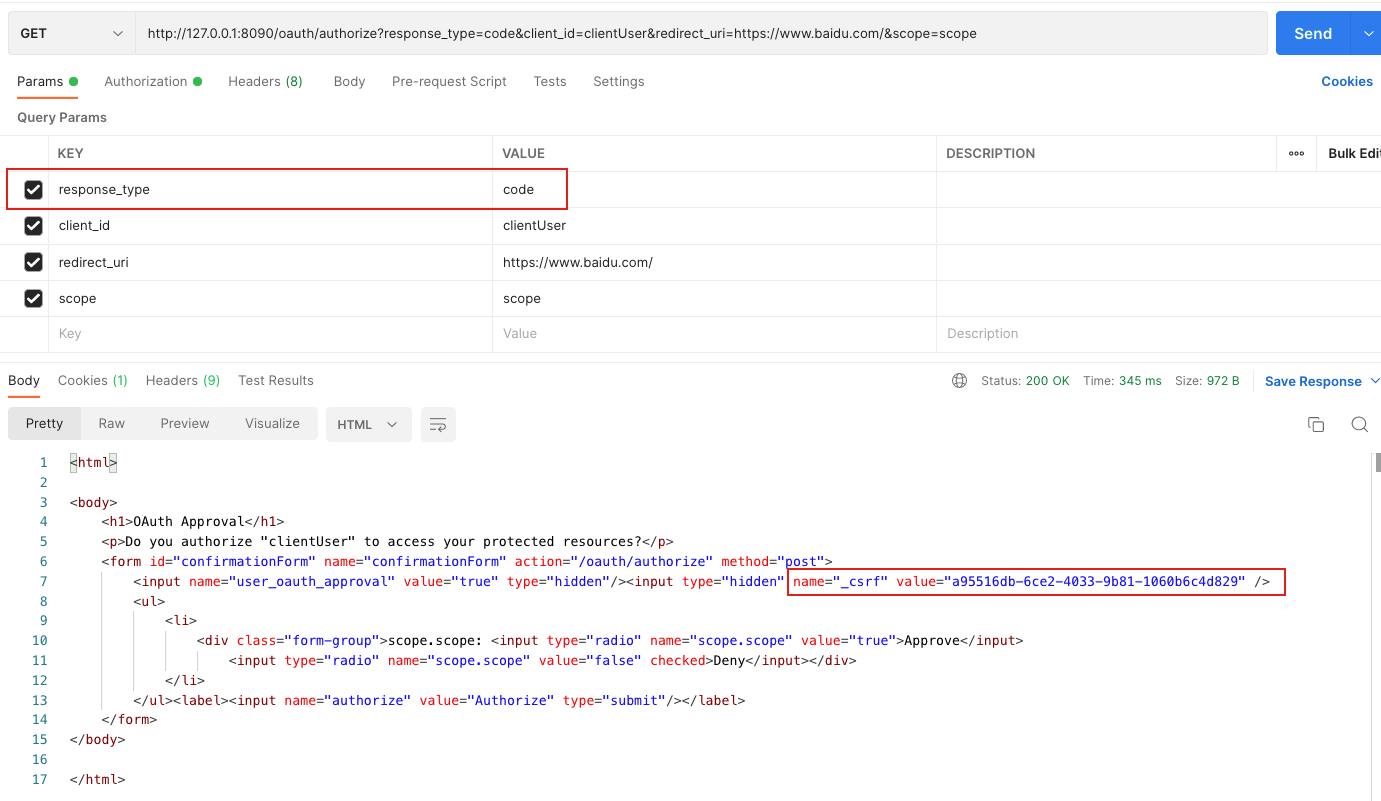
返回结果在浏览器上展示的话,是让用户来勾选是否同意授权的一个页面,还有返回结果的_csrf的值要作为第二步的参数。
curl如下:
curl --location --request GET 'http://127.0.0.1:8090/oauth/authorize?response_type=code&client_id=clientUser&redirect_uri=https://www.baidu.com/&scope=scope' \
--header 'Authorization: Basic dXNlcjoxMjM0NTY=' \
--header 'Cookie: JSESSIONID=AB254815273DB81F1F3BAF74E94DAAB6'
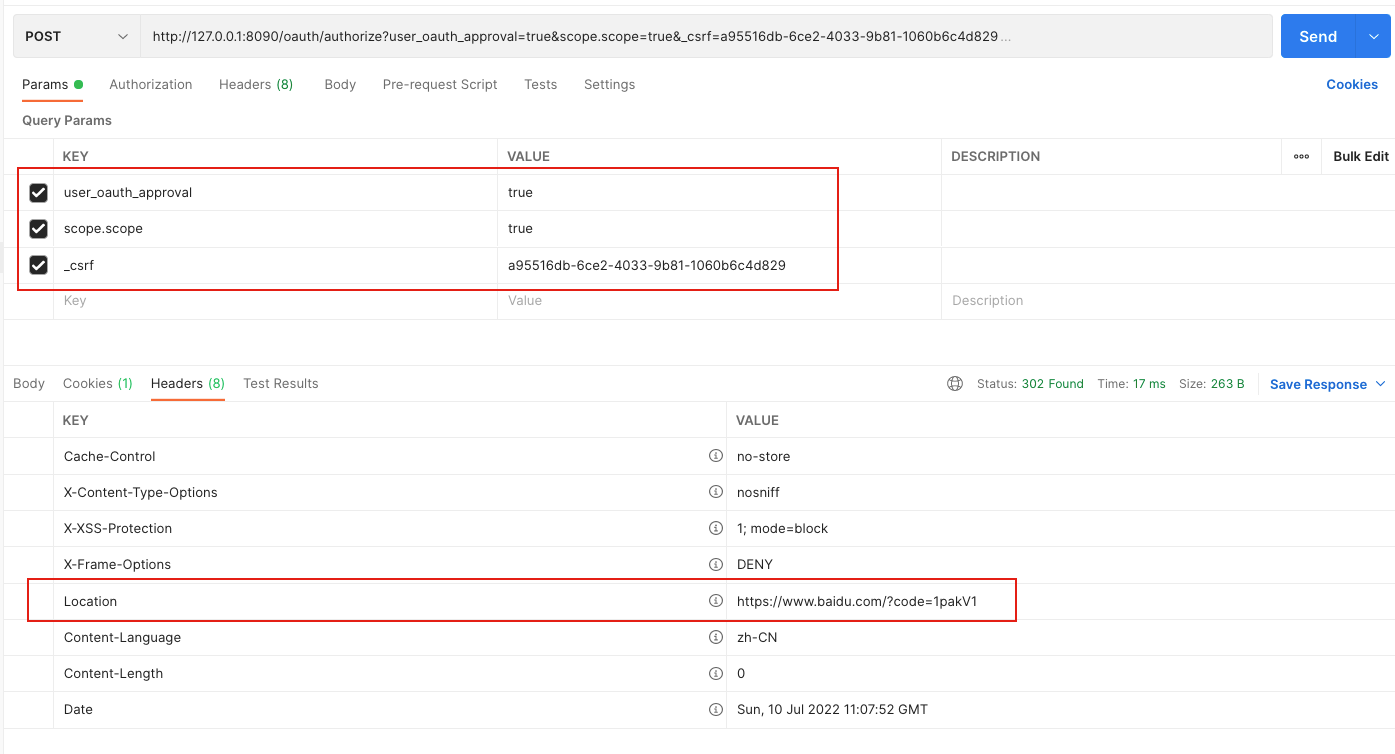
POST /oauth/authorize
相关代码在org.springframework.security.oauth2.provider.endpoint.AuthorizationEndpoint
crul如下:
curl --location --request POST 'http://127.0.0.1:8090/oauth/authorize?user_oauth_approval=true&scope.scope=true&_csrf=a95516db-6ce2-4033-9b81-1060b6c4d829' \
--header 'Cookie: JSESSIONID=73E846796ACB7818E09B93AC4CFD320D'
_csrf 要使用第一步返回的结果,在返回头的Location里可以得到授权码
第一个参数必须要有,因为:
<input name="user_oauth_approval" value="true" type="hidden"/>

@RequestMapping(value = "/oauth/authorize", method = RequestMethod.POST, params = OAuth2Utils.USER_OAUTH_APPROVAL)
public View approveOrDeny(@RequestParam Map<String, String> approvalParameters, Map<String, ?> model, SessionStatus sessionStatus, Principal principal) {
}

public static final String USER_OAUTH_APPROVAL = "user_oauth_approval";
第二个参数是用户是否同意授权
第三步 访问POST /oauth/token
相关代码在org.springframework.security.oauth2.provider.endpoint.TokenEndpoint
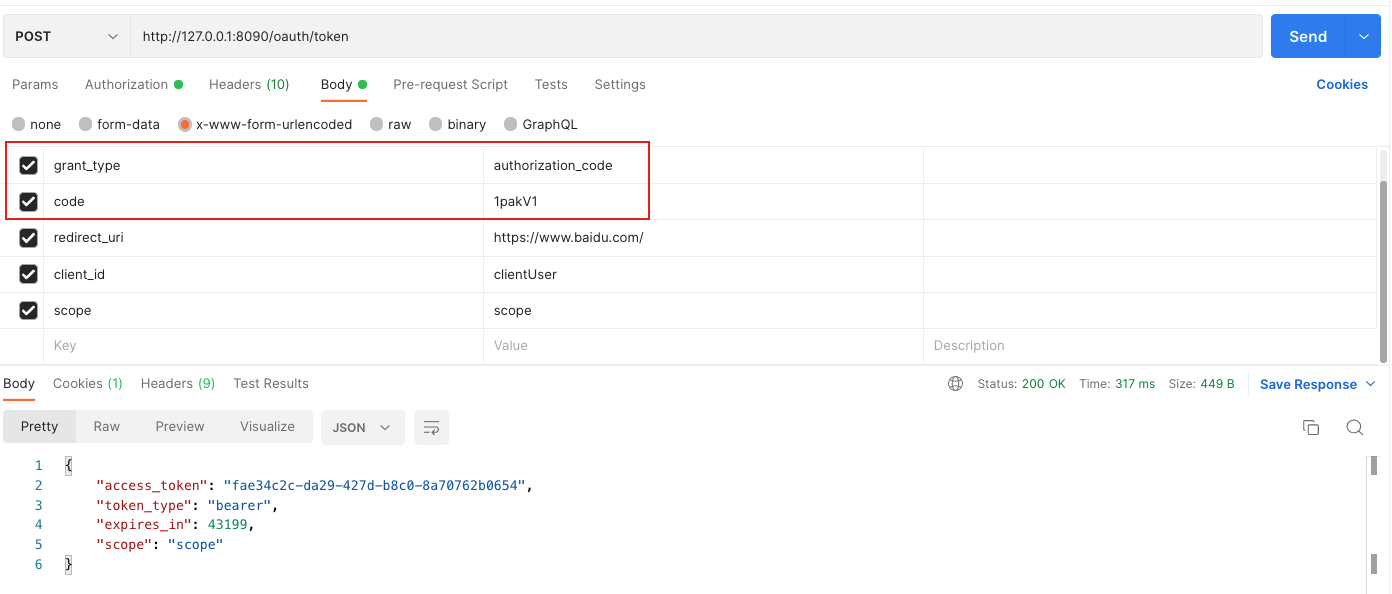
code 使用第二步的返回结果
crul如下:
curl --location --request POST 'http://127.0.0.1:8090/oauth/token' \
--header 'Authorization: Basic Y2xpZW50VXNlcjoxMjM0NTY=' \
--header 'Content-Type: application/x-www-form-urlencoded' \
--header 'Cookie: JSESSIONID=5D41BF01BC875BDF266D3C2178537F21' \
--data-urlencode 'grant_type=authorization_code' \
--data-urlencode 'code=1pakV1' \
--data-urlencode 'redirect_uri=https://www.baidu.com/' \
--data-urlencode 'client_id=clientUser' \
--data-urlencode 'scope=scope'
GET /oauth/authorize
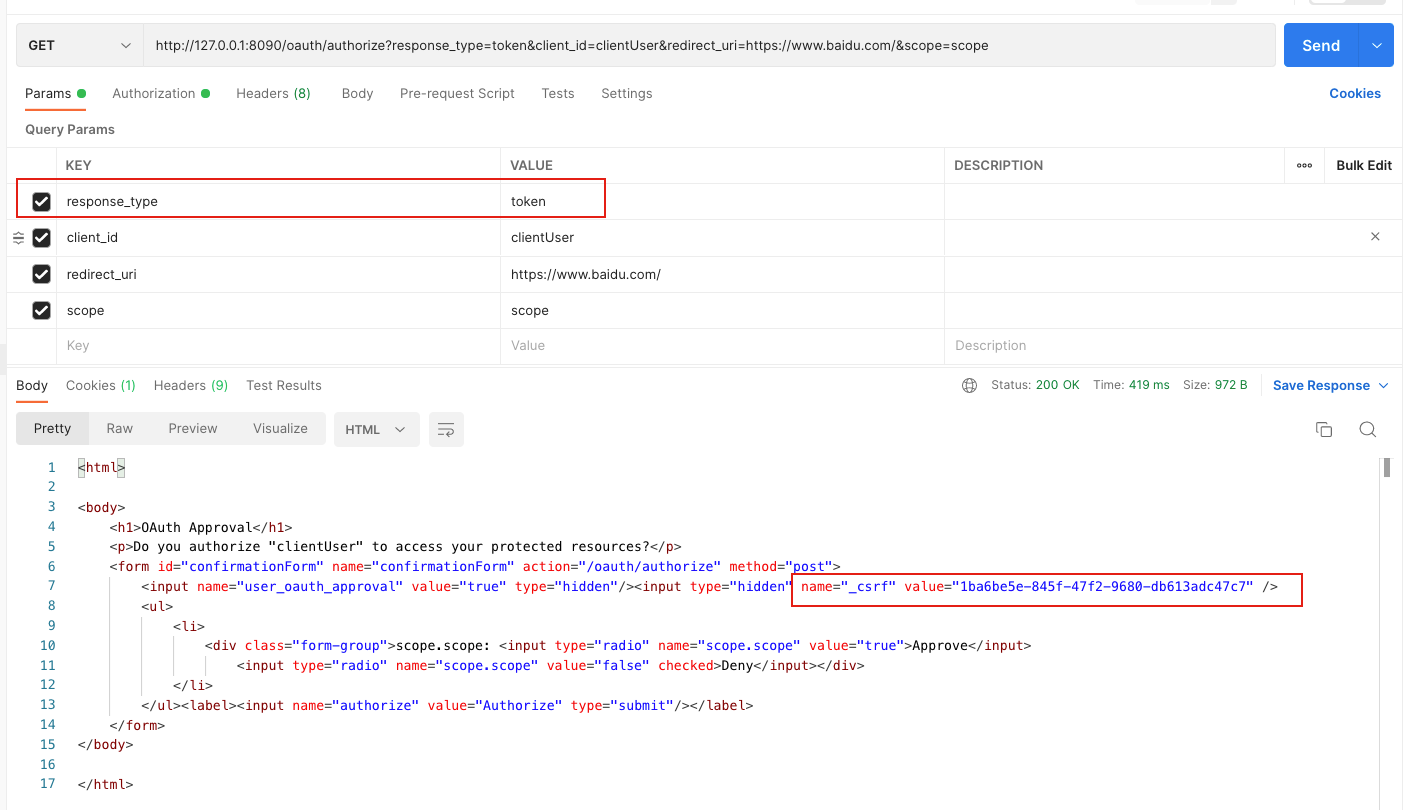
crul如下:
curl --location --request GET 'http://127.0.0.1:8090/oauth/authorize?response_type=token&client_id=clientUser&redirect_uri=https://www.baidu.com/&scope=scope' \
--header 'Authorization: Basic dXNlcjoxMjM0NTY=' \
--header 'Cookie: JSESSIONID=6AD429F6CF30C10C0E9F1A35EC78A790'
POST /oauth/authorize
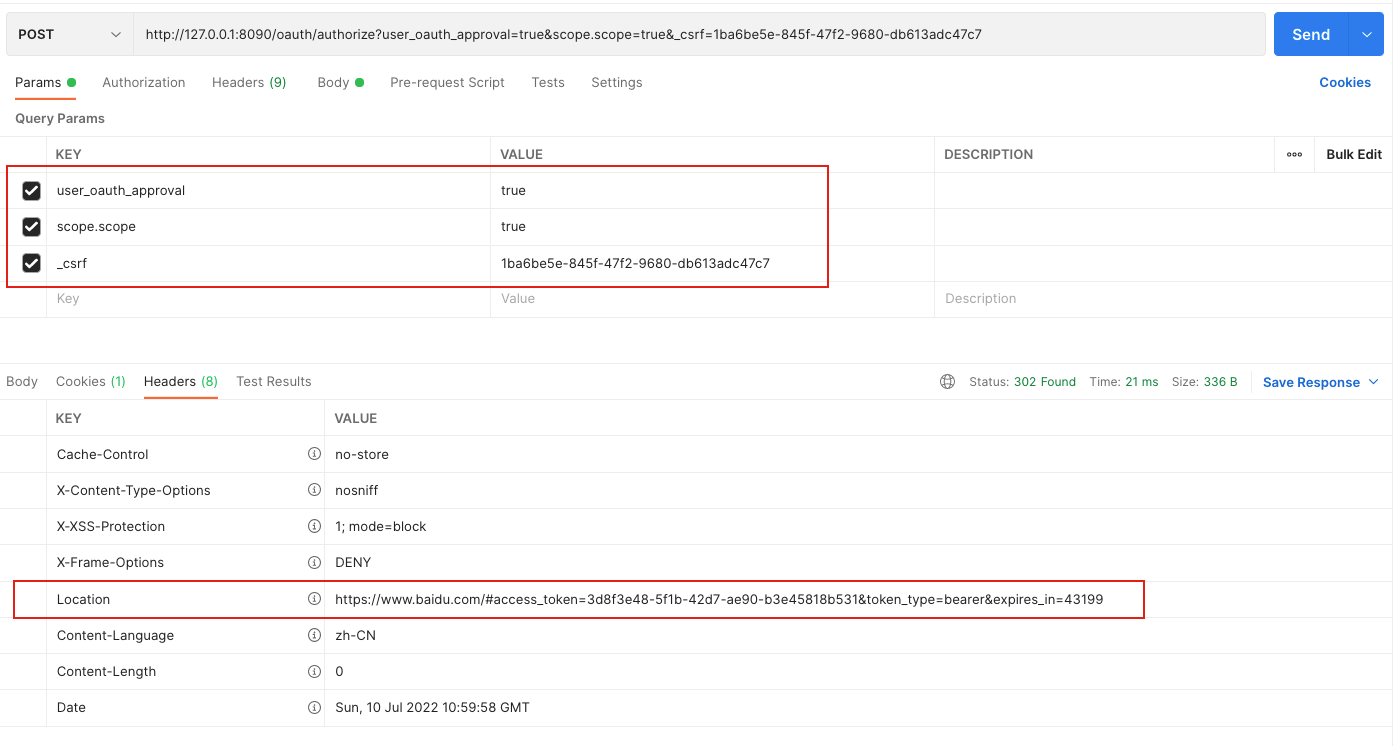
crul如下:
curl --location --request POST 'http://127.0.0.1:8090/oauth/authorize?user_oauth_approval=true&scope.scope=true&_csrf=1ba6be5e-845f-47f2-9680-db613adc47c7' \
--header 'Cookie: JSESSIONID=6AD429F6CF30C10C0E9F1A35EC78A790'
POST /oauth/token

curl如下:
curl --location --request POST 'http://127.0.0.1:8090/oauth/token' \
--header 'Authorization: Basic Y2xpZW50VXNlcjoxMjM0NTY=' \
--header 'Content-Type: application/x-www-form-urlencoded' \
--header 'Cookie: JSESSIONID=7E149951AB7D3C03E31E21450754DAAE' \
--data-urlencode 'grant_type=password' \
--data-urlencode 'username=username' \
--data-urlencode 'scope=scope' \
--data-urlencode 'password=password'
POST /oauth/token
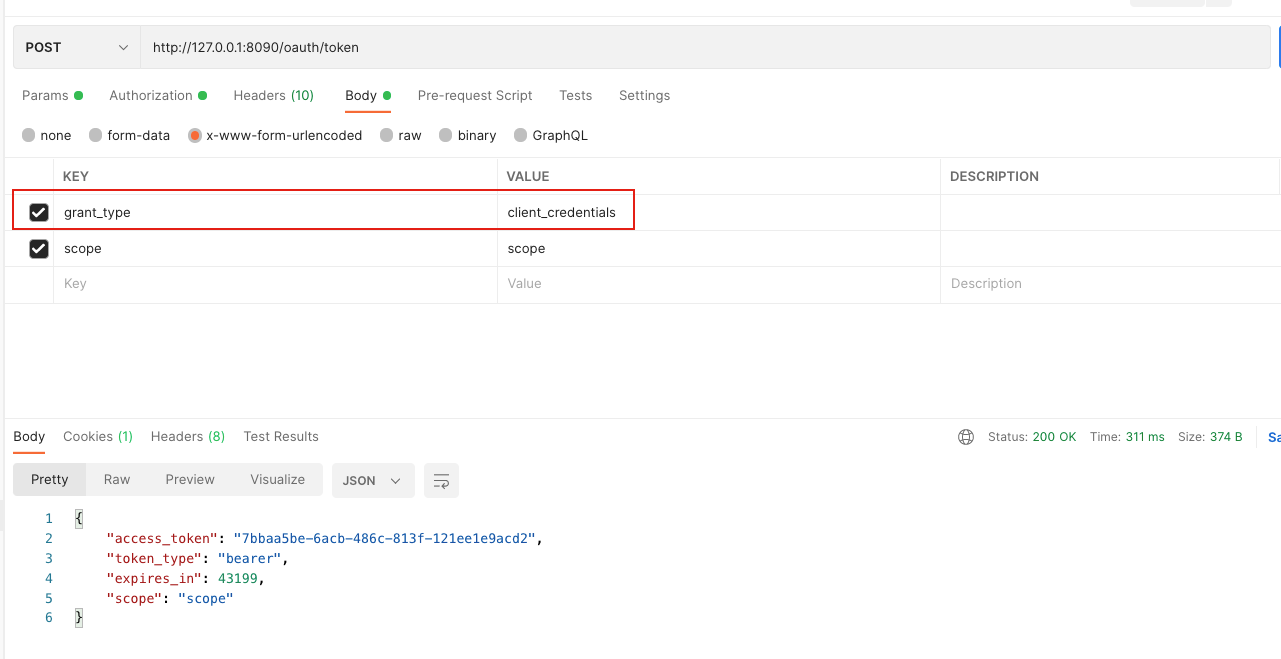
curl如下:
curl --location --request POST 'http://127.0.0.1:8090/oauth/token' \
--header 'Authorization: Basic Y2xpZW50VXNlcjoxMjM0NTY=' \
--header 'Content-Type: application/x-www-form-urlencoded' \
--header 'Cookie: JSESSIONID=7E149951AB7D3C03E31E21450754DAAE' \
--data-urlencode 'grant_type=client_credentials' \
--data-urlencode 'scope=scope'
理解OAuth 2.0 - 阮一峰