目录 1、首先按照官方组件在app.json中定义tabbar 2、在项目根目录创建自定义tabbar组件 3、组件内容如下: 4、在pages下的各个页面组件引入tabbar 总结 1、首先按照官方组件在app.json中定义
目录
- 1、首先按照官方组件在app.json中定义tabbar
- 2、在项目根目录创建自定义tabbar组件
- 3、组件内容如下:
- 4、在pages下的各个页面组件引入tabbar
- 总结
1、首先按照官方组件在app.json中定义tabbar
"tabBar": {
    "custom": true,
    "backgroundColor": "#FFFFFF",
    "borderStyle": "white",
    "list": [
      {
        "pagePath": "pages/index/index",
        "text": "首页",
        "iconPath": "./images/home.png",
        "selectedIconPath": "./images/home.png"
      },
      {
        "pagePath": "pages/me/me",
        "text": "个人中心",
        "iconPath": "./images/me.png",
        "selectedIconPath": "./images/me.png"
      }
    ]
  },
"usingComponents": {}
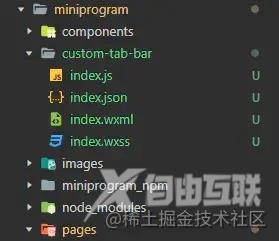
2、在项目根目录创建自定义tabbar组件
划重点:根目录,请看下图,不放根目录会导致this.getTabBar = null

3、组件内容如下:
- custom-tab-bar/index.js
Component({
  data: {
    selected: 0,
    color: "#7A7E83",
    selectedColor: "#3cc51f",
    list: [{
      pagePath: "../../pages/index/index",
      iconPath: "../images/home.png",
      selectedIconPath: "../images/home.png",
      text: "首页"
    }, {
      pagePath: "../../pages/me/me",
      iconPath: "../images/me.png",
      selectedIconPath: "../images/me.png",
      text: "个人中心"
    }]
  },
  attached() {
  },
  methods: {
    switchTab(e) {
      const data = e.currentTarget.dataset
      const url = data.path
      wx.switchTab({url})
      this.setData({
        selected: data.index
      })
    }
  }
})
- custom-tab-bar/index.json
{
  "component": true
}
- custom-tab-bar/index.wxml
<cover-view class="tab-bar">
  <cover-view class="tab-bar-border"></cover-view>
  <cover-view wx:for="{{list}}" wx:key="index" class="tab-bar-item" data-path="{{item.pagePath}}" data-index="{{index}}" bindtap="switchTab">
    <cover-image src="{{selected === index ? item.selectedIconPath : item.iconPath}}"></cover-image>
    <cover-view style="color: {{selected === index ? selectedColor : color}}">{{item.text}}</cover-view>
  </cover-view>
</cover-view>
- custom-tab-bar/index.wxss
.tab-bar {
  position: fixed;
  bottom: 0;
  left: 0;
  right: 0;
  height: 48px;
  background: white;
  display: flex;
  padding-bottom: env(safe-area-inset-bottom);
}

.tab-bar-border {
  background-color: rgba(0, 0, 0, 0.33);
  position: absolute;
  left: 0;
  top: 0;
  width: 100%;
  height: 1px;
  transform: scaleY(0.5);
}

.tab-bar-item {
  flex: 1;
  text-align: center;
  display: flex;
  justify-content: center;
  align-items: center;
  flex-direction: column;
}

.tab-bar-item cover-image {
  width: 27px;
  height: 27px;
}

.tab-bar-item cover-view {
  font-size: 10px;
}
4、在pages下的各个页面组件引入tabbar
以首页举例:
- pages/index.json
{
  "usingComponents": {
    "custom-tab-bar": "../../custom-tab-bar/index"
  }
}
- pages/index.js
Page({
  onShow: function () {
    if (typeof this.getTabBar === 'function' && this.getTabBar()) {
      this.getTabBar().setData({
        selected: 0
      })
    }
  }
})
- pages/index.wxml
<view class="container">
  <custom-tab-bar></custom-tab-bar>
</view>
总结
到此这篇关于关于微信小程序自定义tabbar问题的文章就介绍到这了,更多相关微信小程序自定义tabbar内容请搜索自由互联以前的文章或继续浏览下面的相关文章希望大家以后多多支持自由互联!
