目录 前言 显示隐藏密码明文 1.用到的图片素材 2.代码 3.结果演示 密码框验证信息 1.用到的图片素材 2.代码 3.结果演示 结语 前言 学前端最基本的登录页面肯定要会写,那登录页面里面
目录
- 前言
- 显示隐藏密码明文
- 1.用到的图片素材
- 2.代码
- 3.结果演示
- 密码框验证信息
- 1.用到的图片素材
- 2.代码
- 3.结果演示
- 结语
前言
学前端最基本的登录页面肯定要会写,那登录页面里面的密码框的功能设计就需要好好打磨,主要功能有显示密码明文,密码检测信息提示等等,那么本篇博客将写写这些功能结合js怎么做,很简单,看一下就会了。
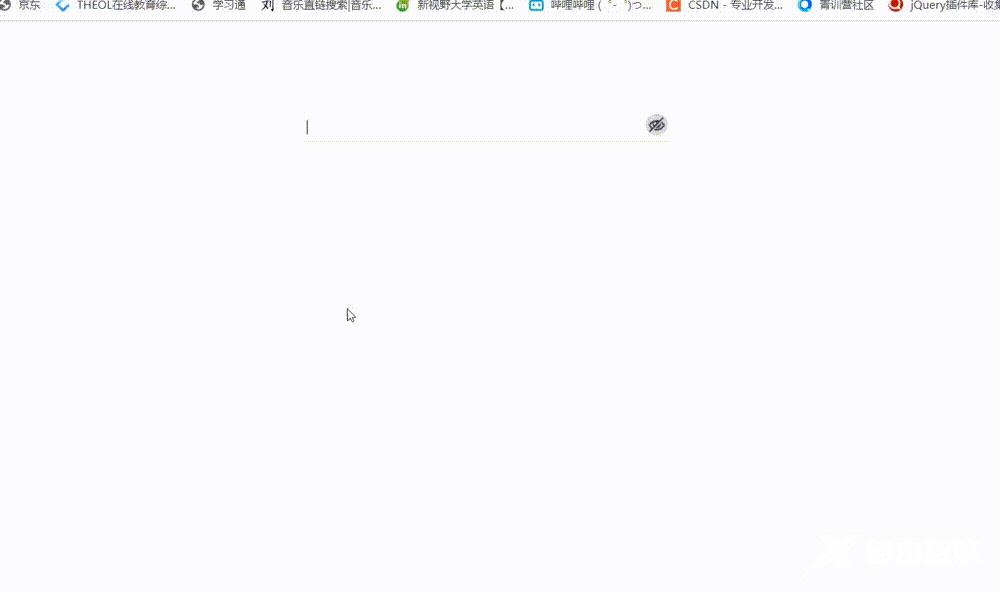
显示隐藏密码明文
1.用到的图片素材


2.代码
<!DOCTYPE html>
<html lang="en">
<head>
    <meta charset="UTF-8">
    <meta http-equiv="X-UA-Compatible" content="IE=edge">
    <meta name="viewport" content="width=device-width, initial-scale=1.0">
    <title>Document</title>
    <style>
        .box{
            position: relative;
            width: 400px;
            border-bottom: 1px solid #ccc;
            margin: 100px auto;
        }
        .box input{
            width: 370px;
            height: 30px;
            border: 0;
            outline: none;
        }
        .box .image{
            position: absolute;
            top:2px;
            right: 2px;
            border: 1px solid #ccc;
            background-color: #ccccccba;
            border-radius: 50%;
            overflow: hidden;
        }
        .box img{
            vertical-align: bottom;   /*父盒子是由img撑开的,所以要去除下面的间隙*/
            width: 22px;
        }

    </style>
</head>
<body>
    <div class="box">
        <div class="image">
            <img src="close.png" alt="" id="img">
        </div>
        <input type="password"  id="pwd">
    </div>
    <script>
        var img = document.getElementById('img');
        var pwd = document.getElementById('pwd');
        var flag = 0;
        img.onclick = function(){
            if(flag == 0){
                pwd.type = 'text';
                this.src='open.png';   // this指向事件函数的调用者,即img
                flag = 1;
            }else{
                pwd.type = 'password';
                this.src='close.png';
                flag = 0;
            }
        }

    </script>

</body>
</html>
3.结果演示
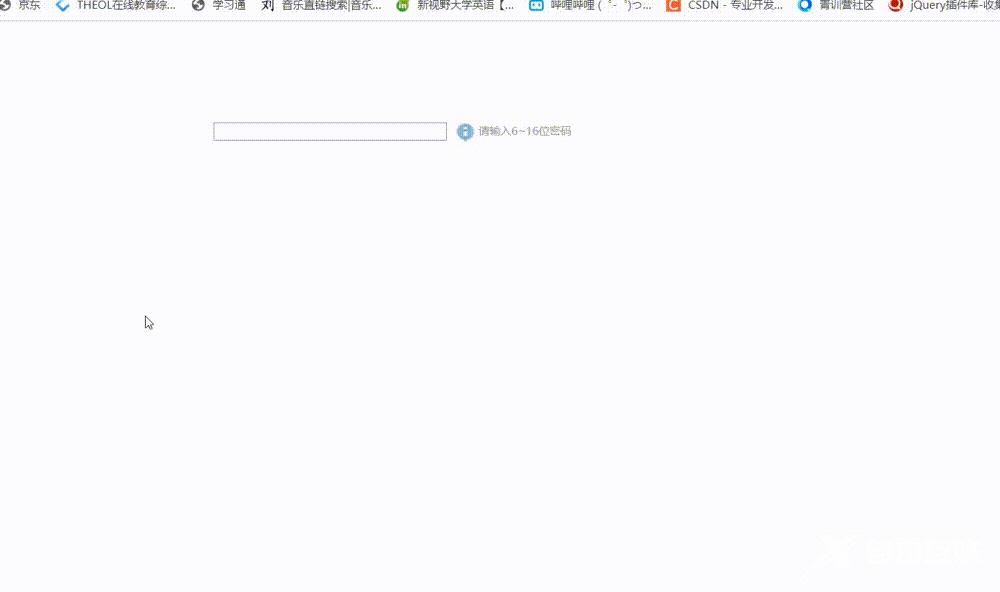
密码框验证信息
1.用到的图片素材


2.代码
<!DOCTYPE html>
<html lang="en">
<head>
    <meta charset="UTF-8">
    <meta http-equiv="X-UA-Compatible" content="IE=edge">
    <meta name="viewport" content="width=device-width, initial-scale=1.0">
    <title>Document</title>
    <style>
        .register{
            width: 600px;
            margin: 100px auto;
        }
        .ipt{
            width: 250px;
            border: 1px solid #999;
            outline: none;
        }
        .message{
            display: inline-block;
            height: 20px;
            font-size: 12px;
            color: #999;
            background: url(mess.png) no-repeat left center;
            padding-left: 30px;
        }
        .wrong{
            color: red;
            background: url(wrong.png) no-repeat left center;
        }
        .right{
            color: green;
            background: url(right.png) no-repeat left center;
        }
    </style>
</head>
<body>
    <div class="register">
        <input type="password" class="ipt">
        <p class="message">请输入6~16位密码</p>
    </div>
    <script>
        var ipt = document.querySelector('.ipt');
        var msg = document.querySelector('.message');
        ipt.onfocus = function(){
            this.style.borderColor = 'skyblue'
        }
        ipt.onblur = function(){
            this.style.borderColor = '#999';
            if(this.value.length<6 || this.value.length>16){
                msg.className = 'message wrong';
                msg.innerHTML = '你输入的位数不符合要求6~16位!';
            }else{
                msg.className = 'message right';
                msg.innerHTML = '你输入的正确!';
            }
        }
    </script>
</body>
</html>
3.结果演示
结语
以上就是javascript解锁前端密码框常见功能做法的详细内容,更多关于javascript前端密码框功能做法的资料请关注自由互联其它相关文章!