本文实例为大家分享了Android使用popupWindow仿微信弹出框的具体实现代码,供大家参考,具体内容如下 效果如下: 一、activity_main.xml代码 在activity_main.xml中设置弹出框按钮,并将activity
本文实例为大家分享了Android使用popupWindow仿微信弹出框的具体实现代码,供大家参考,具体内容如下
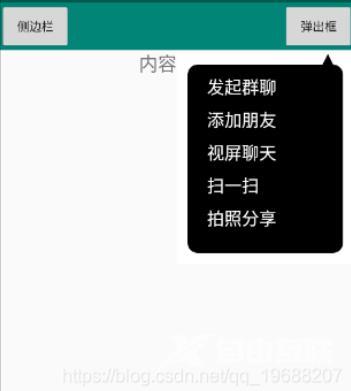
效果如下:
一、activity_main.xml代码
在activity_main.xml中设置"弹出框"按钮,并将activity_main.xml最外层设置一个id,代码如下
<androidx.drawerlayout.widget.DrawerLayout
    xmlns:android="http://schemas.android.com/apk/res/android"
    xmlns:app="http://schemas.android.com/apk/res-auto"
    xmlns:tools="http://schemas.android.com/tools"
    android:layout_width="match_parent"
    android:layout_height="match_parent"
    android:id="@+id/drawerLayout"
    tools:context=".MainActivity">


        <!-- 模拟toolbar的左侧图标 -->
        <LinearLayout
            android:layout_width="match_parent"
            android:layout_height="56dp"
            android:orientation="horizontal"
            android:gravity="center_vertical"
            android:background="@color/colorPrimary">
            <Button
                android:id="@+id/img_menuBtn"
                android:layout_width="match_parent"
                android:layout_height="match_parent"
                android:layout_weight="2"
                android:text="侧边栏"
                android:padding="8dp"/>

            <TextView
                android:layout_width="match_parent"
                android:layout_height="match_parent"
                android:layout_weight="1"/>

            <Button
                android:id="@+id/popupBtn"
                android:layout_width="match_parent"
                android:layout_height="match_parent"
                android:layout_weight="2"
                android:text="弹出框"
                android:padding="8dp"/>
        </LinearLayout>

</androidx.drawerlayout.widget.DrawerLayout>
二、创建带箭头的视图类
ArrowView.java代码如下:
package com.chy.test;

import android.content.Context;
import android.graphics.Canvas;
import android.graphics.Color;
import android.graphics.Paint;
import android.graphics.Path;
import android.graphics.RectF;
import android.util.AttributeSet;
import android.widget.LinearLayout;


import androidx.annotation.Nullable;

public class ArrowView extends LinearLayout {
    /**
     * 构造方法
     * */
    public ArrowView(Context context) {
        super(context);
    }

    public ArrowView(Context context,@Nullable AttributeSet attrs) {
        super(context,attrs);
    }

    public ArrowView(Context context,@Nullable AttributeSet attrs,int defStyleAttr) {
        super(context,attrs,defStyleAttr);
    }

    /**
     * 重写绘制方法
     * */
    @Override
    protected void onDraw(Canvas canvas) {
        super.onDraw(canvas);
        // 创建画笔
        Paint paint = new Paint();
        paint.setAntiAlias(true);   //设置画笔抗锯齿
        paint.setStrokeWidth(2);    //设置线宽
        paint.setColor(Color.BLACK);  //设置线的颜色

        int height = getHeight();   //获取View的高度
        int width = getWidth();     //获取View的宽度

        /**视图显示的区域**/
        /**
         * @param left 长方形左侧的x坐标
         * @param top 长方形顶的Y坐标
         * @param right 长方形右侧的X坐标
         * @param bottom 长方形底的Y坐标*/
        RectF rectF = new RectF(getPaddingLeft() - 20,getPaddingTop() - 20,width - getPaddingRight() + 20,height - getPaddingBottom()+20);

        /**
         * @param rectF RectF对象
         * @param rx x方向上的圆角半径
         * @param ry y方向上的圆角半径
         * @param paint 绘制时所使用的画笔
         * */
        canvas.drawRoundRect(rectF,30,30,paint);
       /* // 三角形在视图的正上方
        Path path = new Path();
        //以下是绘制视图的那个箭头
        path.moveTo(width / 2, 0);// 三角形顶点
        path.lineTo(width / 2 + getPaddingTop(),  getPaddingTop());   //三角形右边的点
        path.lineTo(width / 2 - getPaddingTop(),  getPaddingTop());   //三角形左边的点*/

        // 三角形在视图的正下方
        /*Path path = new Path();
        //以下是绘制视图的那个箭头
        path.moveTo(width / 2, height);// 三角形顶点
        path.lineTo(width / 2 - getPaddingBottom(), height - getPaddingBottom());   //三角形左边的点
        path.lineTo(width / 2 + getPaddingBottom(), height - getPaddingBottom());   //三角形右边的点*/

        /*// 三角形在视图的正左方
        Path path = new Path();
        //以下是绘制视图的那个箭头
        path.moveTo(0,  height / 2);// 三角形左侧顶点
        path.lineTo(getPaddingLeft(), height / 2 - getPaddingLeft());   //三角形上面的点
        path.lineTo(getPaddingLeft(), height / 2 + getPaddingLeft());   //三角形下面的点*/

       /* // 三角形在视图的正右方
        Path path = new Path();
        //以下是绘制视图的那个箭头
        path.moveTo(width,  height / 2);// 三角形右侧顶点
        path.lineTo(width - getPaddingRight(), height / 2 - getPaddingRight());   //三角形上面的点
        path.lineTo(width - getPaddingRight(), height / 2 + getPaddingRight());   //三角形下面的点*/

        // 三角形在视图的右上方
        Path path = new Path();
        //以下是绘制视图的那个箭头
        path.moveTo(width - getPaddingTop() * 3/2, 0);// 三角形顶点
        path.lineTo(width - getPaddingTop(),  getPaddingTop());   //三角形右边的点
        path.lineTo(width - getPaddingTop()*2,  getPaddingTop());   //三角形左边的点

        path.close();
        canvas.drawPath(path, paint);
        super.onDraw(canvas);
    }
}
三、创建popupwindow_dialog.xml和text.xml
popupwindow_dialog.xml代码如下:
<?xml version="1.0" encoding="utf-8"?>
<LinearLayout xmlns:android="http://schemas.android.com/apk/res/android"
    android:layout_width="match_parent"
    android:layout_height="match_parent"
    android:orientation="vertical">
    <!--使用箭头视图-->
    <com.chy.test.ArrowView
        android:layout_width="match_parent"
        android:layout_height="match_parent"
        android:background="@color/whiteColor"
        android:padding="20dp">

        <ListView
            android:id="@+id/lv_dialog"
            android:layout_width="match_parent"
            android:layout_height="match_parent"
            android:cacheColorHint="#00000000">
        </ListView>

    </com.chy.test.ArrowView>

</LinearLayout>
text.xml代码如下
<?xml version="1.0" encoding="utf-8"?>
<LinearLayout xmlns:android="http://schemas.android.com/apk/res/android"
    android:layout_width="match_parent"
    android:layout_height="match_parent"
    android:orientation="vertical" >

    <TextView
        android:id="@+id/tv_item"
        android:layout_width="match_parent"
        android:layout_height="wrap_content"
        android:layout_marginLeft="10dip"
        android:padding="5dp"
        android:textColor="@color/whiteColor"
        android:textSize="20sp" />

</LinearLayout>
四、使用方法
package com.chy.test;

import androidx.appcompat.app.AppCompatActivity;
import android.os.Bundle;
import android.view.Gravity;
import android.view.LayoutInflater;
import android.view.View;
import android.widget.AdapterView;
import android.widget.ArrayAdapter;
import android.widget.Button;
import android.widget.LinearLayout;
import android.widget.ListView;
import android.widget.PopupWindow;
import android.widget.Toast;

public class MainActivity extends AppCompatActivity {


    private Button popupBtn;// 弹出框按钮
    private PopupWindow popupWindow;
    private LinearLayout layout;
    private ListView listView;
    private String[] add ={"发起群聊","添加朋友","视屏聊天","扫一扫","拍照分享"};


    @Override
    protected void onCreate(Bundle savedInstanceState) {
        super.onCreate(savedInstanceState);
        setContentView(R.layout.activity_main);

        initViews();
    }
    /**
     * 初始化视图
     * */
    private void initViews() {
        // 弹出框
        popupBtn = findViewById(R.id.popupBtn);
        popupClick();
    }


    /**
     * 弹出框按钮点击事件
     * */
    private void popupClick(){
        popupBtn.setOnClickListener(new View.OnClickListener() {
            @Override
            public void onClick(View v) {
                int y1 = popupBtn.getBottom() * 3 / 2;
                int x1 = getWindowManager().getDefaultDisplay().getWidth();
                showAddPopupWindow(x1, y1);
            }
        });
    }


    /**
     * 点击popupBtn按钮时弹出popuwindow
     */
    public void showAddPopupWindow(int x, int y) {
        layout = (LinearLayout) LayoutInflater.from(MainActivity.this).inflate(
                R.layout.popupwindow_dialog, null);
        listView = layout.findViewById(R.id.lv_dialog);
        listView.setAdapter(new ArrayAdapter(MainActivity.this,
                R.layout.text, R.id.tv_item, add));

        popupWindow = new PopupWindow(MainActivity.this);
        // 以下两种选其一
        //popupWindow.setBackgroundDrawable(new BitmapDrawable());
        popupWindow.setBackgroundDrawable(null);

        popupWindow
                .setWidth(getWindowManager().getDefaultDisplay().getWidth() / 2);
        popupWindow.setHeight(640);
        popupWindow.setOutsideTouchable(true);
        popupWindow.setFocusable(true);
        popupWindow.setContentView(layout);
        popupWindow.showAtLocation(findViewById(R.id.drawerLayout), Gravity.LEFT
                | Gravity.TOP, x, y);//需要指定Gravity,默认情况是center.
        listView.setOnItemClickListener(new AdapterView.OnItemClickListener() {
            @Override
            public void onItemClick(AdapterView<?> arg0, View arg1, int arg2,
                                    long arg3) {
                Toast.makeText(getBaseContext(), "您选择了:"+add[arg2],Toast.LENGTH_SHORT).show();
                popupWindow.dismiss();
                popupWindow = null;
            }
        });
    }

}
以上就是本文的全部内容,希望对大家的学习有所帮助,也希望大家多多支持自由互联。