目录 LinearLayout RelativeLayout FrameLayout TableLayout GridLayout ConstraintLayout 参考 总结 LinearLayout ?xml version="1.0" encoding="utf-8"?LinearLayout xmlns:android="http://schemas.android.com/apk/res/android" android:layout_wid
目录
- LinearLayout
- RelativeLayout
- FrameLayout
- TableLayout
- GridLayout
- ConstraintLayout
- 参考
- 总结
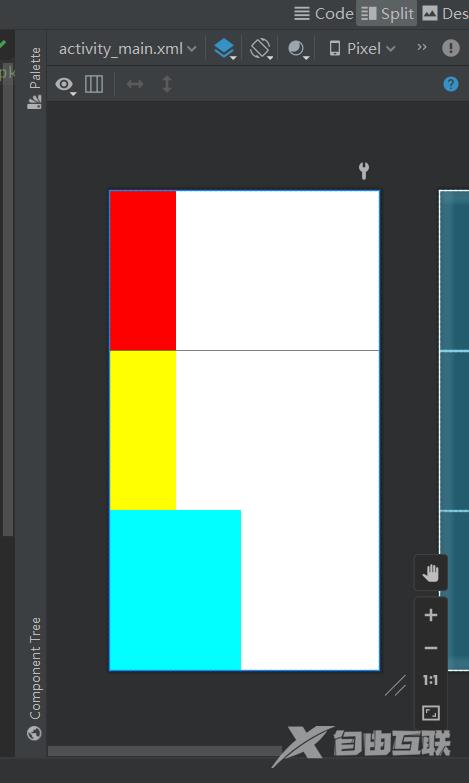
LinearLayout
<?xml version="1.0" encoding="utf-8"?>
<LinearLayout xmlns:android="http://schemas.android.com/apk/res/android"
    android:layout_width="match_parent"
    android:layout_height="match_parent"
    android:orientation="vertical"
    android:dividerPadding="200dp"
    >

    <LinearLayout
        android:layout_width="100dp"
        android:layout_height="0dp"
        android:background="#ff0000"
        android:layout_weight="1"
        />
    <View
        android:layout_width="match_parent"
        android:layout_height="1dp"
        android:background="#ff000000"
        />
    <LinearLayout
        android:layout_width="100dp"
        android:layout_height="0dp"
        android:background="#ffff00"
        android:layout_weight="1"
        />

    <LinearLayout
        android:layout_width="200dp"
        android:layout_height="00dp"
        android:layout_weight="1"
        android:background="#00ffff" />
</LinearLayout>
orientation设置排列方式
layout_weight设置权重(感觉和弹性盒子差不多)
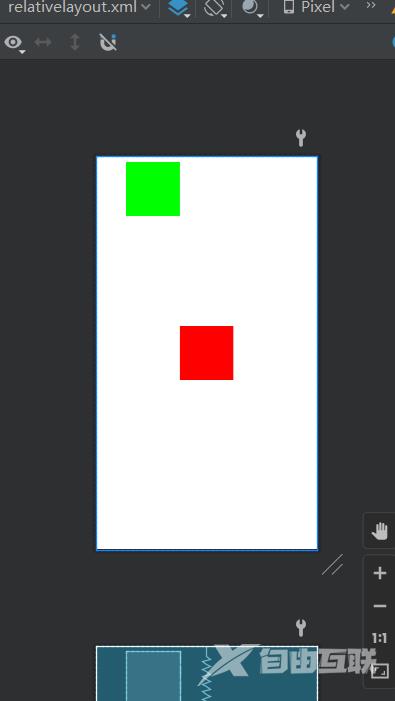
RelativeLayout
顾名思义,相对元素布局
<?xml version="1.0" encoding="utf-8"?>
<RelativeLayout xmlns:android="http://schemas.android.com/apk/res/android"
    android:layout_height="match_parent"
    android:layout_width="match_parent"
    android:padding="10dp"
    >
    <RelativeLayout
        android:id="@+id/rl1"
        android:layout_width="100dp"
        android:layout_height="100dp"
        android:background="#ff0000"
        android:layout_centerInParent="true"
        />
    <RelativeLayout
        android:layout_margin="0dp"
        android:layout_width="100dp"
        android:layout_height="100dp"
        android:background="#00ff00"
        android:layout_toLeftOf="@+id/rl1"
        />

</RelativeLayout>
FrameLayout
<?xml version="1.0" encoding="utf-8"?>
<FrameLayout
    android:layout_width="match_parent"
    android:layout_height="match_parent"
    xmlns:android="http://schemas.android.com/apk/res/android">

    <FrameLayout
        android:layout_width="400dp"
        android:layout_height="400dp"
        android:background="#ff0000"
        />
    <FrameLayout
        android:layout_width="300dp"
        android:layout_height="300dp"
        android:background="#ffff00"
        android:foreground="@drawable/a"
        />

    <FrameLayout
        android:layout_width="200dp"
        android:layout_height="200dp"
        android:background="#00ff00"/>

</FrameLayout>

简单来说,就是可以叠一起的布局
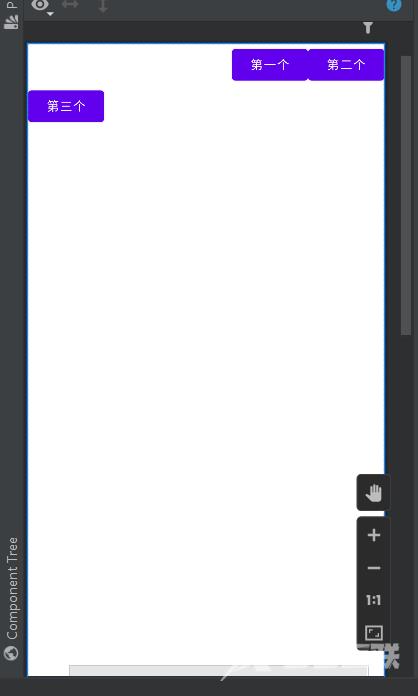
TableLayout
<?xml version="1.0" encoding="utf-8"?>
<TableLayout
    xmlns:android="http://schemas.android.com/apk/res/android"
    android:collapseColumns=""

    android:layout_width="match_parent"
    android:layout_height="match_parent"
    >
    <Button
        android:layout_width="wrap_content"
        android:layout_height="wrap_content"
        android:text="第1个"
        />
    <TableRow>
        <Button
            android:layout_width="wrap_content"
            android:layout_height="wrap_content"
            android:text="第一个"
            />

        <Button
            android:layout_width="wrap_content"
            android:layout_height="wrap_content"
            android:text="第二个"
            />
    </TableRow>

    <TableRow>
        <Button
            android:layout_width="wrap_content"
            android:layout_height="wrap_content"
            android:text="第一个"
            />
    </TableRow>

</TableLayout>

可以看成类似excel的表格一样的布局
通常结合< TableRow >一起使用
GridLayout
网格布局
<?xml version="1.0" encoding="utf-8"?>
<GridLayout
    xmlns:android="http://schemas.android.com/apk/res/android"
    android:layout_width="match_parent"
    android:layout_height="match_parent"
    android:orientation="horizontal"
    android:columnCount="3"
    >
    <Button
        android:layout_width="wrap_content"
        android:layout_height="wrap_content"
        android:layout_row="0"
        android:layout_column="1"
        android:text="第一个"
        />

    <Button
        android:layout_width="wrap_content"
        android:layout_height="wrap_content"
        android:text="第二个"
        />
    <Button
        android:layout_width="wrap_content"
        android:layout_height="wrap_content"
        android:text="第三个"
        android:layout_columnSpan="3"
        />
</GridLayout>
可以看成TableLayout升级版?
ConstraintLayout
约束布局
这个应该是最强的布局了
创建布局默认的就是这个了。

打开design模式,然后随便拖几个按钮进去
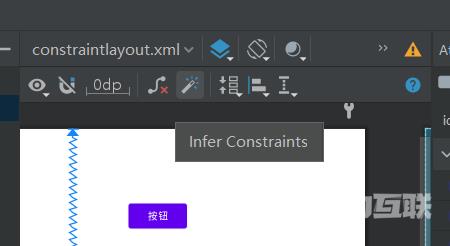
点击魔术棒建立约束。
ok完成布局了。
代码也自动生成好了:
<?xml version="1.0" encoding="utf-8"?>
<androidx.constraintlayout.widget.ConstraintLayout xmlns:android="http://schemas.android.com/apk/res/android"
    xmlns:app="http://schemas.android.com/apk/res-auto"
    xmlns:tools="http://schemas.android.com/tools"
    android:layout_width="match_parent"
    android:layout_height="match_parent">


    <Button
        android:id="@+id/button"
        android:layout_width="wrap_content"
        android:layout_height="wrap_content"
        android:layout_marginStart="246dp"
        android:layout_marginTop="107dp"
        android:text="按钮"
        app:layout_constraintStart_toStartOf="parent"
        app:layout_constraintTop_toTopOf="parent" />

    <Button
        android:id="@+id/button3"
        android:layout_width="wrap_content"
        android:layout_height="wrap_content"
        android:layout_marginEnd="172dp"
        android:layout_marginBottom="125dp"
        android:text="Button"
        app:layout_constraintBottom_toBottomOf="parent"
        app:layout_constraintEnd_toEndOf="parent" />

    <Button
        android:id="@+id/button4"
        android:layout_width="wrap_content"
        android:layout_height="wrap_content"
        android:layout_marginStart="115dp"
        android:text="Button"
        app:layout_constraintBottom_toBottomOf="parent"
        app:layout_constraintStart_toStartOf="parent"
        app:layout_constraintTop_toTopOf="parent" />
</androidx.constraintlayout.widget.ConstraintLayout>
我们开个虚拟机运行一下:
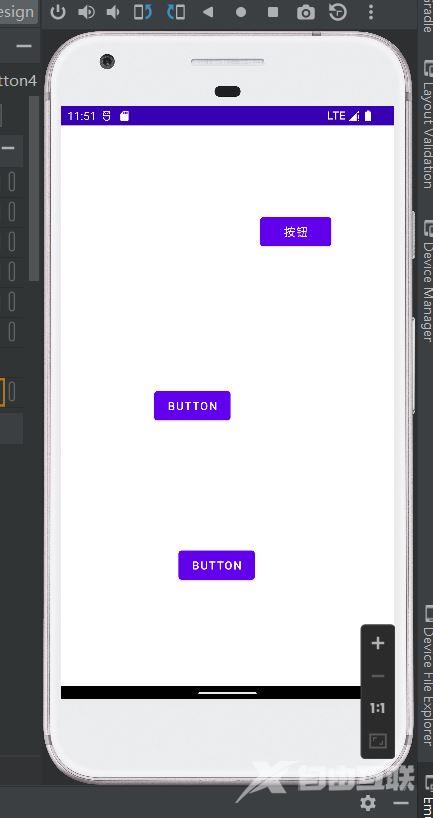
只能说,差不太多,微调一下差不多就能用了。
也能够设置各个组件的属性值颜色字体等等。
这用起来就像是墨刀一样。
参考
https://www.bilibili.com/video/BV1Jb4y187C4/?p=25&spm_id_from=pageDriver&vd_source=f57738ab6bbbbd5fe07aae2e1fa1280f
总结
到此这篇关于Android移动应用开发指南之六种布局的文章就介绍到这了,更多相关Android移动应用开发布局内容请搜索自由互联以前的文章或继续浏览下面的相关文章希望大家以后多多支持自由互联!