目录
- 前言
- Path 的 transform 方法
- 绕任意点旋转
- 卡片3D 旋转实现
- 日历翻页效果
- 总结
前言
本篇我们继续介绍 Flutter 绘图的 Path 的应用。Flutter 的 Path 类提供了一个三维空间的变换方法,可以实现路径在三维空间的平移、旋转等操作,从而可以实现3D 绘制的效果。通过本篇你将了解到:
Path的三维转换方法transform的使用。- 绕三维空间某一点的旋转实现。
- 卡片3D 旋转动效。
- 类似日历的三维翻页效果。
Path 的 transform 方法
Path 类的 transform 方法 将给定的Path 通过一个Float64List的对象进行三维变换,然后返回变换后的 Path对象,方法定义如下。
Path transform(Float64List matrix4) {
  assert(_matrix4IsValid(matrix4));
  final Path path = Path._();
  _transform(path, matrix4);
  return path;
}
其中 Float64List 一般都是通过 Matrix4 对象的 storage得到,例如我们在 x 方向平移5.0,可以按如下方式得到对应的 Float64List 对象。
var transform = (Matrix4.identity()
  ..translate(5.0, 0.0, 0.0)).storage;
Matrix4提供了平移、旋转、逆矩阵等多种方法,有兴趣的可以看一下 Matrix4的源码,实际上就是大学线性代数课(这门课还挺难的)的矩阵乘法内容。
绕任意点旋转
网上关于绕任意点的旋转推导很多,这里就不再赘述,结论就是实际上三个矩阵,先按给定点的(x,y,z)平移,再按给定的角度旋转,再按给定点的反向(-x,-y,-z)平移。比如下面是围绕 point 点,在 X 轴方向旋转 angle 角度的变换代码。
var transform = Matrix4.identity()
  ..translate(point.dx, point.dy, point.dz)
  ..rotateX(angle)
  ..translate(-point.dx, -point.dy, -point.dz);
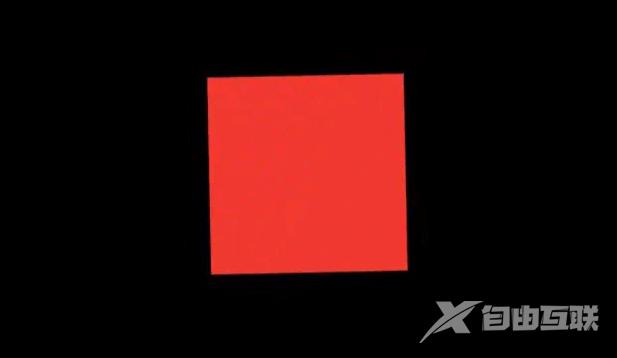
卡片3D 旋转实现
有了上面的基础,我们就可以实现卡片的3D旋转效果了。

这个实际就是用 Path 绘制了一个实心的正方形,然后绕中心点同时在 X 轴和 Y 轴旋转,旋转的角度由动画来控制。然后在动画值的中间的变更颜色,就看起来像是两面了。具体实现的代码如下。
var paint = Paint()
  ..style = PaintingStyle.fill
  ..color = Colors.blue[400]!
  ..strokeWidth = 4.0;

var center = Offset(size.width / 2, size.height / 2);
var path = Path();
final rectSize = 100.0;
path.addRect(Rect.fromCenter(
    center: Offset(center.dx, center.dy),
    width: rectSize,
    height: rectSize));
var transform = Matrix4.identity()
  ..translate(center.dx, center.dy, 0.0)
  ..rotateX(pi * animationValue)
  ..rotateY(pi * animationValue)
  ..translate(-center.dx, -center.dy, 0.0);

var transformedPath = path.transform(transform.storage);
if (animationValue < 0.5) {
  paint.color = Colors.blue[400]!;
} else {
  paint.color = Colors.red;
}
canvas.drawPath(transformedPath, paint);
我们还可以绕 Z 轴旋转来看看效果。
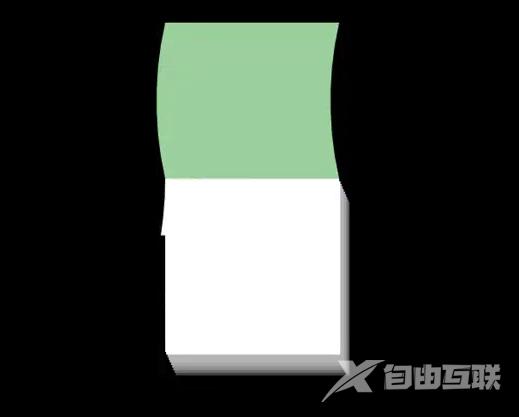
日历翻页效果
老的日历通常是挂在墙上,过了一天就把这一天的翻上去。

观察上面的图,下面的部分是矩形,上面翻上去的会有一个曲度,这个我们可以通过贝塞尔曲线来实现。然后,翻页过程其实就是从下面绕中间位置旋转岛上面的过程,只是在旋转过程中需要同时更改绘制的路径,逐步从矩形过渡到带有曲度的形状。
下半部分绘制
下半部分绘制比较简单,我们为了体现日历的厚度,可以绘制多个高度错开的矩形,并且颜色有点偏差,看起来就像有厚度了。

绘制代码如下,这里有两个关键点,一个是每次绘制的矩形会往下偏和往右偏移一定的位置,另一个是更改绘制颜色的透明度,这样就会有厚度的感觉了。
var bottomPath = Path();
for (var i = 0; i < 10; ++i) {
  bottomPath.addRect(Rect.fromCenter(
      center: Offset(
          size.width / 2 + i / 1.5, center.dy + rectSize / 2 + i * 1.5),
      width: rectSize,
      height: rectSize));
  paint.color = Colors.white70.withAlpha(240 + 10 * i);
  canvas.drawPath(bottomPath, paint);
上半部分的绘制
上半部分我们的侧边绘制一定的曲度,这样看着像翻过后卷起来的感觉。因为有部分卷起来了,因此高度会比下半部分低一些,曲度我们通过贝塞尔曲线控制,绘制的代码如下,这里有两个常量,一个是 topHeight 代表上半部分的高度,一个是 flippedSize,用于控制贝塞尔曲线的曲度。
final topHeight = 90.0;
final flippedSize = -10.0;

var topPath = Path();
topPath.moveTo(center.dx - rectSize / 2, center.dy);
topPath.lineTo(center.dx + rectSize / 2, center.dy);
topPath.quadraticBezierTo(
    center.dx + rectSize / 2 + flippedSize,
    center.dy - topHeight / 2,
    center.dx + rectSize / 2,
    center.dy - topHeight);
topPath.lineTo(center.dx - rectSize / 2, center.dy - topHeight);
topPath.quadraticBezierTo(center.dx - rectSize / 2 + flippedSize,
    center.dy - topHeight / 2, center.dx - rectSize / 2, center.dy);
canvas.drawPath(topPath, paint);
绘制的效果如下,看起来就有日历的感觉了。

翻页动效绘制
翻页动效实际上就是再画一个 Path,这个对象在动画过程中逐步从矩形转换为上半部分的图形,同时通过旋转动效翻转上去 —— 也就是其实我们绘制的是下半部分,只是通过旋转翻上去实现翻页的动效。实现的代码如下,主要的逻辑为:
下边缘的Y 轴位置在 animationValue = 0.0的时候等于下半部分的下边缘Y 轴的位置(rectSize),在 animationValue = 1.0的时候等于上半部分的上边缘Y 轴相对中心点对称位置的,即 center.dy + topHeight,因此得到高度变化的计算代码如下面第2行代码所示。这里增加了一些小的偏移,主要是为了和上下部分有点偏移量,这样能够将翻页和其他部分区分开。
左右两侧的曲度一开始是0,直到翻到中间位置后才显示,这个通过第3到第6行控制,当 animationValue < 0.5的时候,aniamtedFlippedSize 一直是0,即贝塞尔的控制点和起止点在同一条直线上,这样就不会有曲度了,等到animationValue > 0.5后,曲度跟随 animationValue 变化,最终和上半部分的曲度保持一致,这样旋转上去后能够重合。
旋转采用上面我们说的绕任意一点旋转的方式实现,这里我们是绕屏幕的中心,绕 X轴旋转,角度范围是0-180度。
最后是我们更改了翻页的颜色,这个主要是能够通过颜色区分,如果是相同的颜色的话就分不太出来了。
var flippedPath = Path();
var endY = rectSize - 2 + (topHeight - 1 - rectSize) * animationValue;
var animatedFlippedSize = 0.0;
if (animationValue > 0.5) {
  animatedFlippedSize = flippedSize * animationValue;
}
var offsetX = (1 - animationValue) * 4.0;
flippedPath.moveTo(center.dx - rectSize / 2, center.dy);
flippedPath.lineTo(center.dx + rectSize / 2, center.dy);
flippedPath.quadraticBezierTo(
    center.dx + rectSize / 2 + animatedFlippedSize - offsetX,
    center.dy + endY / 2,
    center.dx + rectSize / 2 - offsetX,
    center.dy + endY);

flippedPath.lineTo(center.dx - rectSize / 2 - offsetX, center.dy + endY);
flippedPath.quadraticBezierTo(
    center.dx - rectSize / 2 + animatedFlippedSize,
    center.dy + endY / 2,
    center.dx - rectSize / 2,
    center.dy);
var transform = Matrix4.identity()
  ..translate(center.dx, center.dy, 0.0)
  ..rotateX(pi * animationValue)
  ..translate(-center.dx, -center.dy, 0.0);
var transformedPath = flippedPath.transform(transform.storage);
if (animationValue < 0.5) {
  paint.color = Colors.white;
} else {
  paint.color = Colors.green[300]!;
}
canvas.drawPath(transformedPath, paint);
最终的实现效果如下所示。
总结
本篇介绍了Flutter 绘图中的 Path类的三维空间变换方法和应用,可以看到,基于三维变换可以实现3D效果图形的绘制和实现3D 动效,这在有些特殊绘制的场景中或增添趣味性十分有用。
以上就是利用Flutter绘制出3D效果动画的详细内容,更多关于Flutter 3D动画的资料请关注自由互联其它相关文章!