本文实例为大家分享了opencv实现图像平移的具体代码,供大家参考,具体内容如下 图像平移指的是沿水平方向或垂直方向进行图像的移动。 平移变换公式: 对于原始图像而言,正变换
本文实例为大家分享了opencv实现图像平移的具体代码,供大家参考,具体内容如下
图像平移指的是沿水平方向或垂直方向进行图像的移动。
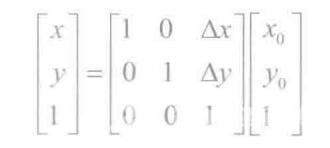
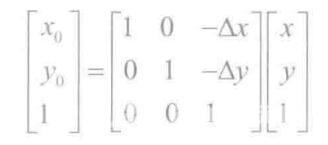
平移变换公式:

对于原始图像而言,正变换矩阵:

对于目标图像而言,逆变换矩阵:

代码:
#include<opencv2/imgproc.hpp>
#include<opencv2/highgui.hpp>
#include<opencv2/core.hpp>
#include<iostream>
#include<stdlib.h>
using namespace std;
using namespace cv;

Mat imgTranslation1(Mat& src, int xOffset, int yOffset);
Mat imgTranslation2(Mat& src, int xOffset, int yOffset);
int main()
{
    Mat src = imread("C:\\Users\\H\\Desktop\\niao.bmp");
    if (src.empty())
    {
        cout << "请检查图像是否存在..." << endl;
        return -1;
    }
    pyrDown(src, src);
    cout << "原图尺寸\trows:" << src.rows << "\tcols: " << src.cols << endl;

    int xOffset = 50, yOffset = 80;

    Mat dst1 = imgTranslation1(src, xOffset, yOffset);
    imshow("dst1", dst1);
    cout << "平移不改变尺寸\trows: " << dst1.rows << "\tcols: " << dst1.cols << endl;

    Mat dst2 = imgTranslation2(src, xOffset, yOffset);
    imshow("dst2", dst2);
    cout << "平移改变尺寸\trows: " << dst2.rows << "\tcols: " << dst2.cols << endl;
    waitKey(0);
    system("pause");
    return 0;
}

图像的平移 ,大小不变
Mat imgTranslation1(Mat& src, int xOffset, int yOffset)
{
    int nrows = src.rows;
    int ncols = src.cols;
    Mat dst(src.size(), src.type());
    for (int i = 0; i < nrows; i++)
    {
        for (int j = 0; j < ncols; j++)
        {
            映射变换
            int x = j - xOffset;
            int y = i - yOffset;
            边界判断
            if (x >= 0 && y >= 0 && x < ncols && y < nrows)
            {
                dst.at<Vec3b>(i, j) = src.ptr<Vec3b>(y)[x];
            }
        }
    }
    return dst;
}
//图像平移大小改变
Mat imgTranslation2(Mat& src, int xOffset, int yOffset)
{
    int nrows = src.rows + abs(yOffset);
    int ncols = src.cols + abs(xOffset);
    Mat dst(nrows, ncols, src.type());
    for (int i = 0; i < nrows; i++)
    {
        for (int j = 0; j < ncols; j++)
        {
            int x = j - xOffset;
            int y = i - yOffset;
            if (x >= 0 && y >= 0 && x < ncols && y < nrows)
            {
                dst.at<Vec3b>(i, j) = src.ptr<Vec3b>(y)[x];
            }
        }
    }
    return dst;
}
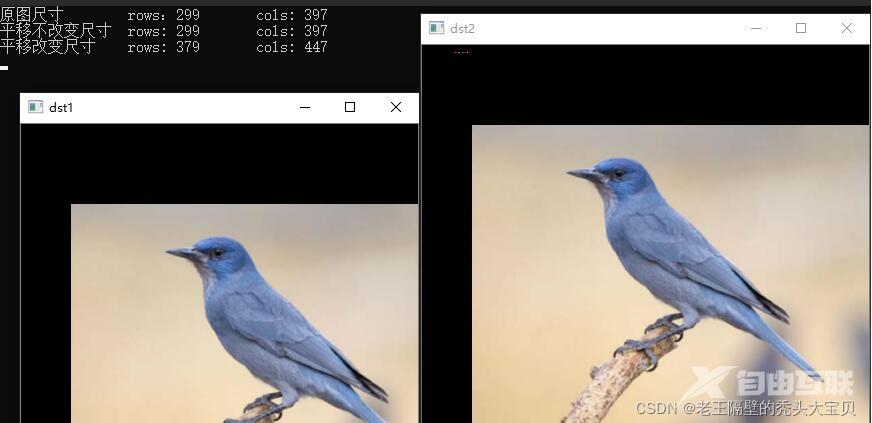
结果展示:

以上就是本文的全部内容,希望对大家的学习有所帮助,也希望大家多多支持自由互联。
