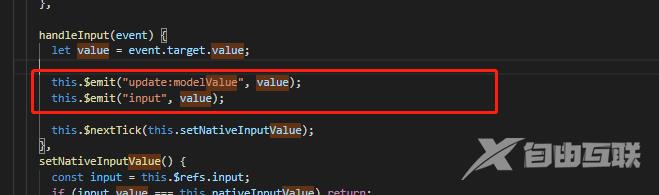
首先要注意 vue3中 v-model 默认绑定的变量名变了,从原理的 value 改成了 modelValue, 如果要改变变量的值,要执行一个事件 this.$emit(update:modelValue, value); templatediv class="inline"input :type="pas
首先要注意 vue3中 v-model 默认绑定的变量名变了,从原理的 value 改成了 modelValue,
如果要改变变量的值,要执行一个事件 this.$emit("update:modelValue", value);
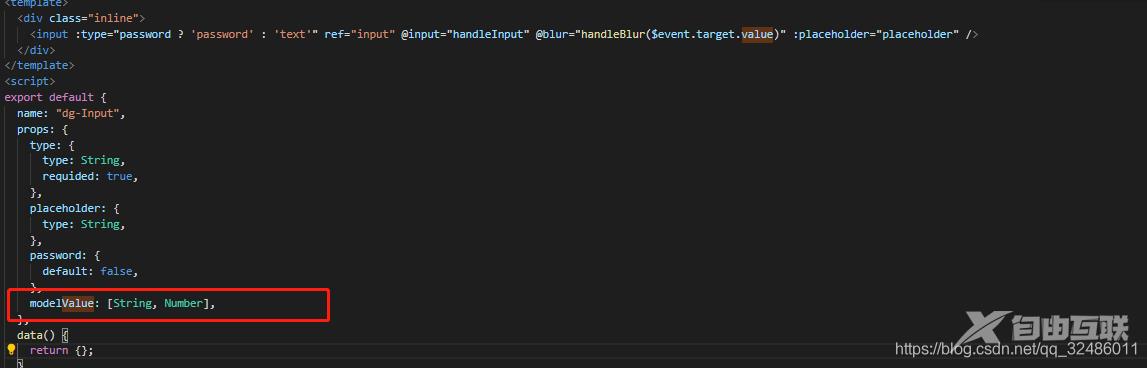
<template>
	<div class="inline">
		<input :type="password ? 'password' : 'text'" ref="input" @input="handleInput" @blur="handleBlur($event.target.value)" :placeholder="placeholder" />
	</div>
</template>
<script>
export default {
	name: "dg-Input",
	props: {
		type: {
			type: String,
			requided: true,
		},
		placeholder: {
			type: String,
		},
		password: {
			default: false,
		},
		modelValue: [String, Number],
	},
	data() {
		return {};
	},
	computed: {
		nativeInputValue() {
			return this.modelValue === null || this.modelValue === undefined ? "" : String(this.modelValue);
		},
	},
	methods: {
		handleInput(event) {
			let value = event.target.value;
			this.$emit("update:modelValue", value);
			this.$emit("input", value);
			this.$nextTick(this.setNativeInputValue);
		},
		setNativeInputValue() {
			const input = this.$refs.input;
			if (input.value === this.nativeInputValue) return;
			input.value = this.nativeInputValue;
		},


	},
	mounted() {
		this.setNativeInputValue();
	},
};
</script>
<style lang="scss" scoped>
.inline {
	display: inline-block;
	input {
		width: 100%;
		height: 100%;
		padding-left: 5px;
	}
}
</style>
vue3文档地址
补充:下面看下vue3中自定义组件使用v-model
vue2 中的v-model
v-model本质上是一个语法糖,如下代码
<input v-model="test">
<!--上面代码本质上就是下方代码-->
<input :value="test" @input="test = $event.target.value">
因此,对于一个带有 v-model 的组件(核心用法),它应该如下:
带有v-model的父组件通过绑定的value值(即v-model的绑定值)传给子组件,子组件通过 prop接收一个 value;
子组件利用oninput事件实时通过 $emit 触发父组件input 事件,并传入新值value给父组件;
父组件
<template>
    <div>
        <child v-model="msg" @input="msg = $event.target.value" />
        <!--<child :value="msg" @input="msg = $event.target.value" />-->
    </div>
</template>
<script>
import child from './components/Child.vue'
export default {
    components: {
        child
    },
    data() {
        return {
            msg: ''
        }
    }
}
</script>
子组件child
<template>
    <input type="text" :value="modelValue" @input="handleInput">
</template>
<script>
export default {
    name: 'Child',
    props:['value'],
    data() {
        return {
            modelValue: this.value
        }
    },
    methods: {
        handleInput(event) {
            this.$emit('input', event)
        }
    }
}
vue3中的 v-model
vue3中的v-model默认绑定的不是value,而是modelValue,接收的方法由input改为@update:modelValue。
<template>
  <child v-model="msg" />
  <p>{{msg}}</p>
</template>

<script lang="ts">
import { defineComponent,ref} from 'vue';
import child from './components/child/index.vue'

export default defineComponent({
  name: 'App',
  components:{
    child
  },
  setup(){
    const msg = ref('1')
    return{
      msg
    }
  }
});
</script>
<template>
    <input type="text" :value="modelValue" @input="onInput">
</template>
<script lang="ts">
import {defineComponent} from 'vue'
export default defineComponent({
    name:'ChildInput',
    props:{
        modelValue:{
            type:String
        }
    },
    setup(props, context){
        const onInput = (e: Event) =>{
            context.emit('update:modelValue',e.target.value)
        }
        return{
            onInput
        }
    }
})
</script>
到此这篇关于vue3 封装自定义组件v-model的文章就介绍到这了,更多相关vue3 自定义组件v-model内容请搜索易盾网络以前的文章或继续浏览下面的相关文章希望大家以后多多支持易盾网络!