目录 1.创建项目 2.安装vite 3.启动项目 4.可在vite.config.ts文件下修改端口号,默认为3030,我们可以改成习惯用的8080 5.安装路由router和element-plus 6.在src目录下新建views和router文件夹,然后在
目录
- 1.创建项目
- 2.安装vite
- 3.启动项目
- 4.可在vite.config.ts文件下修改端口号,默认为3030,我们可以改成习惯用的8080
- 5.安装路由router和element-plus
- 6.在src目录下新建views和router文件夹,然后在router目录下新建index.ts文件,在index.ts文件下配置路由
- 6.然后在main.ts中引入
- 7.使用element-plus
- 8.在App.vue中编写样式
- 附:vite引入element-plus修改主题色报错
- 总结
1.创建项目
npm init vite@latest m-component -- --template vue-ts
2.安装vite
npm i
3.启动项目
npm run dev
4.可在vite.config.ts文件下修改端口号,默认为3030,我们可以改成习惯用的8080
import { defineConfig } from 'vite'
import vue from '@vitejs/plugin-vue'

// https://vitejs.dev/config/
export default defineConfig({
  plugins: [vue()],
  server:{
    port:8080
  }
})
5.安装路由router和element-plus
npm i -S vue-router@next element-plus
可在package.json中查看下载的路由和element-plus配置信息
6.在src目录下新建views和router文件夹,然后在router目录下新建index.ts文件,在index.ts文件下配置路由
import { createRouter,createWebHistory,RouteRecordRaw } from "vue-router";
import Home from "../views/Home.vue"
const routes:RouteRecordRaw[] = [
    {
        path:'/',
        component:Home
    }
]
const router = createRouter({
    routes,
    history:createWebHistory()
})

export default router
在views目录下新建一个Home.vue文件
<template>
    <div>
       首页
    </div>
</template>

<script lang="ts" setup>

</script>

<style lang="scss" scoped>
</style>
6.然后在main.ts中引入
import { createApp } from 'vue'
import App from './App.vue'
import router from './router/index'

const app =createApp(App)
app.use(router)
app.mount('#app')
7.使用element-plus
在main.ts中引入使用
import { createApp } from 'vue'
import App from './App.vue'
import router from './router/index'
import ElementPlus from 'element-plus'
import 'element-plus/dist/index.css'

const app =createApp(App)
app.use(router).use(ElementPlus)
app.mount('#app')
在Home.vue中
<template>
    <div>
        <el-button>按钮</el-button>
    </div>
</template>

<script lang="ts" setup>

</script>

<style lang="scss" scoped>
</style>
8.在App.vue中编写样式
<template>
    <router-view></router-view>
</template>

<style>
*{
    margin: 0;
    padding: 0;
}
</style>
这里使用的scss,需要先安装sass 和sass-loader(*这是css的预处理器)
npm i -D sass sass-loader
附:vite引入element-plus修改主题色报错
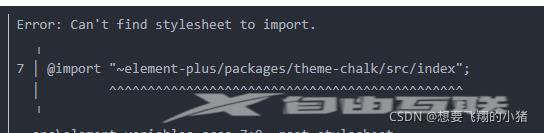
原因:引入文件路径不对
解决:~改成node_modules/,安装scss --dev,然后引入时去掉.scss/.css,完美运行
$--color-primary: #62c28c;

/* 改变 icon 字体路径变量,必需 */
$--font-path: "node_modules/element-plus/lib/theme-chalk/fonts";
@import "node_modules/element-plus/packages/theme-chalk/src/index";
总结
到此这篇关于搭建vite项目并配置路由和element-plus的文章就介绍到这了,更多相关vite搭建并配置路由element-plus内容请搜索易盾网络以前的文章或继续浏览下面的相关文章希望大家以后多多支持易盾网络!