ThinkPHP依赖以下环境Nginx+PHP,建议提前装好Composer,PHP、Composer需要设置好系统环境变量。 1.通过 Composer 安装Laravel框架 composer create-project topthink/think thinkphp6 启动服务测试 cd thinkphp6 php
ThinkPHP依赖以下环境Nginx+PHP,建议提前装好Composer,PHP、Composer需要设置好系统环境变量。
1.通过 Composer 安装Laravel框架
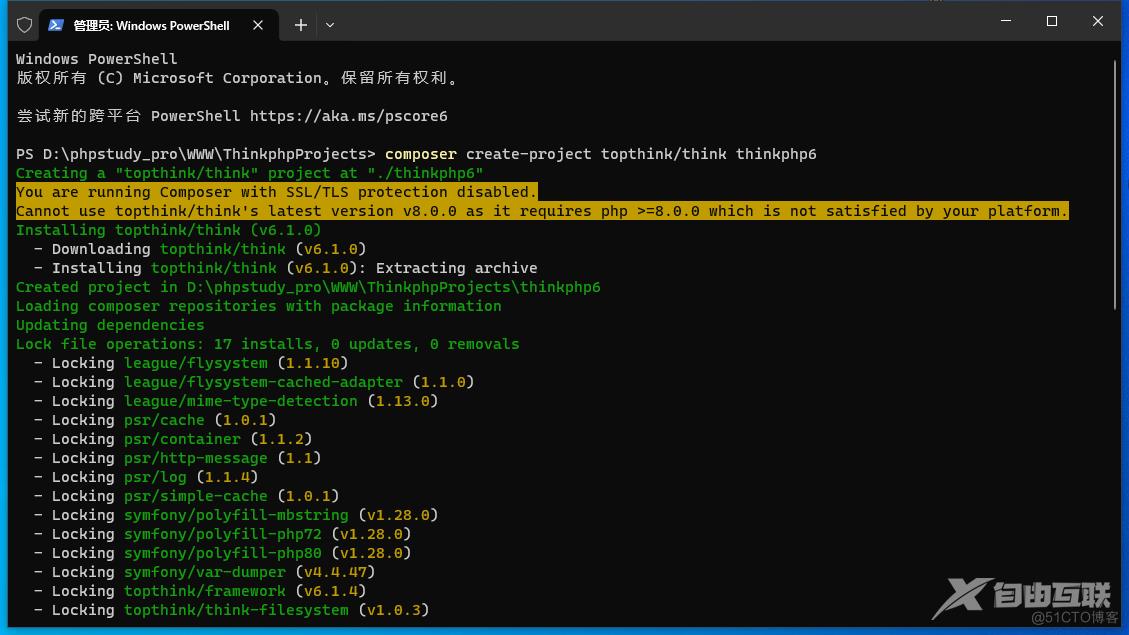
composer create-project topthink/think thinkphp6
启动服务测试
cd thinkphp6php think run然后就可以在浏览器中访问
http://localhost:8000
如果不能显示这个界面,请检查是否漏掉了上面某个步骤。
如果需要更新框架使用
composer update topthink/framework2.通过 Composer 安装PhpSpreadsheet
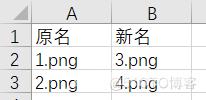
使用PhpSpreadsheet库来读取Excel文件
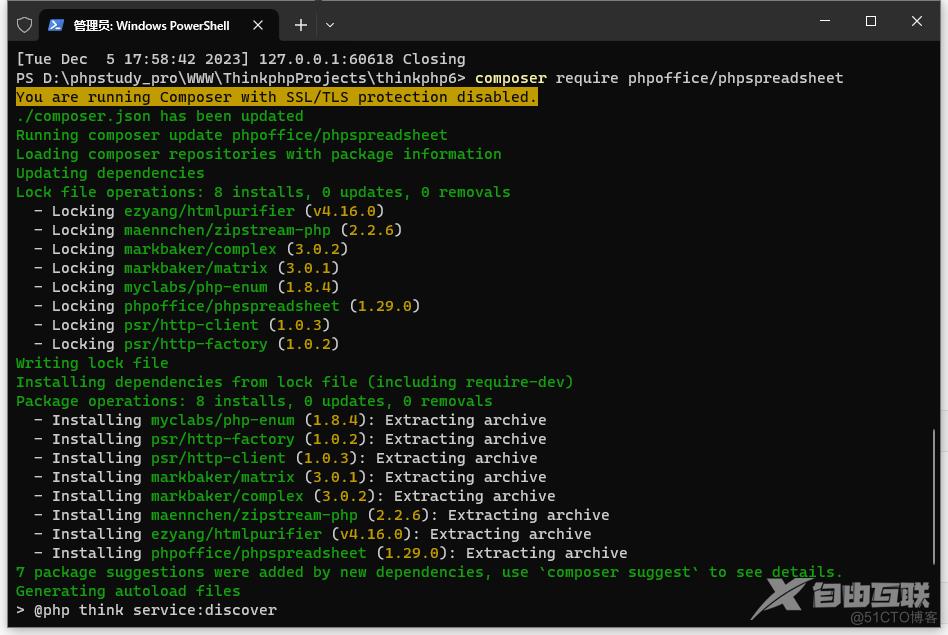
composer require phpoffice/phpspreadsheet
3.根据自己的需求编写批量处理代码

修改app\controller\Index.php文件
<?php
namespace app\controller;

use app\BaseController;

class Index extends BaseController
{
    public function index()
    {
        return '<style type="text/css">*{ padding: 0; margin: 0; } div{ padding: 4px 48px;} a{color:#2E5CD5;cursor: pointer;text-decoration: none} a:hover{text-decoration:underline; } body{ background: #fff; font-family: "Century Gothic","Microsoft yahei"; color: #333;font-size:18px;} h1{ font-size: 100px; font-weight: normal; margin-bottom: 12px; } p{ line-height: 1.6em; font-size: 42px }</style><div style="padding: 24px 48px;"> <h1>:) </h1><p> ThinkPHP V' . \think\facade\App::version() . '<br/><span style="font-size:30px;">14载初心不改 - 你值得信赖的PHP框架</span></p><span style="font-size:25px;">[ V6.0 版本由 <a href="https://www.yisu.com/" target="yisu">亿速云</a> 独家赞助发布 ]</span></div><script type="text/javascript" src="https://tajs.qq.com/stats?sId=64890268" charset="UTF-8"></script><script type="text/javascript" src="https://e.topthink.com/Public/static/client.js"></script><think id="ee9b1aa918103c4fc"></think>';
    }

    public function hello($name = 'ThinkPHP6')
    {
        return 'hello,' . $name;
    }

    public function batchRenameImages()
    {
        // 设置图片所在的文件夹路径
        $imageFile = public_path()."static/";
        // 设置Excel文件路径和工作表名称
        $excelFile = public_path()."static/1.xlsx";
        $sheetName = "Sheet1";
        // 读取Excel文件
        $excelData = [];
        $excelReader = new \PhpOffice\PhpSpreadsheet\Reader\Xlsx();
        $spreadsheet = $excelReader->load($excelFile);
        $worksheet = $spreadsheet->getSheetByName($sheetName);

        // 遍历Excel表格的每一行
        for ($row = 2; $row <= $worksheet->getHighestRow(); $row++) {
            // 获取第一列和第二列的值
            $oldName = $worksheet->getCellByColumnAndRow(1, $row)->getValue();
            $newName = $worksheet->getCellByColumnAndRow(2, $row)->getValue();

            // 替换图片名称
            if (file_exists($imageFile."images/".$oldName)) {
                rename($imageFile."images/".$oldName, $imageFile."images/".$newName);
                echo "成功替换图片:{$oldName} -> {$newName}<br>";
            } else {
                echo "图片不存在:{$oldName}<br>";
            }
        }
    }

    public function batchCopyImages()
    {
        // 设置图片所在的文件夹路径
        $imageFile = public_path()."static/";
        // 设置Excel文件路径和工作表名称
        $excelFile = public_path()."static/1.xlsx";
        $sheetName = "Sheet1";
        // 读取Excel文件
        $excelData = [];
        $excelReader = new \PhpOffice\PhpSpreadsheet\Reader\Xlsx();
        $spreadsheet = $excelReader->load($excelFile);
        $worksheet = $spreadsheet->getSheetByName($sheetName);

        // 遍历Excel表格的每一行
        for ($row = 2; $row <= $worksheet->getHighestRow(); $row++) {
            // 获取第一列和第二列的值
            $oldName = $worksheet->getCellByColumnAndRow(1, $row)->getValue();
            $newName = $worksheet->getCellByColumnAndRow(2, $row)->getValue();

            // 替换图片名称
            if (file_exists($imageFile."images/".$oldName)) {
                if (copy($imageFile."images/".$oldName, $imageFile."image/".$newName)) {
                    echo "图片复制成功!<br>";
                } else {
                    echo "图片复制失败!<br>";
                }
            } else {
                echo "图片不存在:{$oldName}<br>";
            }
        }
    }
}
批量重命名图片
http://localhost:8000/index.php/index/batchRenameImages批量复制图片
http://localhost:8000/index.php/index/batchCopyImages大家也可以根据自己的需求编写批量处理代码。
创作不易,如果您觉得这篇文章对您有帮助,欢迎点赞、收藏、转发,有不同的见解可以评论区留言。感谢支持!
