目录
- 一、配置vite
- 二、router路由
- 1、安装router路由
- 2、配置router路由
- 3、注册router路由
- 4、使用router路由
- 三、安装element plus等其他依赖
- 1、注册element plus并配置图标
- 四、pinia使用
- 1、安装pinia
- 2、注册pinia
- 3、配置pinia
- 4、测试pinia
- 五、layout布局
- 六、菜单栏logo
- 七、路由和页面联动
- 1、路由和页面联动的注意细节
首先使用npm 或者yarn创建一个vue项目
// 使用npm创建一个基于vite构建的vue项目
npm create vite@latest
// 使用yarn创建一个基于vite构建的vue项目
yarn create vite@latest
在创建的构成中选择
vue
vue-ts
创建完之后将项目拖到编译器打开
一、配置vite
在vite.config.ts文件中配置项目的服务数据,配置如下:
  // 此处配置项目服务参数
  server: {
    host: "0.0.0.0", // 项目运行地址,此处代表localhost
    port: 8888, // 项目运行端口
    open: true, //编译之后是否自动打开页面
    hmr: true, // 是否开启热加载
  },
之后server下方接着配置src的别名@,配置如下
  // 配置src的别名@
  resolve: {
    alias: {
      "@": resolve(__dirname, "./src"),
    },
  },
此外还需在ts的配置文件tsconfig.json中加入以下配置:
    "baseUrl": "./",                                // 配置路径解析的起点
    "paths": {                                      // 配置src别名
      "@/*": ["src/*"]                              // 当我们输入@/时会被映射成src/
    }
二、router路由
1、安装router路由
npm install vue-router@latest
yarn add vue-router@latest
2、配置router路由
在src下新建router文件夹,同时创建index.ts并配置如下
import { createRouter, createWebHistory, RouteRecordRaw} from 'vue-router';
import Layout from '@/components/HelloWorld.vue'

// 定义路由,此处为Array数组,数据类型为RouteRecordRaw
const routes: Array<RouteRecordRaw> = [
    {
        path: '/home',
        name: 'home',
        component: Layout
    }
]

// 创建路由
const router = createRouter({
    history: createWebHistory(),
    routes      // 将定义的路由传入
})

// 将创建的router路由暴露,使其在其他地方可以被引用
export default router
3、注册router路由
在main.ts中先通过 import router from '@/router/index' 引入路由,然后使用use函数注册路由,具体如下:
import { createApp } from 'vue'
import './style.css'
import App from './App.vue'
// 此处引入定义的路由
import router from '@/router/index'

// createApp(App).mount('#app')
// 此处将链式创建拆解,从中注册路由
const app = createApp(App);
// 注册路由
app.use(router)
app.mount('#app')
4、使用router路由
注册完成之后,在程序入口App.vue中通过 <router-view></router-view> 使用路由,具体如下:
<template>
  <!-- <div>
    <a href="https://vitejs.dev" rel="external nofollow"  target="_blank">
      <img src="/vite.svg" class="logo" alt="Vite logo" />
    </a>
    <a href="https://vuejs.org/" rel="external nofollow"  target="_blank">
      <img src="@/assets/vue.svg" class="logo vue" alt="Vue logo" />
    </a>
  </div> -->
  <!-- 在App的入口程序使用路由,会将我们注册的路由全部引入到App入口,通过路由的路径确定跳转的页面 -->
  <router-view></router-view>
</template>
三、安装element plus等其他依赖
# 选择一个你喜欢的包管理器

// 安装element-plus
npm install element-plus --save

yarn add element-plus

pnpm install element-plus

// 安装element-plus的图标库组件
npm install @element-plus/icons-vue

yarn add @element-plus/icons-vue

pnpm install @element-plus/icons-vue
1、注册element plus并配置图标
和router一样都是在main.ts中注册,配置如下:
import { createApp } from "vue";
import "./style.css";
import App from "./App.vue";
// 次数引入定义的路由
import router from "@/router/index";
// 引入element-plus
import ElementPlus from "element-plus";
import "element-plus/dist/index.css";
// 引入element-plus的图标库
import * as ElementPlusIconsVue from "@element-plus/icons-vue";

// createApp(App).mount('#app')
// 此处将链式创建拆解,从中注册路由

const app = createApp(App);
// 注册路由、element-plus等
app.use(router).use(ElementPlus);
// 将所有配置挂载到index.html的id为app的容器上
app.mount("#app");

// 此处参考官网,意为将图标库中的每个图标都注册成组件
for (const [key, component] of Object.entries(ElementPlusIconsVue)) {
  app.component(key, component);
}
四、pinia使用
pinia官网
1、安装pinia
yarn add pinia
# 或者使用 npm
npm install pinia
2、注册pinia
// 从pinia中引入创建实例的函数
import { createPinia } from 'pinia'

// 使用createPinia函数创建一个pinia实例并注册
app.use(createPinia())
3、配置pinia
在src下面新建store文件夹并新建index.ts文件,并配置如下:
// 从pinia中引入defineStore函数来定义store
import { defineStore } from "pinia";

// 定义一个store并取名为useStore
// defineStore第一个参数是应用程序中store的唯一标识,也就是在定义其他store时该标识不能相同
// 此处可以类比为java中的实体类,useStore就是类名,state里的属性是成员属性,getters里的函数是getter方法,actions里的函数是setter方法
export const useStore = defineStore("useStore", {
  // 定义state
  // 推荐使用 完整类型推断的箭头函数
  state: () => {
    return {
      // 所有这些属性都将自动推断其类型
      count: 0,
      name: "Eduardo",
      isAdmin: true,
    };
  },

  // 定义getters,里面定义一些对state值的取值操作
  // 指向箭头函数定义的时候所处的对象,而不是其所使用的时候所处的对象,默认指向父级的this
  // 普通函数中的this指向它的调用者,如果没有调用者则默认指向window
  getters: {
    doubleCount: (state) => state.count * 2,
    doubleCountOne(state) {
      return state.count * 2;
    },
    doublePlusOne(): number {
      return this.count * 2 + 1;
    },
  },

  // 定义actions,里面定义一些对state的赋值操作
  actions: {
    setCounter(count:number){
        this.count = count
    }
  }
});

// 1、只有一个参数的时候,参数可以不加小括号,没有参数或2个及以上参数的,必须加上小括号
// 2、返回语句只有一条的时候可以不写{}和return,会自动加上return的,返回多条语句时必须加上{}和return
// 3、箭头函数在返回对象的时候必须在对象外面加上小括号
// 在vue中定义函数时,我们尽量都指明函数返回值类型以及参数的数据类型
4、测试pinia
<template>
  <!-- 测试element-plus -->
  <el-button type="primary">Primary</el-button>

  <!-- 测试element-plus图标 -->
  <div style="font-size: 20px">
    <Edit style="width: 1em; height: 1em; margin-right: 8px" />
    <Share style="width: 1em; height: 1em; margin-right: 8px" />
    <Delete style="width: 1em; height: 1em; margin-right: 8px" />
    <Search style="width: 1em; height: 1em; margin-right: 8px" />
  </div>

  <h2>方式一、直接通过store.count++</h2>
  <!-- 测试pinia -->
  <h3>直接从store取值并测试pinia:{{ count }}</h3>
  <el-button type="primary" @click="addCount">增加</el-button>

  <h3>使用storeToRefs函数解析store后测试pinia:{{ count1 }}</h3>
  <el-button type="primary" @click="addCount1">增加</el-button>

    <h2>方式二、通过调用store中的函数</h2>
   <h3>通过store中的函数并测试pinia:{{ count1 }}</h3>
  <el-button type="primary" @click="addCount2">增加</el-button>
</template>

<script setup lang="ts">
import { useStore } from "@/store/index";
import { storeToRefs } from "pinia"; // 解析store中的数据,如成员属性、方法

// 创建了一个useStore实例对象
const store = useStore();
// 增加成员属性count的值,方式一、直接通过store.count++

// 拿到成员属性count,但这样取值会失去响应性,也就是不能实时同步,当我们点击增加按钮后,虽然操作已经完成,count也增加了,但展示有延迟
// 这个取值过程可能涉及解析数据,从而导致函数执行完后数据没有变化
const count = store.count;
const addCount = () => {
  store.count++;
};
// 通过pinia中的storeToRefs函数将store中的数据都进行解析
const count1 = storeToRefs(store).count;
const addCount1 = () => {
  store.count++;
};

// 方式二、通过调用store中的函数
const addCount2 = () => {
  store.setCounter(++store.count)
};
</script>

<style scoped>
.read-the-docs {
  color: #888;
}
</style>
五、layout布局
在配置layout之前,我们还需要对一些标签做初始化的样式设置,比如:html、body等,具体如下
在项目的index.html文件下添加样式设置
<!DOCTYPE html>
<html lang="en">
  <head>
    <meta charset="UTF-8" />
    <link rel="icon" type="image/svg+xml" href="/vite.svg" rel="external nofollow"  />
    <meta name="viewport" content="width=device-width, initial-scale=1.0" />
    <title>Vite + Vue + TS</title>
  </head>
  <body>
    <!-- 此处为程序的最终入口,会引入App.vue 并将相应的配置挂载到id为app <div id="app"></div> 上 -->
    <div id="app"></div>
    <script type="module" src="/src/main.ts"></script>
  </body>
</html>

<!-- 这里对html、body、挂载容器div做样式的初始化设置,去除原有的设置 -->
<style lang="less">
  html,body,#app {
    padding: 0px;
    margin: 0px;
    height: 100%;
    box-sizing: border-box;
  }
  #app {
    width: 100%;
    max-width: 100%;
  }
</style>
之后在src下新建layout文件夹并新建index.vue文件,配置如下:
整个el-container为layout布局的整体,其下又可以按照布局的不同划分出不同的区块,但总结起来可以划分为:1、侧边菜单栏;2、头部区;3、内容展示区;4、尾部区,我们根据自己的需要进行选择组合,这些划分出来的区块涉及到不同的配置和处理,因此,我们可以将这些大的区块从layout整体布局中抽离成组件,让代码拥有更好的可读性;此外,每个抽离的组件自己本身也可能存在需要拆分的问题。我们通过拆分,可以很好的将一个问题化繁为简,从而很轻松的解决。
<template>
  <el-container class="container">
    <!-- layout布局左侧菜单区 -->
    <el-aside width="200px" class="aside">
      <!-- 菜单项,通过组件的形式引入 -->
      <Menu></Menu>
    </el-aside>
    <!-- layout布局内容区 -->
    <el-container>
      <!-- 内容区头部 -->
      <el-header class="header">
        <!-- 头部组件,抽离成组件形式 -->
        <Header></Header>
      </el-header>
      <!-- 内容区的主体,用于数据展示 -->
      <el-main class="content">Main</el-main>
    </el-container>
  </el-container>
</template>

<script setup lang="ts">
// vue3中组件引入后不需要使用conponents注册,可以直接使用
import Header from '@/layout/header/Header.vue'
import Menu from '@/layout/menu/Menu.vue'

</script>

<style scoped lang="less">
.container {
  height: 100%;
  .aside {
    background-color: antiquewhite;
  }
  .header {
    background-color: aquamarine;
  }
  .content {
    background-color: pink
  }
}
</style>
从layout布局抽离的菜单栏组件:
<template>
  <el-menu
    default-active="2"
    class="el-menu-vertical-demo"
    :unique-opened='uniqueOpenedFlag'
  >
    <!-- 在为el-menu设置unique-opened属性时必须要确保el-sub-menu、el-menu-item中index的唯一性,如果index不唯一则不生效 -->
    <!-- 本组件作为父组件向子组件传递数据menuList,子组件需要定义menuList属性以确保可以接受该数据 -->
    <menu-item :menuList="menuList"></menu-item>
  </el-menu>
</template>

<script setup lang="ts">
import { ref, reactive } from "vue";
import MenuItem from "@/layout/menu/item/MenuItem.vue";

// 自定义的假的树形菜单数据
// reactive函数用来处理响应式数据,处理的数据一般是复杂类型数据,如对象类型
// ref函数也可以处理响应式数据,不过数据一般是基本数据类型
const isCollapse = ref(false)
const uniqueOpenedFlag = ref(true)


const menuList = reactive([
  {
    path: "/system",
    name: "system",
    component: "Layout",
    meta: {
      title: "系统管理",
      icon: "Setting",
      roles: ["sys:manage"],
    },
    children: [
      {
        path: "/worker",
        name: "worker",
        component: "Layout",
        meta: {
          title: "员工管理",
          icon: "Setting",
          roles: ["sys:manage"],
        },
      },
      {
        path: "/happy",
        name: "happy",
        component: "Layout",
        meta: {
          title: "菜单管理",
          icon: "Setting",
          roles: ["sys:manage"],
        },
      },
    ],
  },
  {
    path: "/mail",
    name: "mail",
    component: "Layout",
    meta: {
      title: "商场管理",
      icon: "Setting",
      roles: ["sys:manage"],
    },
    children: [
      {
        path: "/worker11",
        name: "worker11",
        component: "Layout",
        meta: {
          title: "员工管理22",
          icon: "Setting",
          roles: ["sys:manage"],
        },
      },
      {
        path: "/happy22",
        name: "happy22",
        component: "Layout",
        meta: {
          title: "菜单管理22",
          icon: "Setting",
          roles: ["sys:manage"],
        },
      },
    ],
  },
]);

</script>

<style lang="less" scoped></style>
从菜单栏抽离的菜单项组件:
<template>
  <template v-for="item in menuList" :key="item.path">
    <!-- 判断该菜单项是否有子菜单 -->
    <el-sub-menu v-if="item.children && item.children.length > 0" :index="item.path" >
      <template #title>
        <el-icon>
          <!-- 通过动态组件展示图标,因为图标数据一般是通过后端查数据库拿到的 -->
          <component :is="item.meta.icon"></component>
        </el-icon>
        <span>{{ item.meta.title }}</span>
      </template>
      <!-- 递归调用,将子菜单传递给组件处理 -->
      <menu-item :menuList="item.children"></menu-item>
    </el-sub-menu>
    <el-menu-item v-else :index="item.path">
      <el-icon>
        <!-- 通过动态组件展示图标 -->
        <component :is="item.meta.icon"></component>
      </el-icon>
      <span>{{ item.meta.title }}</span>
    </el-menu-item>
  </template>
</template>

<script setup lang="ts">
import {
  Document,
  Menu as IconMenu,
  Location,
  Setting,
} from "@element-plus/icons-vue";

// 子组件接受父组件传递的数据
// 本组件为子组件,接受父组件传过来的数据,此处定义menuList属性,接受父组件传递的menuList数据
defineProps(["menuList"]);
</script>

<style lang="less" scoped></style>
六、菜单栏logo
首先,将自己准备的logo图片放到src下的assets文件夹下,然后在layout的menu的logo文件夹下新建MenuLogo.vue文件,并配置如下:
<template>
  <div class="logo">
    <img :src="Logo" />
    <span class="logo-title">{{ title }}</span>
  </div>
</template>

<script setup lang="ts">
import { ref } from "vue";
import Logo from "@/assets/logo.png";
const title = ref("博客管理系统");
</script>

<style lang="less" scoped>
.logo {
  display: flex; // 弹性布局
  width: 100%;
  height: 60px;
  line-height: 60px;
  background-color: rgb(234, 255, 127);
  text-align: center;
  cursor: pointer; // 鼠标悬浮在元素上时,鼠标从箭头变成小手
  align-items: center;
  img {
    width: 36px;
    height: 36px;
    margin-left: 20px; // 元素的外边距
    margin-right: 12px;
  }
  .logo-title {
    font-weight: 800; // 800为加粗
    color: black;
    font-size: 20px;
    line-height: 60px; // 元素上下居中
    font-family: FangSong; // 字体类型
  }
}
</style>
最后在菜单栏组件中引入菜单logo组件并使用
// 在script标签中引入
import MenuLogo from "@/layout/menu/logo/MenuLogo.vue";

// el-menu标签上方引入使用
<menu-logo></menu-logo>
效果如下:

七、路由和页面联动
在src的router的index.ts文件下添加如下路由配置并在views文件夹下创建对应的文件
{
    path: "/",
    component: Layout,      // 每个路由都需要通过component指定归属的布局组件
    redirect: "/index",
    name: "Root",
    children: [
      {
        path: "/index",
        name: "Index",
        component: () => import("@/views/index/index.vue"),
        meta: {
          title: "首页看板",
          icon: "icon-home",
          affix: true,
          noKeepAlive: true,
        },
      },
    ],
  },
  {
    path: "/comp",
    component: Layout,
    name: "Comp",
    meta: { title: "系统管理", icon: "icon-code" },
    children: [
      {
        path: "/element",
        name: "ElementComp",
        component: () => import("@/views/element/index.vue"),
        meta: {
          title: "菜单管理",
          icon: "icon-code",
        },
      },
      {
        path: "/iconPark",
        name: "IconPark",
        component: () => import("@/views/icon/index.vue"),
        meta: {
          title: "路由管理",
          icon: "icon-like",
        },
      },
      {
        path: "/chart",
        name: "Chart",
        component: () => import("@/views/echarts/index.vue"),
        meta: {
          title: "员工管理",
          icon: "icon-chart-line",
        },
        children: [
          {
            path: "/line",
            name: "Line",
            component: () => import("@/views/echarts/line.vue"),
            meta: {
              title: "商品管理",
            },
          },
          {
            path: "/bar",
            name: "Bar",
            component: () => import("@/views/echarts/bar.vue"),
            meta: {
              title: "手机管理",
            },
          },
          {
            path: "/otherChart",
            name: "OtherChart",
            component: () => import("@/views/echarts/other.vue"),
            meta: {
              title: "会员管理",
            },
          },
        ],
      },
    ],
  },
  {
    path: "/errorPage",
    name: "ErrorPage",
    component: Layout,
    meta: {
      title: "用户管理",
      icon: "icon-link-cloud-faild",
    },
    children: [
      {
        path: "/404Page",
        name: "404Page",
        component: () => import("@/views/errorPage/404.vue"),
        meta: {
          title: "角色管理",
          icon: "icon-link-cloud-faild",
        },
      },
      {
        path: "/401Page",
        name: "401Page",
        component: () => import("@/views/errorPage/401.vue"),
        meta: {
          title: "权限管理",
          icon: "icon-link-interrupt",
        },
      },
    ],
  },
添加完路由配置之后,创建路由的对应文件并添加一些描述文字,此时虽然路由和对应的页面都已经创建完毕并关联在了一起,但路由并没有被引用,也就无法在正确的位置展示路由页面的数据,所以,我们需要将路由引用到layout布局的main区域,也就是数据展示区,确保当我们访问某个路由时,对应的路由页面能够在该区域展示。

1、路由和页面联动的注意细节
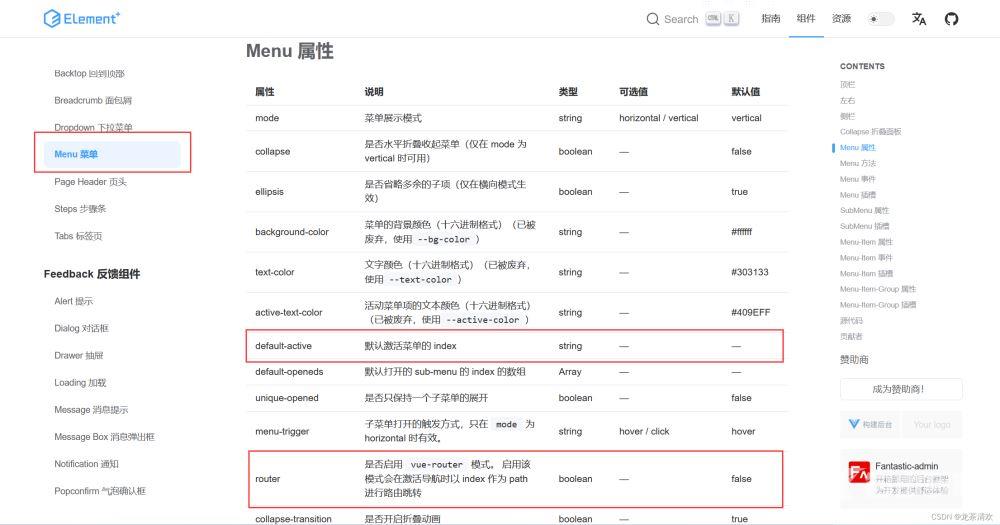
在菜单项组件中,我们给菜单项的index属性绑定了路由的path值,其用意是为了启用element-plus中提供的一种在激活导菜单时(当我们点击某个菜单项时,该菜单项就是被激活的菜单)以index作为path进行路由跳转,所以为了我使用这个功能,我们还需要在菜单栏组件的el-menu标签中添加 router 属性以开启该功能,同时再添加 default-active 属性来指明当前被激活的菜单。用例如下
<template>
  <menu-logo></menu-logo>
  <el-menu
    :default-active="activeIndex"
    class="el-menu-vertical-demo"
    :unique-opened="uniqueOpenedFlag"
    router
  >
    <!-- 在为el-menu设置unique-opened属性时必须要确保el-sub-menu、el-menu-item中index的唯一性,如果index不唯一则不生效 ,一般我们为index绑定路由的path值 -->
    <!-- 本组件作为父组件向子组件传递数据menuList,子组件需要定义menuList属性以确保可以接受该数据 -->
    <!-- router属性可以激活以 index 作为 path 进行路由跳转 -->
    <!-- default-active属性用来指明当前被激活的菜单,其值为菜单项中index的值,也就是path值 -->
    <menu-item :menuList="menuList"></menu-item>
  </el-menu>
</template>

import { useRouter, useRoute } from "vue-router";

// 获取当前点击的路由
const route = useRoute();
// 从路由中获取path
const activeIndex = computed(() => {
  const { path } = route;
  return path;
});
到此这篇关于使用vue3搭建后台系统的过程记录的文章就介绍到这了,更多相关vue3后台系统内容请搜索易盾网络以前的文章或继续浏览下面的相关文章希望大家以后多多支持易盾网络!