目录
- 1.首先创建一个store
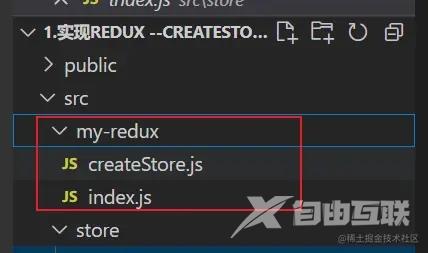
- 2.其次创建一个my-redux
- 书写getState()方法
- 书写dispatch方法
- 书写subscribe方法
- 特别注意:
- 3.创建一个Test组件进行检测。
- 1. 将Test组件记得引入App根组件
- 2. 将store引入Test组件
- 3. 创建一个类组件,并且使用store.getState()获得状态值
- 4. 书写对应的点击按钮
1.首先创建一个store
沙箱链接
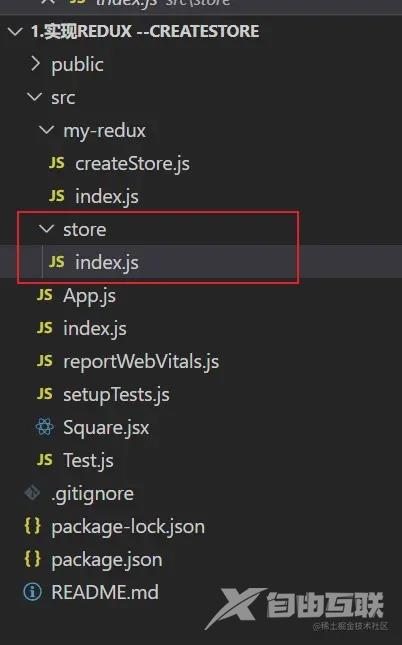
根目录创建一个store文件夹,下面创建一个index.js

import { createStore } from '../my-redux'
// 书写reducer函数
function reducer(state = 0, action) {
    switch (action.type) {
        case "add":
            return state + 1;
        case "inc":
            return state - 1;
        default:
            return state;
    }
}
// 使用createStore(reducer)创建store对象并且导出
const state = createStore(reducer);
export default state;
结合上面的代码分析
- 创建store是redux库的createStore函数接收一个reducer函数进行创建。
import { createStore } from '../my-redux'
- 先手写一个简单的reducer函数
// 书写reducer函数
状态值默认为0
function reducer(state = 0, action) {
    switch (action.type) {
        case "add":
            return state + 1;
        case "inc":
            return state - 1;
        default:
            return state;
    }
}
- 将创建的store导出
// 使用createStore(reducer)创建store对象并且导出
const state = createStore(reducer);
export default state;
2.其次创建一个my-redux

- 将所有的函数都导入index.js

import createStore from './createStore'
export {
    createStore
}
- 创建一个createStore.js
export default function createStore(reducer) {
    let currentState; // 当前state值
    let currentListeners = []; // store订阅要执行的函数储存数组
    // 获得当前state值
    function getState() {
        return currentState;
    }
    // 更新state
    function dispatch(action) {
        // 传入action 调用reducer更新state值
        currentState = reducer(currentState, action)
        // 遍历调用订阅的函数
        currentListeners.forEach((listener) => listener());
    }
    // 将订阅事件储存到currentListeners数组,并返回unsubscribe 函数来取消订阅
    function subscribe(listener) {
        currentListeners.push(listener);
        // unsubscribe
        return () => {
            const index = currentListeners.indexOf(listener);
            currentListeners.splice(index, 1);
        };
    }
    dispatch({ type: "" }); // 自动dispatch一次,保证刚开始的currentState值等于state初始值
    // 返回store对象
    return {
        getState,
        dispatch,
        subscribe,
    }
}
可以根据上面给出的代码步步分析:
①明确createStore接收一个reducer函数作为参数。
②createStore函数返回的是一个store对象,store对象包含getState,dispatch,subscribe等方法。
- 逐步书写store上的方法
书写getState()方法
返回值:当前状态值
// 获得当前state值
    function getState() {
        return currentState;
    }
书写dispatch方法
接受参数:action。
dispatch方法,做的事情就是:①调用reducer函数更新state。②调用store订阅的事件函数。
currentState是当前状态值,currentListeners是储存订阅事件函数的数组。
    // 更新state
    function dispatch(action) {
        // 传入action 调用reducer更新state值
        currentState = reducer(currentState, action)
        // 遍历调用订阅的函数
        currentListeners.forEach((listener) => listener());
    }
书写subscribe方法
接受参数:一个函数 返回值:一个函数,用于取消订阅unsubscribe
    // 将订阅事件储存到currentListeners数组,并返回unsubscribe 函数来取消订阅
    function subscribe(listener) {
        currentListeners.push(listener);
        // unsubscribe
        return () => {
            const index = currentListeners.indexOf(listener);
            currentListeners.splice(index, 1); // 删除函数
        };
    }
返回store对象
    // 返回store对象
    return {
        getState,
        dispatch,
        subscribe,
    }
特别注意:
初始进入createStore函数的时候,需要通过dipatch方法传入一个独一无二的action(reducer函数默认返回state)来获取初始的store赋值给currentStore。
可以结合下面reducer的default项和createStore方法调用的dispatch来理解
dispatch({ type: "" }); // 自动dispatch一次,保证刚开始的currentState值等于state初始值
// 书写reducer函数
function reducer(state = 0, action) {
    switch (action.type) {
        case "add":
            return state + 1;
        case "inc":
            return state - 1;
        default:
            return state;
    }
}
这样我们的createStore函数就已经完成了。那接下来就是检查我们写的这玩意是否起作用没有了。
3.创建一个Test组件进行检测。

老规矩先抛全部代码
import React, { Component } from 'react'
import store from './store' // 引入store对象
export default class Test extends Component {
    // 组件挂载之后订阅forceUpdate函数,进行强制更新
    componentDidMount() {
        this.unsubscribe = store.subscribe(() => {
            this.forceUpdate()
        })
    }
    // 组件卸载后取消订阅
    componentWillUnmount() {
        this.unsubscribe()
    }
    // handleclick事件函数
    add = () => {
        store.dispatch({ type: 'add' });
        console.log(store.getState());
    }
    inc = () => {
        store.dispatch({ type: 'inc' });
        console.log(store.getState());
    }
    render() {
        return (
            <div>
                {/* 获取store状态值 */}
                <div>{store.getState()}</div>
                <button onClick={this.add}>+</button>
                <button onClick={this.inc}>-</button>
            </div>
        )
    }
}
1. 将Test组件记得引入App根组件
import Test from './Test';
function App() {
  return (
    <div className="App">
      <Test />
    </div>
  );
}
export default App;
2. 将store引入Test组件
import React, { Component } from 'react'
import store from './store' // 引入store对象
3. 创建一个类组件,并且使用store.getState()获得状态值
<div>
    {/* 获取store状态值 */}
    <div>{store.getState()}</div>
    <button onClick={this.add}>+</button>
    <button onClick={this.inc}>-</button>
</div>
4. 书写对应的点击按钮
    // handleclick事件函数
    add = () => {
        store.dispatch({ type: 'add' });
        console.log(store.getState());
    }
    inc = () => {
        store.dispatch({ type: 'inc' });
        console.log(store.getState());
    }
    <div>
        {/* 获取store状态值 */}
        <div>{store.getState()}</div>
        <button onClick={this.add}>+</button>
        <button onClick={this.inc}>-</button>
    </div>
这样是不是就可以实现了呢?哈哈哈,傻瓜,你是不是猛点鼠标,数字还是0呢?
当然,这里我们只是更新了store,但是并没有更新组件,状态的改变可以导致组件更新,但是store又不是Test组件的状态。
这里我们使用一个生命周期函数componentDidMount和store的订阅函数进行更新组件的目的,使用componentWillUnmount和store的取消订阅函数(订阅函数的返回值)。
    // 组件挂载之后订阅forceUpdate函数,进行强制更新
    componentDidMount() {
        this.unsubscribe = store.subscribe(() => {
            this.forceUpdate()
        })
    }
    // 组件卸载后取消订阅
    componentWillUnmount() {
        this.unsubscribe()
    }
好了。这里我们就真实实现了一个简单的createStore函数来创建store。
以上就是简易的redux createStore手写实现示例的详细内容,更多关于手写redux createStore的资料请关注自由互联其它相关文章!
