第一步:使用idea创建一个springboot项目(此处不再赘述) 创建好项目之后使用下面的依赖: dependencies dependency groupId org . springframework . boot / groupId artifactId spring - boot - starter - web / artif
第一步:使用idea创建一个springboot项目(此处不再赘述)
创建好项目之后使用下面的依赖:
<dependencies><dependency>
<groupId>org.springframework.boot</groupId>
<artifactId>spring-boot-starter-web</artifactId>
</dependency>
<dependency>
<groupId>org.apache.shardingsphere</groupId>
<artifactId>shardingsphere-jdbc-core-spring-boot-starter</artifactId>
<version>5.1.1</version>
</dependency>
<dependency>
<groupId>mysql</groupId>
<artifactId>mysql-connector-java</artifactId>
<scope>runtime</scope>
</dependency>
<dependency>
<groupId>com.baomidou</groupId>
<artifactId>mybatis-plus-boot-starter</artifactId>
<version>3.3.1</version>
</dependency>
<dependency>
<groupId>org.projectlombok</groupId>
<artifactId>lombok</artifactId>
<optional>true</optional>
</dependency>
<dependency>
<groupId>org.springframework.boot</groupId>
<artifactId>spring-boot-starter-test</artifactId>
<scope>test</scope>
<exclusions>
<exclusion>
<groupId>org.junit.vintage</groupId>
<artifactId>junit-vintage-engine</artifactId>
</exclusion>
</exclusions>
</dependency>
</dependencies>
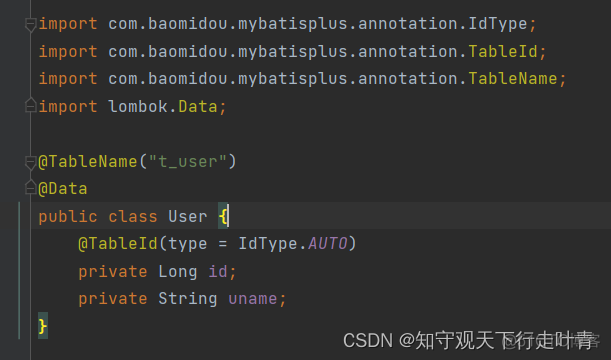
第二步:创建实体类User(第一篇文章讲到我们数据库表是t_user表)
第三步:创建mapper接口

第四步:配置读写分离
# 内存模式--实际项目中请配置集群模式spring.shardingsphere.mode.type=Memory
# 配置真实数据源-名字自己起
spring.shardingsphere.datasource.names=master,slave1,slave2
# 配置第 1 个数据源
spring.shardingsphere.datasource.master.type=com.zaxxer.hikari.HikariDataSource
spring.shardingsphere.datasource.master.driver-class-name=com.mysql.jdbc.Driver
spring.shardingsphere.datasource.master.jdbc-url=jdbc:mysql://ip:3306/db_user
spring.shardingsphere.datasource.master.username=root
spring.shardingsphere.datasource.master.password=123456
# 配置第 2 个数据源
spring.shardingsphere.datasource.slave1.type=com.zaxxer.hikari.HikariDataSource
spring.shardingsphere.datasource.slave1.driver-class-name=com.mysql.jdbc.Driver
spring.shardingsphere.datasource.slave1.jdbc-url=jdbc:mysql://ip:3307/db_user
spring.shardingsphere.datasource.slave1.username=root
spring.shardingsphere.datasource.slave1.password=123456
# 配置第 3 个数据源
spring.shardingsphere.datasource.slave2.type=com.zaxxer.hikari.HikariDataSource
spring.shardingsphere.datasource.slave2.driver-class-name=com.mysql.jdbc.Driver
spring.shardingsphere.datasource.slave2.jdbc-url=jdbc:mysql://ip:3308/db_user
spring.shardingsphere.datasource.slave2.username=root
spring.shardingsphere.datasource.slave2.password=123456
# 读写分离类型,如: Static,Dynamic
spring.shardingsphere.rules.readwrite-splitting.data-sources.myds.type=Static
# 写数据源名称
spring.shardingsphere.rules.readwrite-splitting.data-sources.myds.props.write-data-source-name=master
# 读数据源名称,多个从数据源用逗号分隔
spring.shardingsphere.rules.readwrite-splitting.data-sources.myds.props.read-data-source-names=slave1,slave2
# 负载均衡算法名称-自己起(随机访问可以用alg_random,权重使用alg_weight)
spring.shardingsphere.rules.readwrite-splitting.data-sources.myds.load-balancer-name=alg_round
# 负载均衡算法配置
# 负载均衡算法类型
# 轮询算法
spring.shardingsphere.rules.readwrite-splitting.load-balancers.alg_round.type=ROUND_ROBIN
# 随机访问算法
spring.shardingsphere.rules.readwrite-splitting.load-balancers.alg_random.type=RANDOM
# 权重算法
spring.shardingsphere.rules.readwrite-splitting.load-balancers.alg_weight.type=WEIGHT
spring.shardingsphere.rules.readwrite-splitting.load-balancers.alg_weight.props.slave1=1
spring.shardingsphere.rules.readwrite-splitting.load-balancers.alg_weight.props.slave2=2
# 打印SQl
spring.shardingsphere.props.sql-show=true
第五步:读写分离测试
新建controller向数据库中插入一条数据,查看数据库中主从数据库是否都有数据:
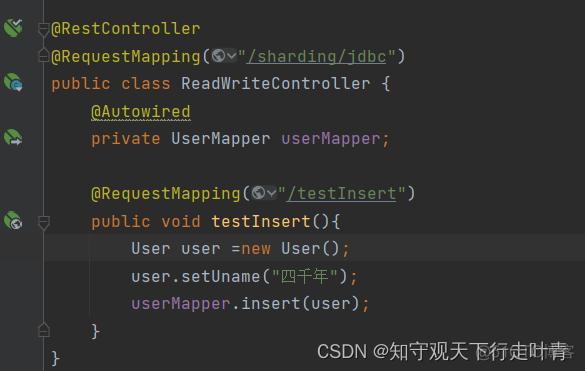

运行完这个时候先检查主数据库数据:可以看到已经成功插入

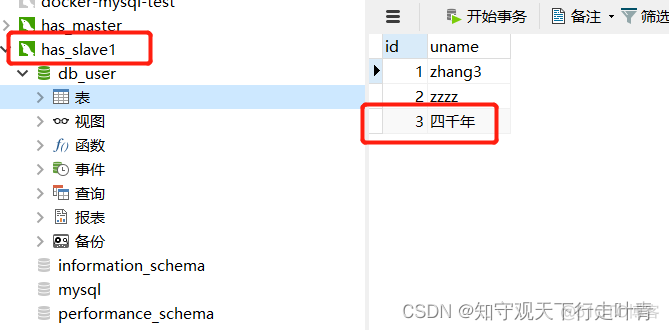
然后我检查slave1的数据库表看是否已经同步到主数据库的数据:
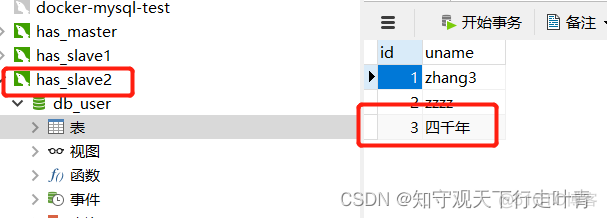
然后我检查slave2的数据库表看是否已经同步到主数据库的数据:
第六步:事务一致性测试
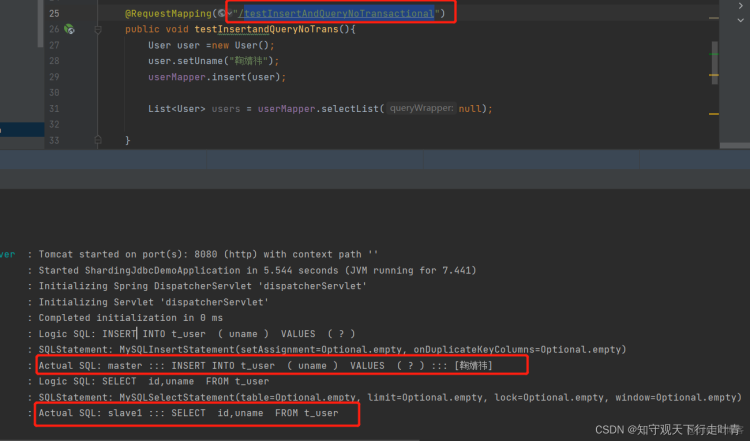
1、当没加事务注解的时候可以看到insert是插入的master库,查询是查询的slave库
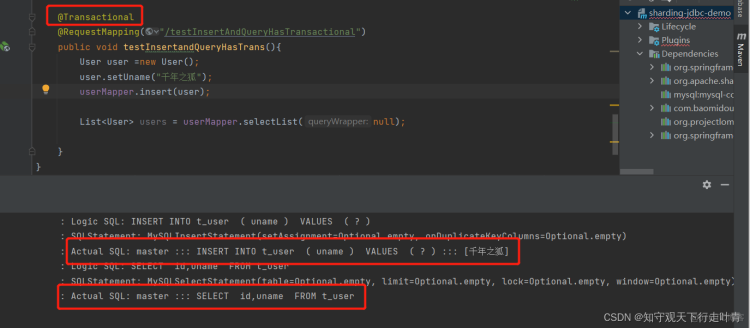
2、当加了事务注解的时候可以看到insert和query都是执行的master库
因此得出了结论:
为了保证主从库间的事务一致性,避免跨服务的分布式事务,ShardingSphere-JDBC的主从模型中,事务中的数据读写均用主库。
即: 不添加@Transactional:insert对主库操作,select对从库操作
添加@Transactional:则insert和select均对主库操作
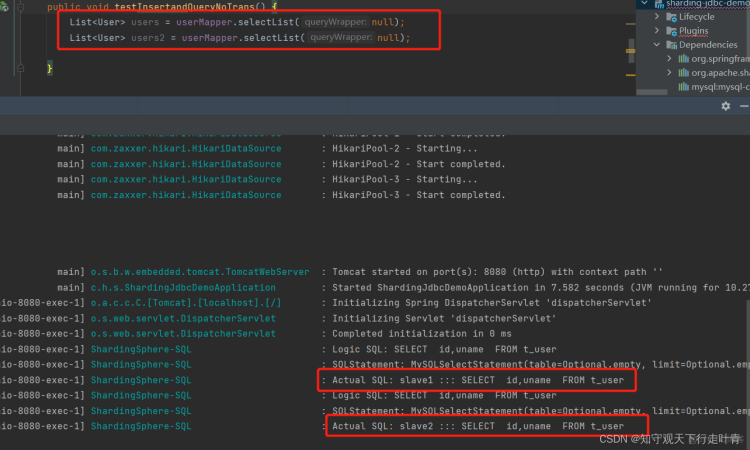
由于我的负载均衡方法配置的是轮询,所以当我执行两次查询的时候可以发现分别从slave1、slave2机器来进行查询:
源代码已经上传码云:https://gitee.com/vancl/sharding-jdbc/tree/master
